Gitea Actions 是Gitea内置的CI&CD解决方案,它最大程度的兼容了Github Actions 的设计语法和使用方式。
升级Gitea
从Gitea 1.19开始支持原生CI&CD的Actions解决方案,之前我安装的Gitea版本是1.20.5,升级到最新稳定版本Gitea 1.25.1 ,修改docker-compose.yml的image即可:
1
2
3
4
5
6
7
8
9
10
11
12
services: server: image: gitea/gitea:1.25 .1 -rootless restart: always volumes: - ./data:/var/ lib/gitea - ./config:/etc/ gitea - /etc/ timezone:/etc/ timezone:ro - /etc/ localtime:/etc/ localtime:ro ports: - "3000:3000" - "2222:2222"
如果需要重新创建,参考轻量级DevOps平台-Gitea
安装Act Runner
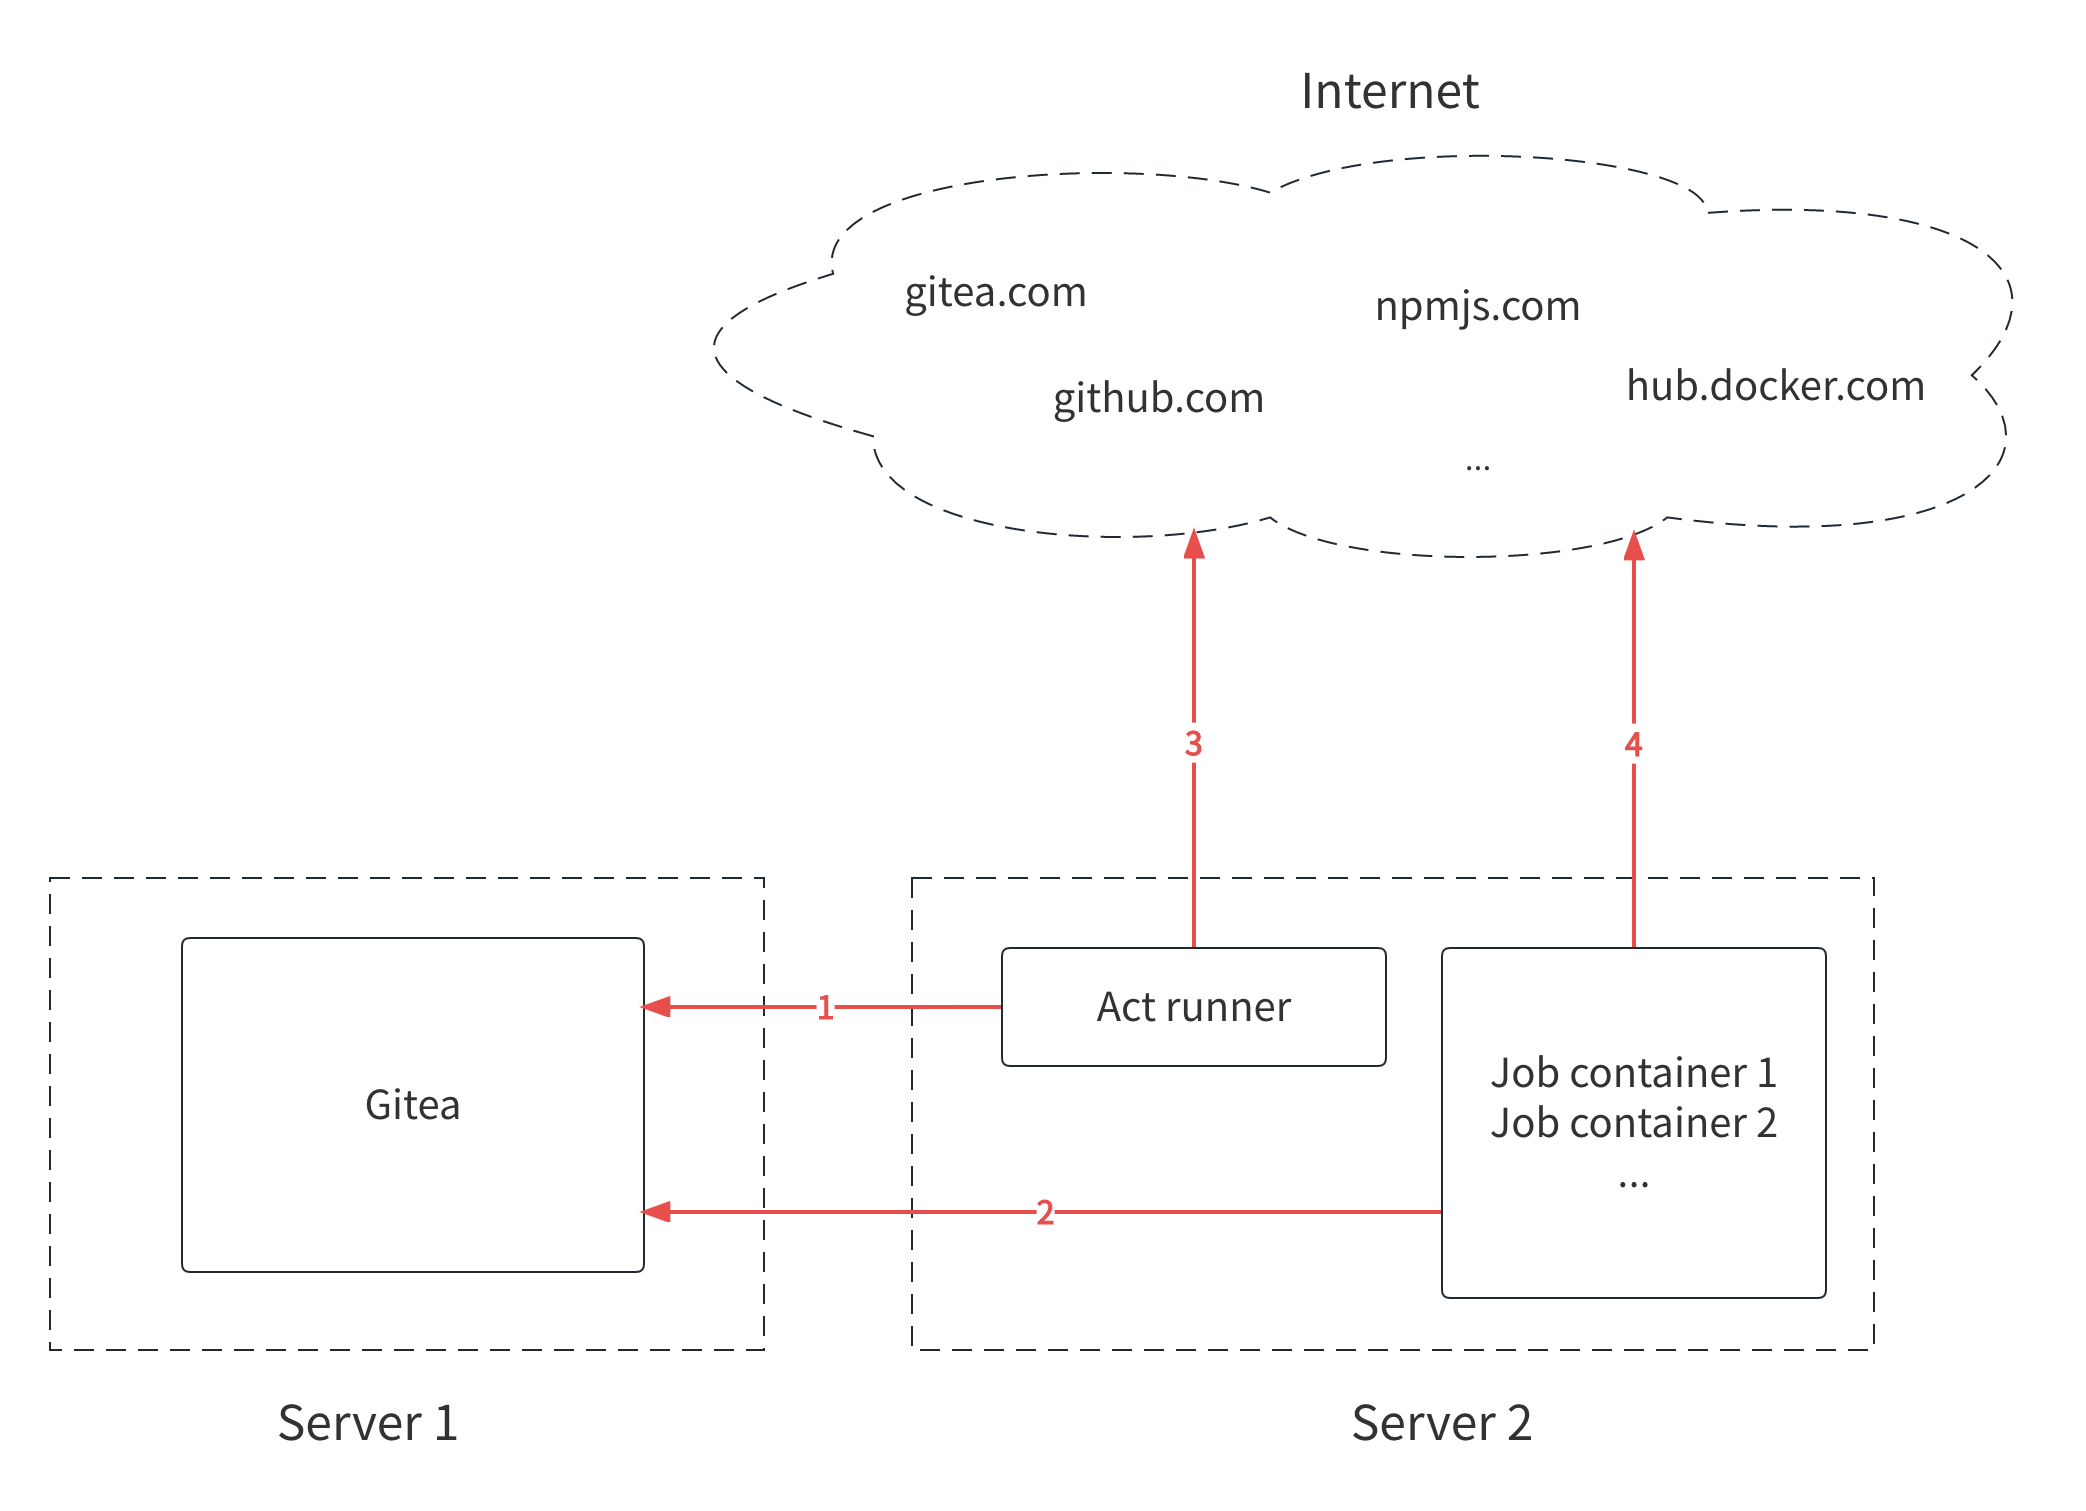
Act Runner 是一个独立的程序,首先要注册Runner到Gitea实例 中,然后Gitea Actions发送Job到Runner中运行。下载预构建的二进制文件,当前最新版本是act_runner-0.2.13 (后面章节使用docker容器创建自托管Runner服务 )。
设置Runner
1
2
3
4
5
6
7
8
./act_runner register --no-interactive --instance <instance> --token <token>$ ./act_runner-0.2.13-linux-arm64 register --no-interactive --instance http://xxx.xxx.xxx.xxx :3000 --token ZEHjxRucixxxxxxxxxxxxx INFO Registering runner, arch=arm64, os=linux, version =v0.2.13. WARN Runner in user-mode. INFO Runner name is empty, use hostname 'LAPTOP-S3BIPLGN'. DEBU Successfully pinged the Gitea instance server INFO Runner registered successfully.
instance是您的Gitea实例的地址,如http://192.168.8.8:3000 或 https://gitea.com。 Runner和Job容器(由Runner启动以执行Job)将连接到此地址。 这意味着它可能与用于Web访问的ROOT_URL不同。 使用回环地址(例如127.0.0.1 或 localhost)是一个不好的选择。 如果不确定使用哪个地址,通常选择局域网地址即可。
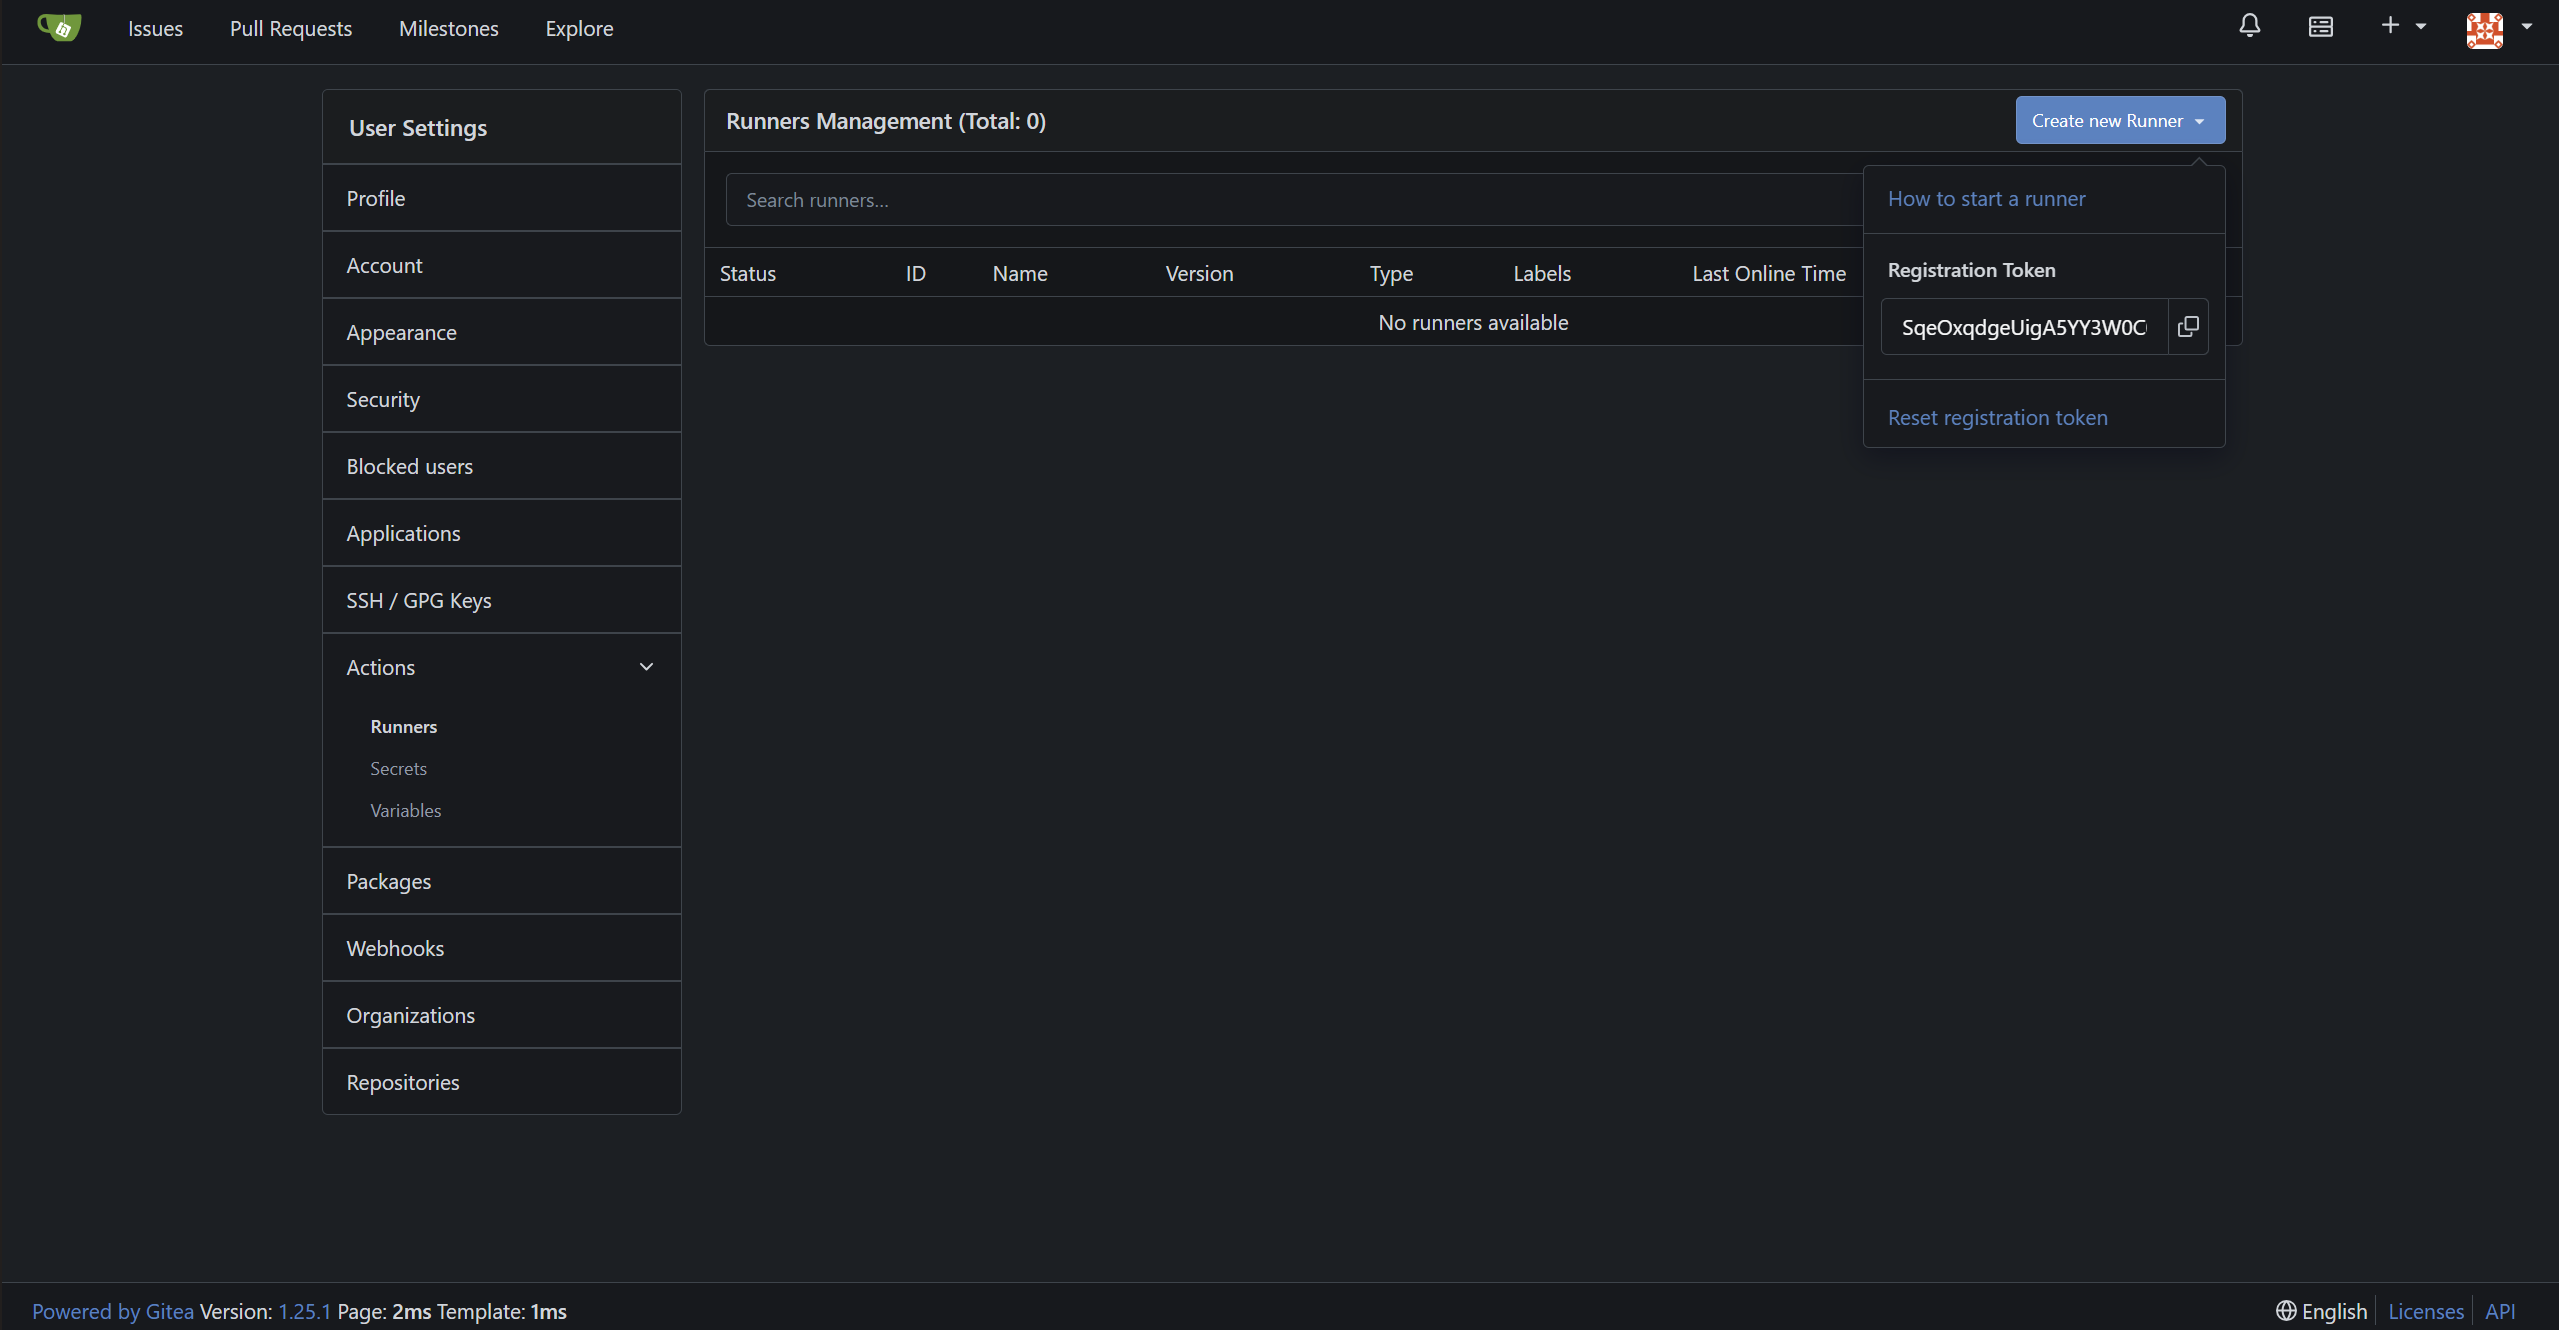
token 用于身份验证和标识,例如P2U1U0oB4XaRCi8azcngmPCLbRpUGapalhmddh23。 它只能使用一次,并且不能用于注册多个Runner。 您可以从 <your_gitea.com>/admin/runners 获取令牌。
注意一:注册Runner后能够自动生成一个.runner文件; 注意二:每次删掉Gitea实例(docker-compose down)后重新创建容器(docker-compose up -d)都会生成新的token,此时需要重新注册。
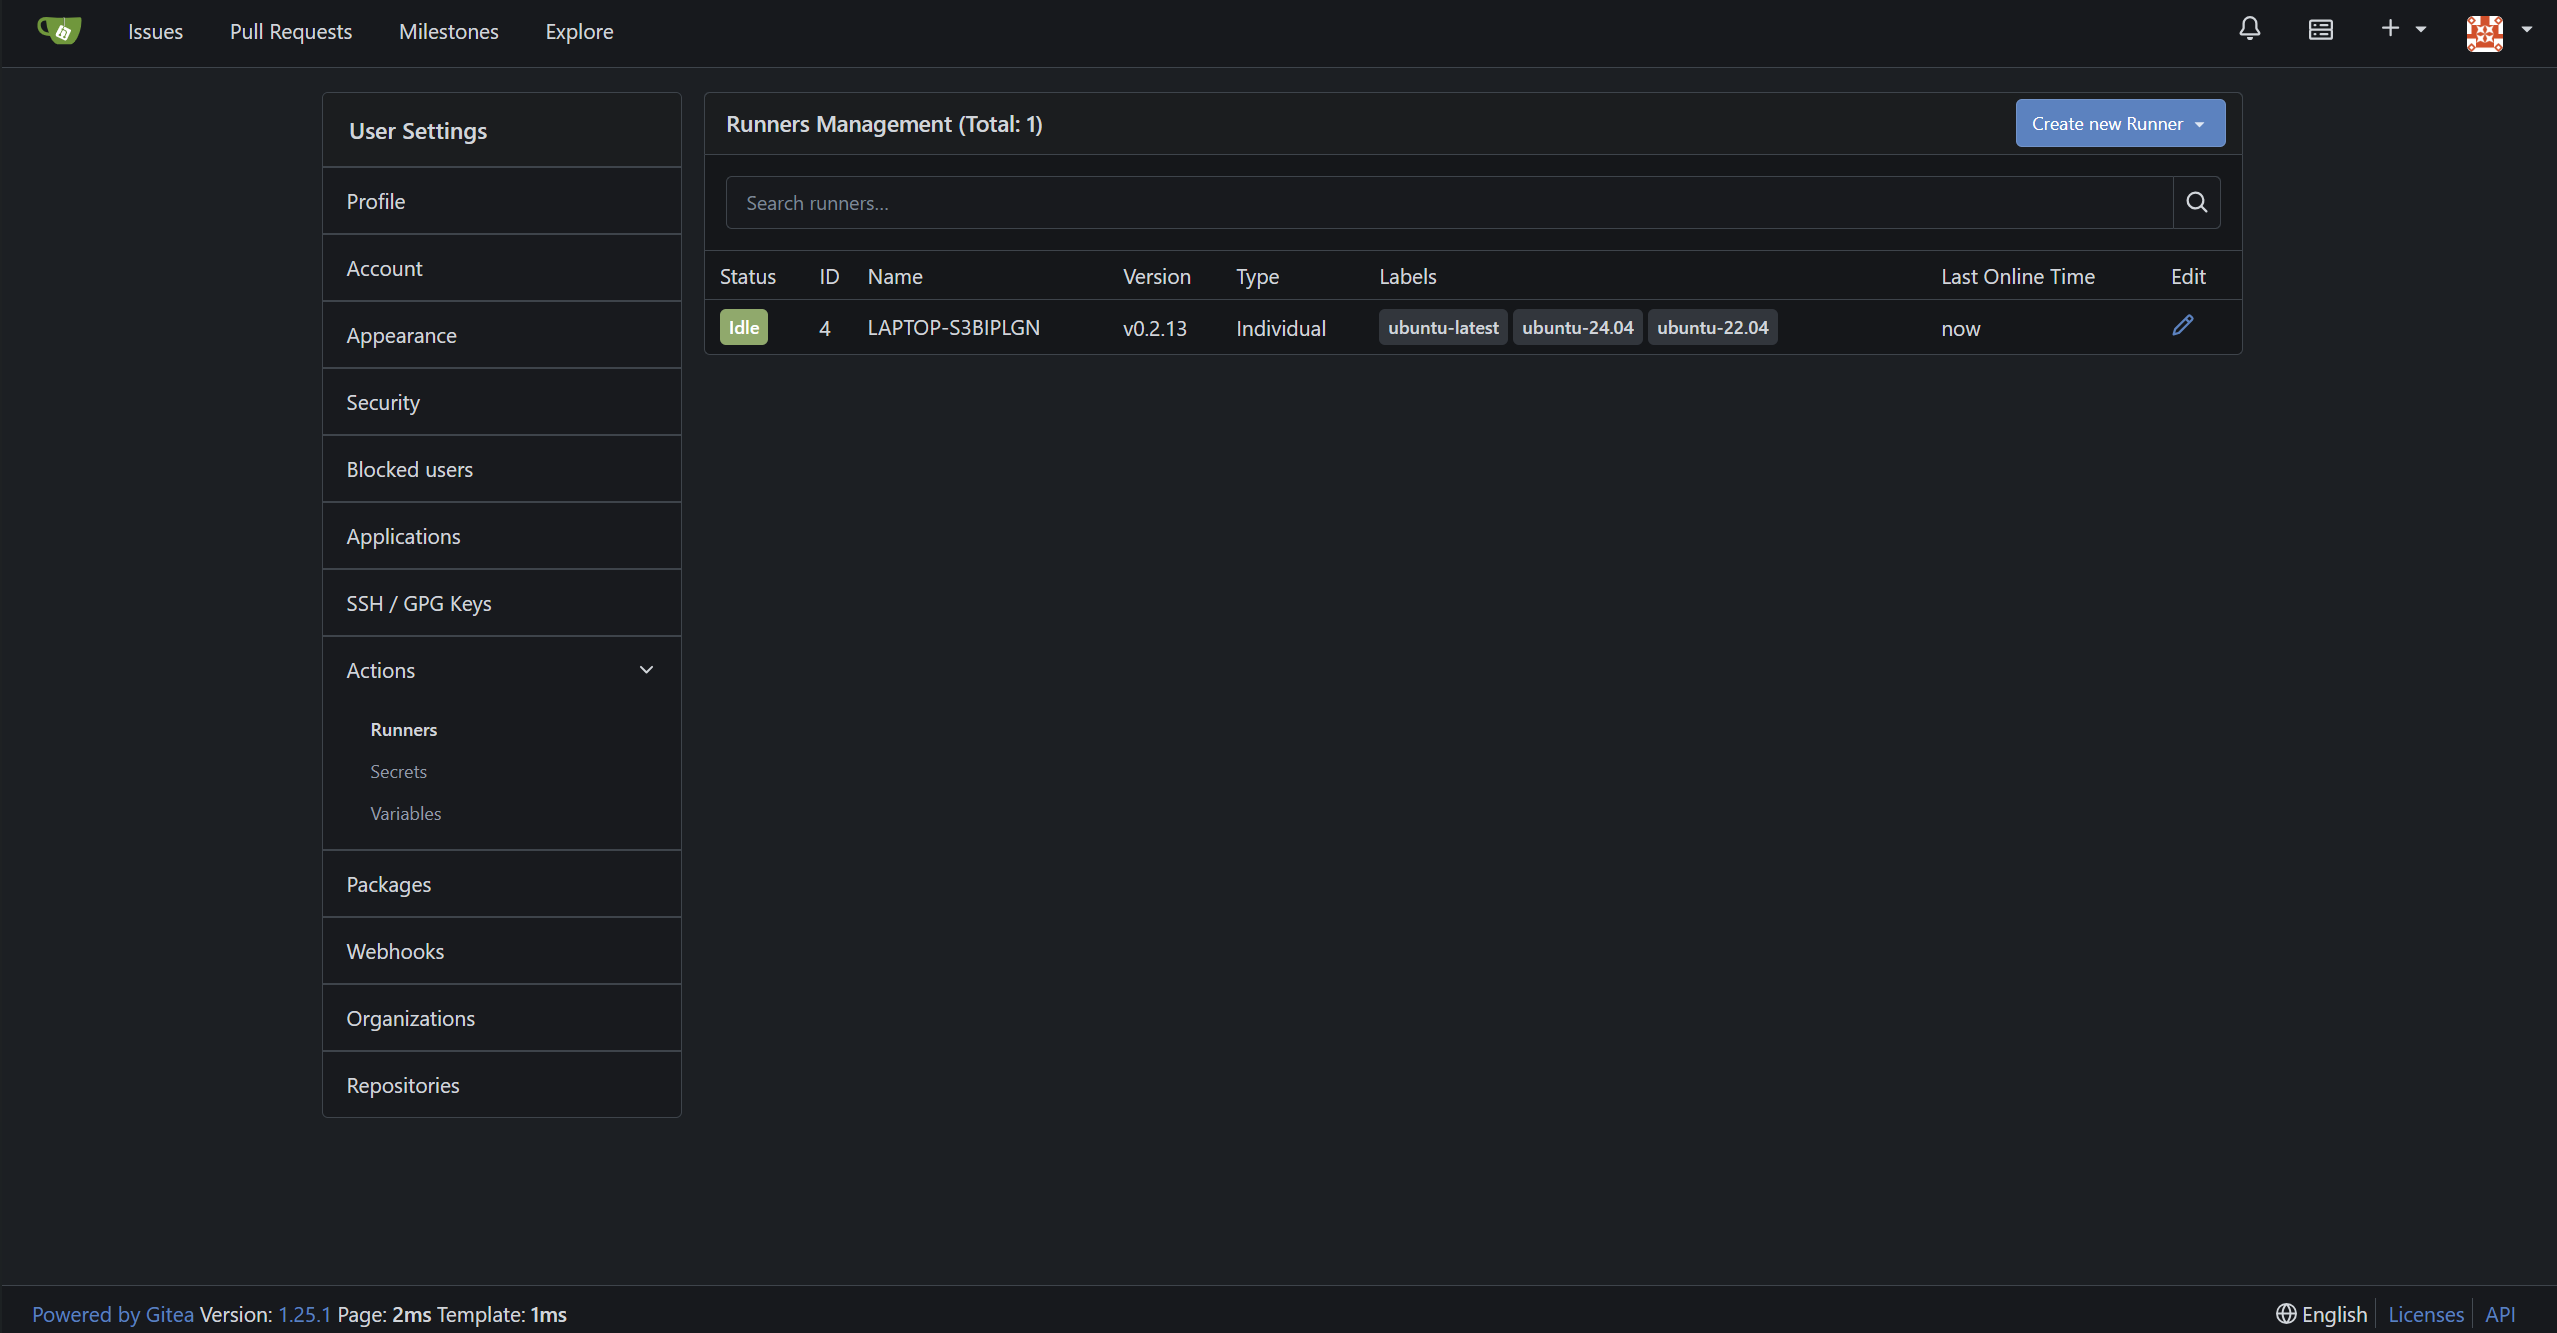
启动Runner,就可以在Gitea管理页面上看到注册情况:
1
2
3
4
5
./act_runner daemon # $ ./act_runner-0 .2.13-linux-arm64 daemon INFO[2025-11 -16 T21:38:05+08 :00] Starting runner daemon INFO[2025-11 -16 T21:38:05+08 :00] runner: LAPTOP-S3BIPLGN, with version: v0.2.13, with labels: [ubuntu-latest ubuntu-24 .04 ubuntu-22 .04], declare successfully
使用Actions
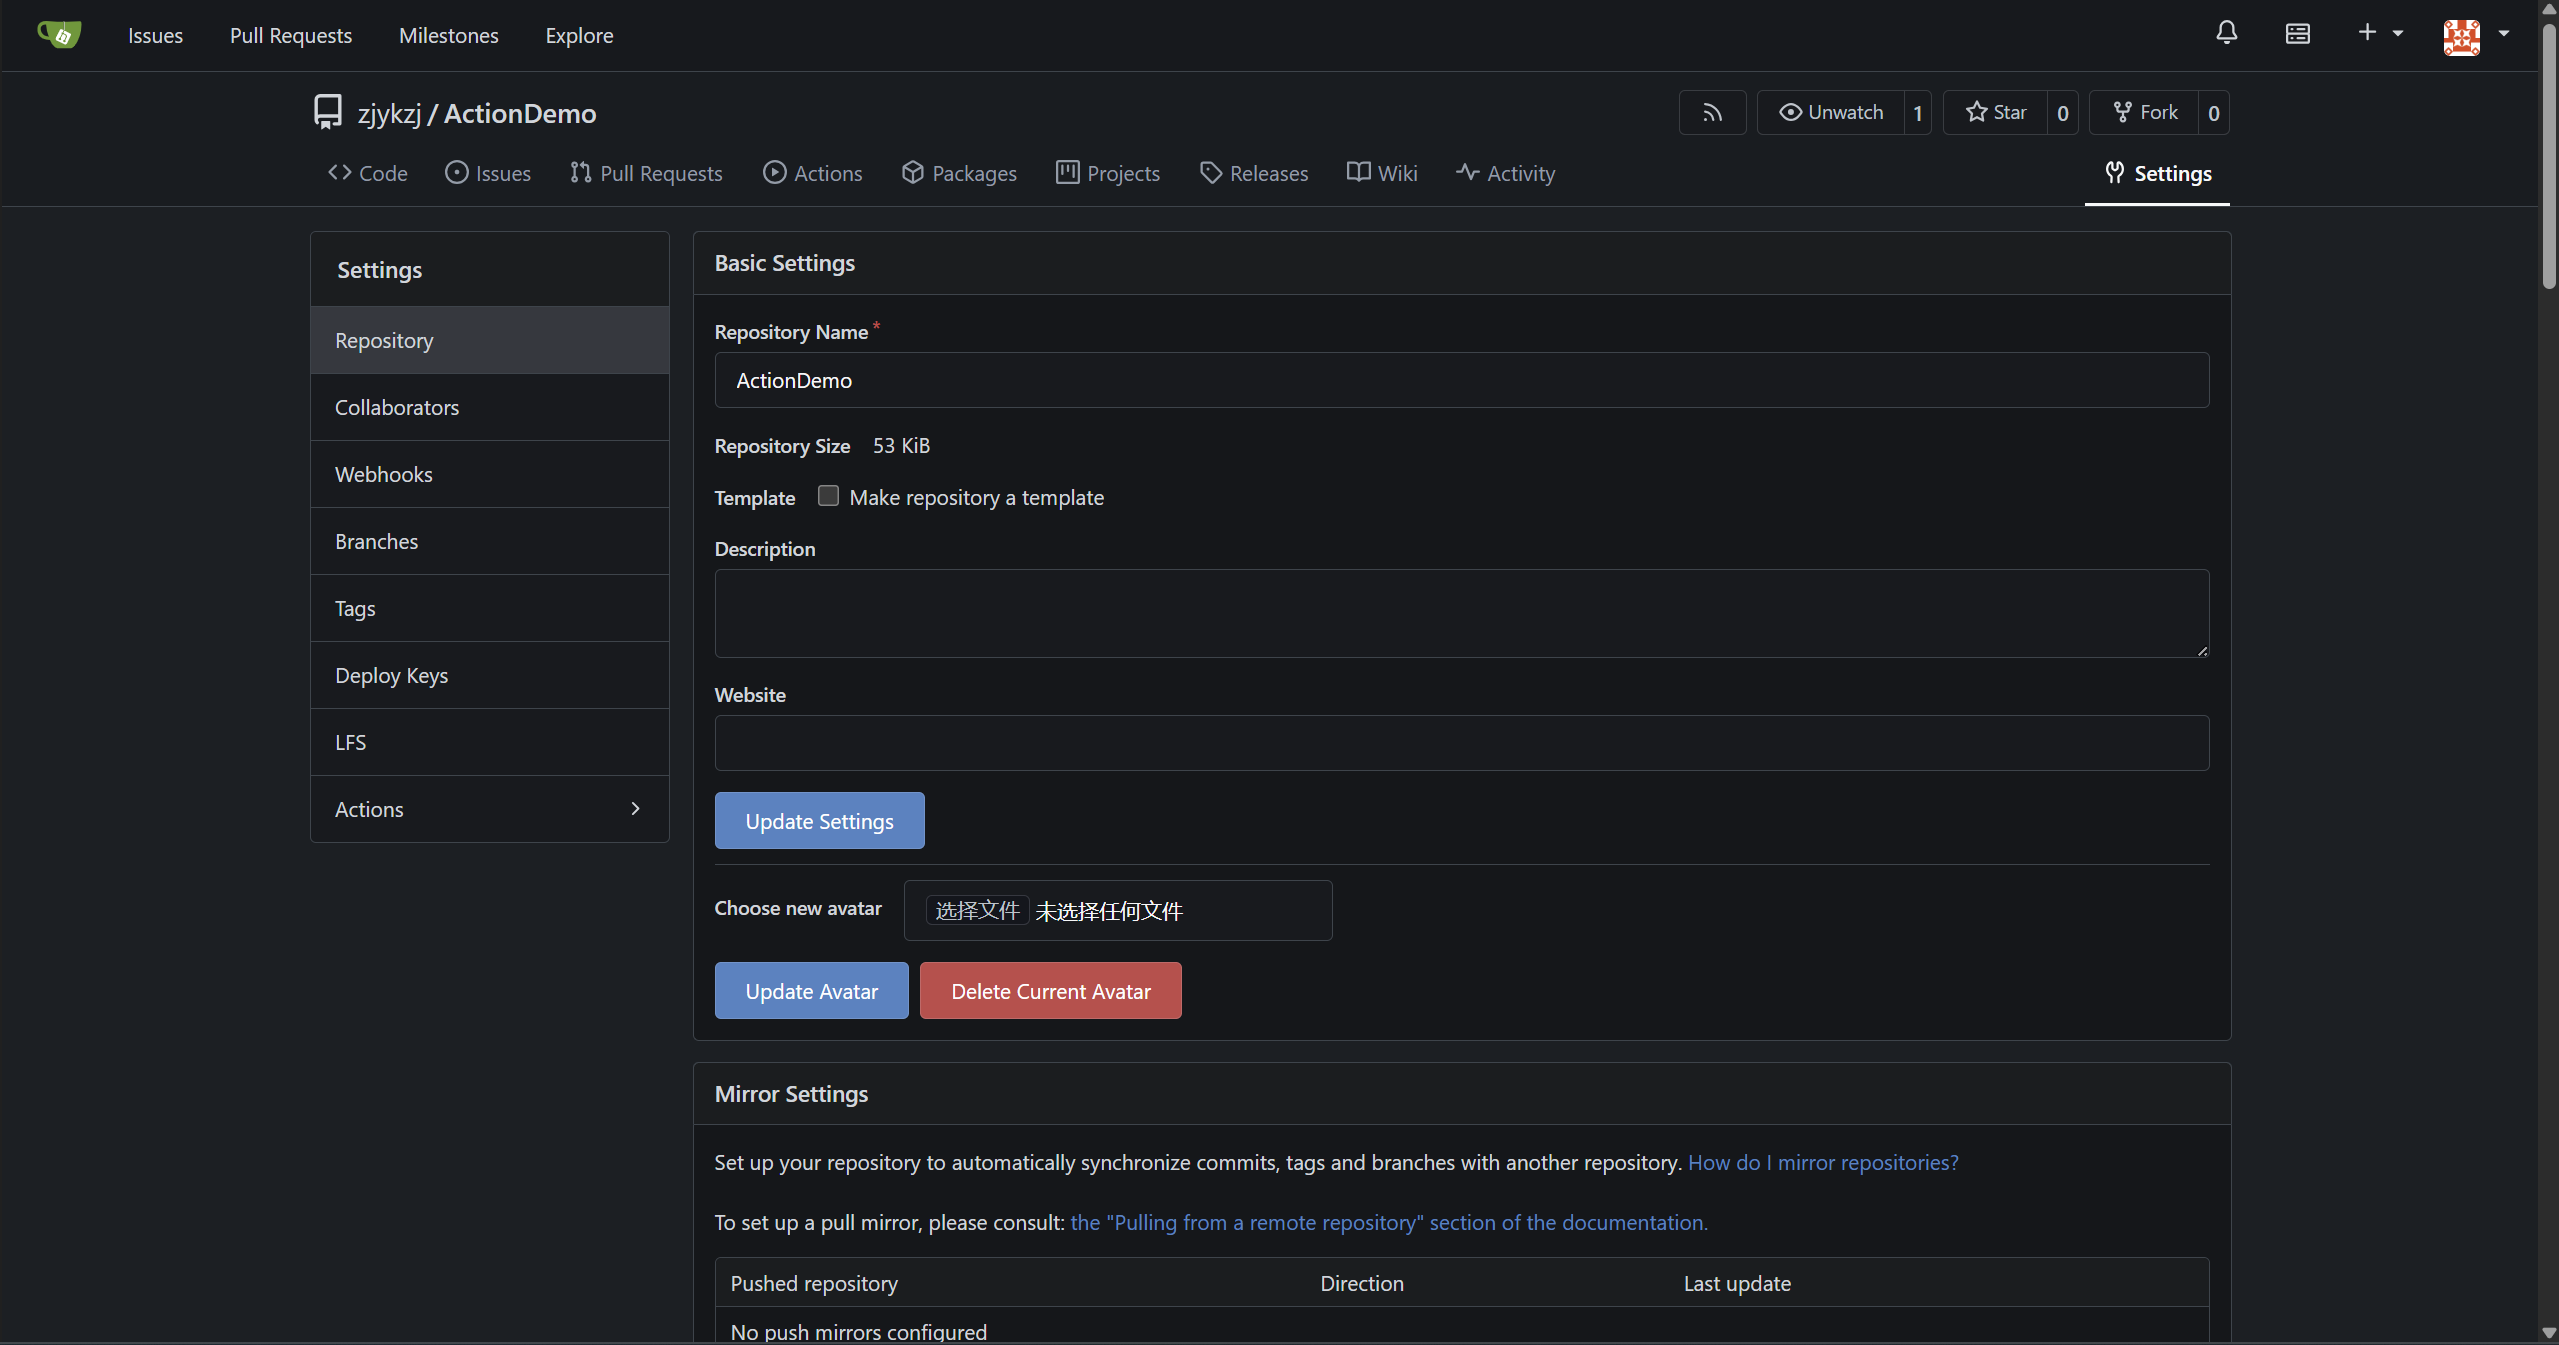
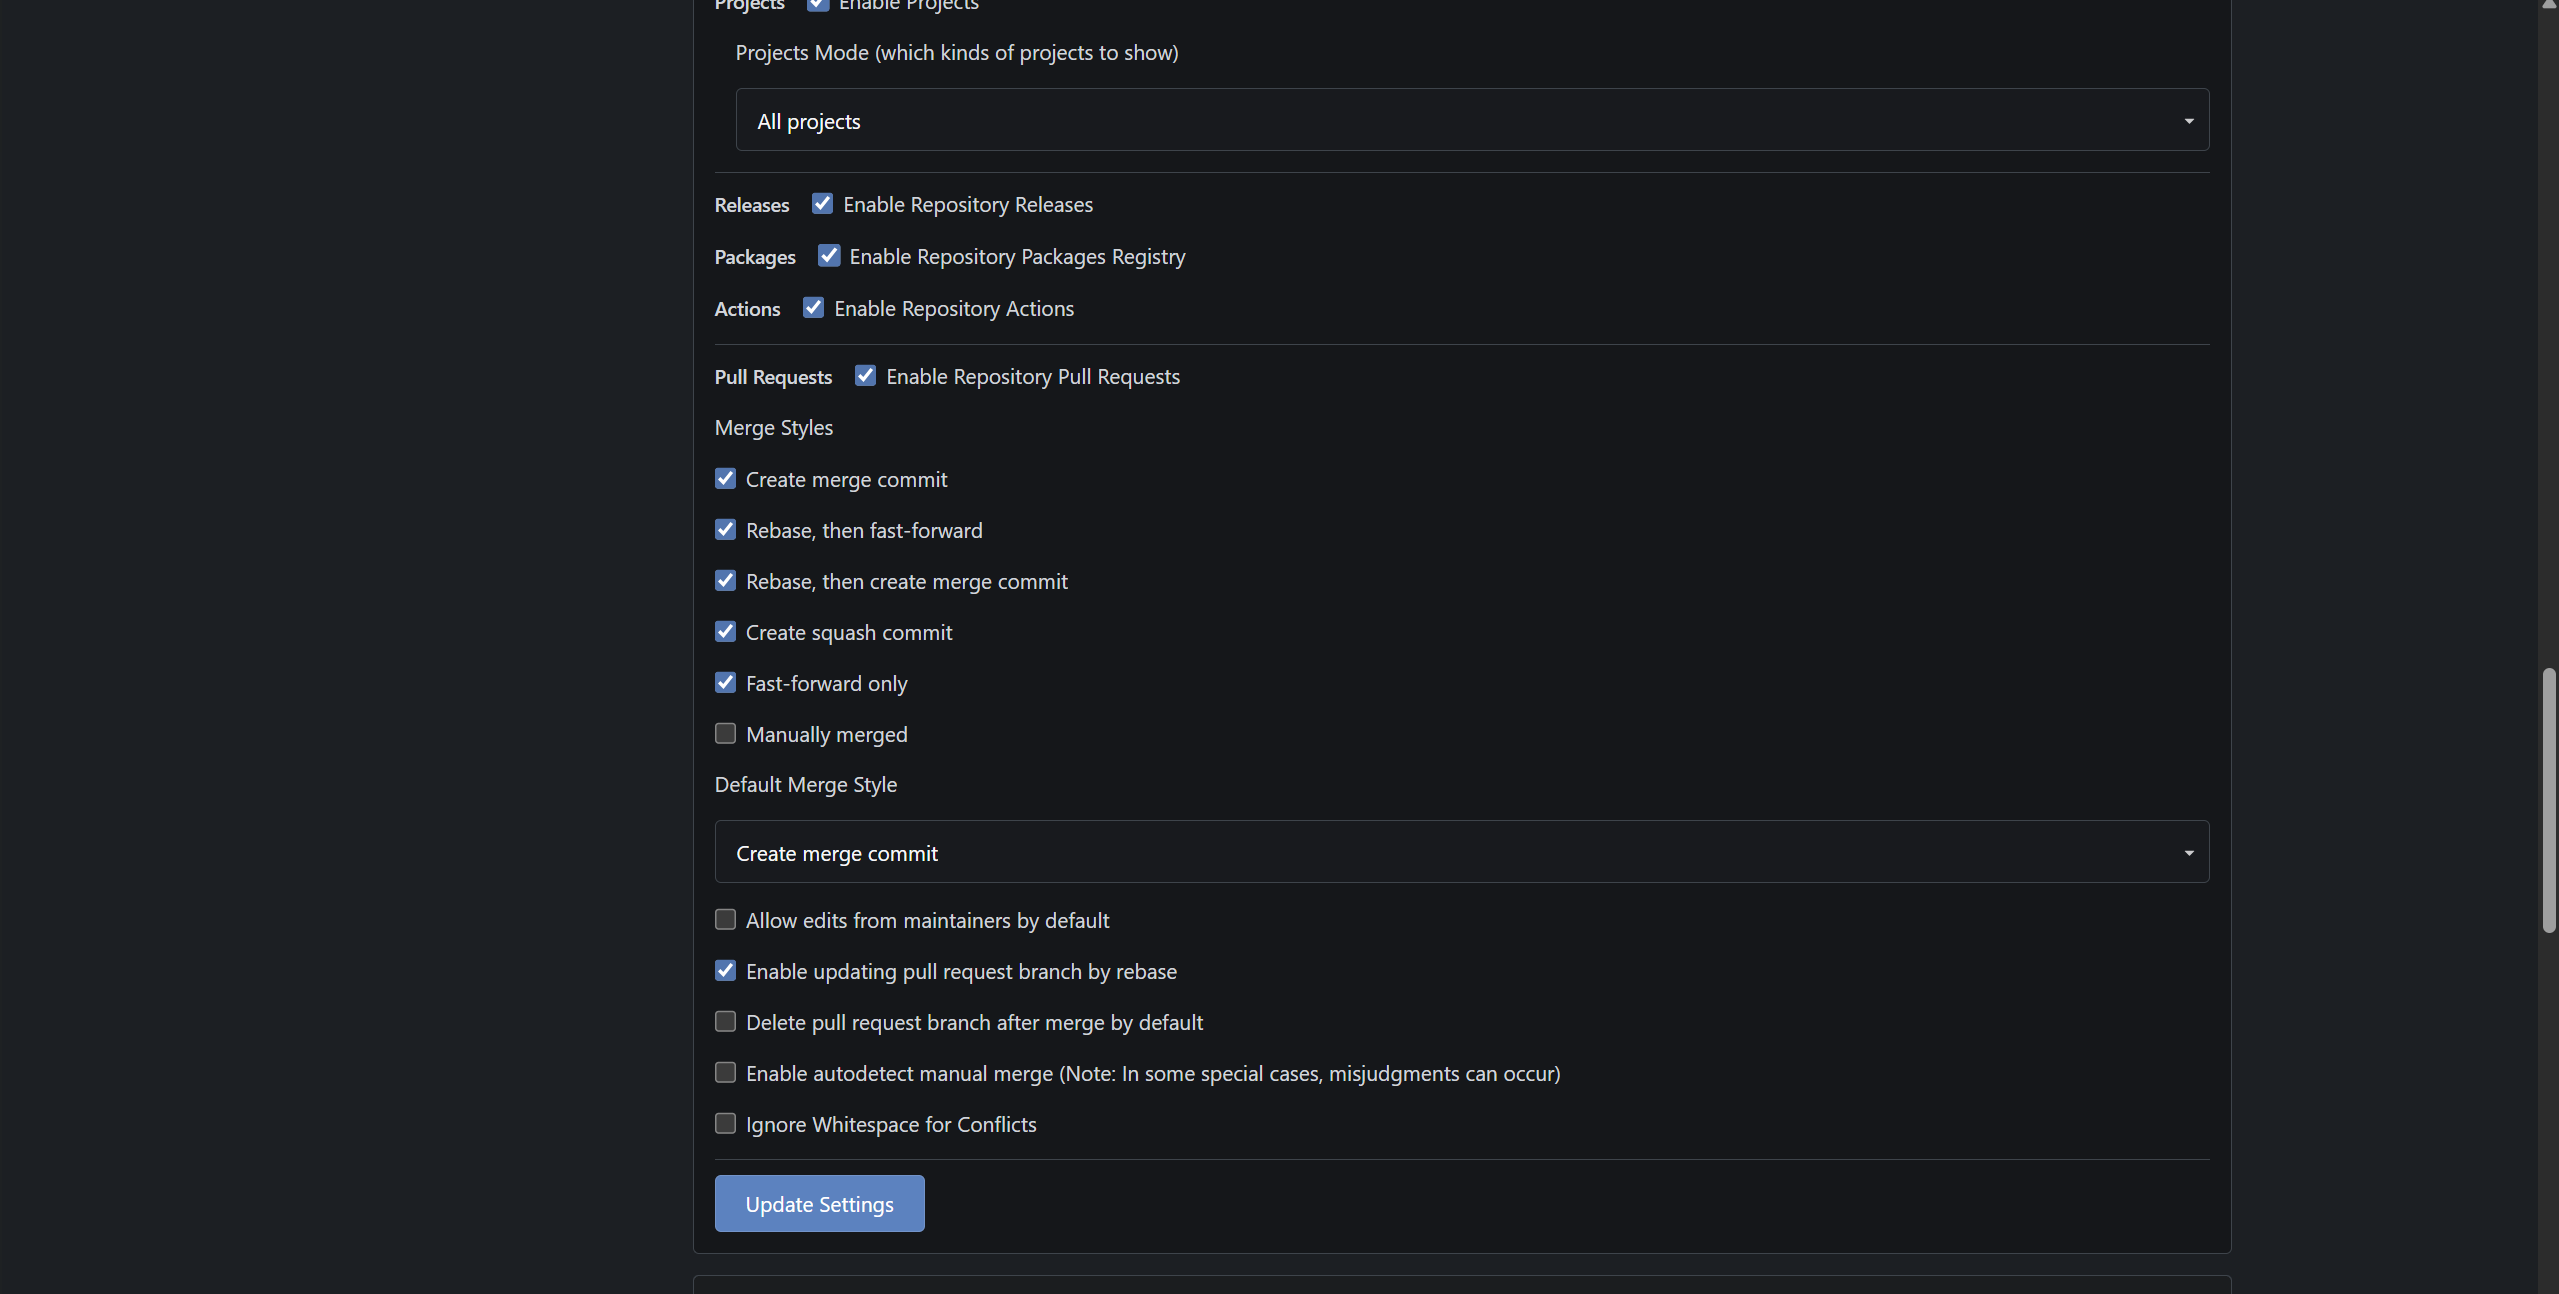
即使对于启用了Gitea实例的Actions,存储库仍默认禁用Actions。
要启用它,请转到存储库的设置页面,例如your_gitea.com/<owner>/repo/settings,然后启用Enable Repository Actions。
docker-dompose
拉取最新稳定版本
1
2
3
4
5
6
7
8
9
$ docker pull gitea/act_runner:0.2.13 0.2.13: Pulling from gitea/act_runner 9824c27679d3: Pull complete 96e70a89510f: Pull complete 748572556419: Pull complete 7fd1ed8ea89d: Pull complete Digest: sha256:8477d5b61b655caad4449888bae39f1f34bebd27db56cb15a62dccb3dcf3a944 Status: Downloaded newer image for gitea/act_runner:0.2.13 docker.io/gitea/act_runner:0.2.13
配置相关文件
1
2
3
4
5
6
7
8
9
10
11
12
13
14
15
16
17
18
19
20
21
22
23
24
25
$ mkdir act_runner & cd act_runner $ docker run - -entrypoint= "" - -rm - it gitea/ act_runner:0.2 .13 act_runner generate-config > config.yaml $ mkdir data INSTANCE_URL = http://your-gitea.example.com REGISTRATION_TOKEN = your_token_here RUNNER_NAME = my-runner-01 RUNNER_LABELS = linux,self-hosted version: "3.8" services: runner: image: gitea/ act_runner:0.2 .13 environment: CONFIG_FILE: /config.yaml GITEA_INSTANCE_URL: "${INSTANCE_URL} " GITEA_RUNNER_REGISTRATION_TOKEN: "${REGISTRATION_TOKEN} " GITEA_RUNNER_NAME: "${RUNNER_NAME} " GITEA_RUNNER_LABELS: "${RUNNER_LABELS} " volumes: - ./ config.yaml:/config.yaml - ./ data:/data - / var/ run/ docker.sock:/var/run/docker.sock $ ls config.yaml data docker-compose.yml
启动容器
关闭forcePull
Gitea提供了用于Job运行阶段的构建镜像:gitea/runner-images ,常用的有
1
2
$ docker image ls | grep ubuntu docker.gitea.com /runner-images ubuntu-latest fb5e48a0afc7 2 weeks ago 1.56 GB
可以先下载到本地,然后在act_runner config.yaml关闭强制更新选项
修改为false,重新启动act_runner,这样后续actions运行时不会主动拉取线上镜像文件
1 2 3 4 5 6 7 8 9 10 11 12 13 $ docker-compose down WARN[0000] /home/zjykzj/software/act_runner/docker-compose.yml: the attribute `version` is obsolete, it will be ignored, please remove it to avoid potential confusion [+] Running 2/2 ✔ Container act_runner-runner-1 Removed 0.0s ✔ Network act_runner_default Removed $ docker-compose up -d WARN[0000] /home/zjykzj/software/act_runner/docker-compose.yml: the attribute `version` is obsolete, it will be ignored, please remove it to avoid potential confusion [+] Running 2/2 ✔ Network act_runner_default Created 0.0s ✔ Container act_runner-runner-1 Started $ docker logs -f 4f7 time ="2025-11-17T13:40:44Z" level =info msg ="Starting runner daemon" time ="2025-11-17T13:40:44Z" level =info msg ="runner: my-runner-01, with version: v0.2.13, with labels: [ubuntu-latest ubuntu-22.04 ubuntu-20.04], declare successfully"
简单Workflow/Job
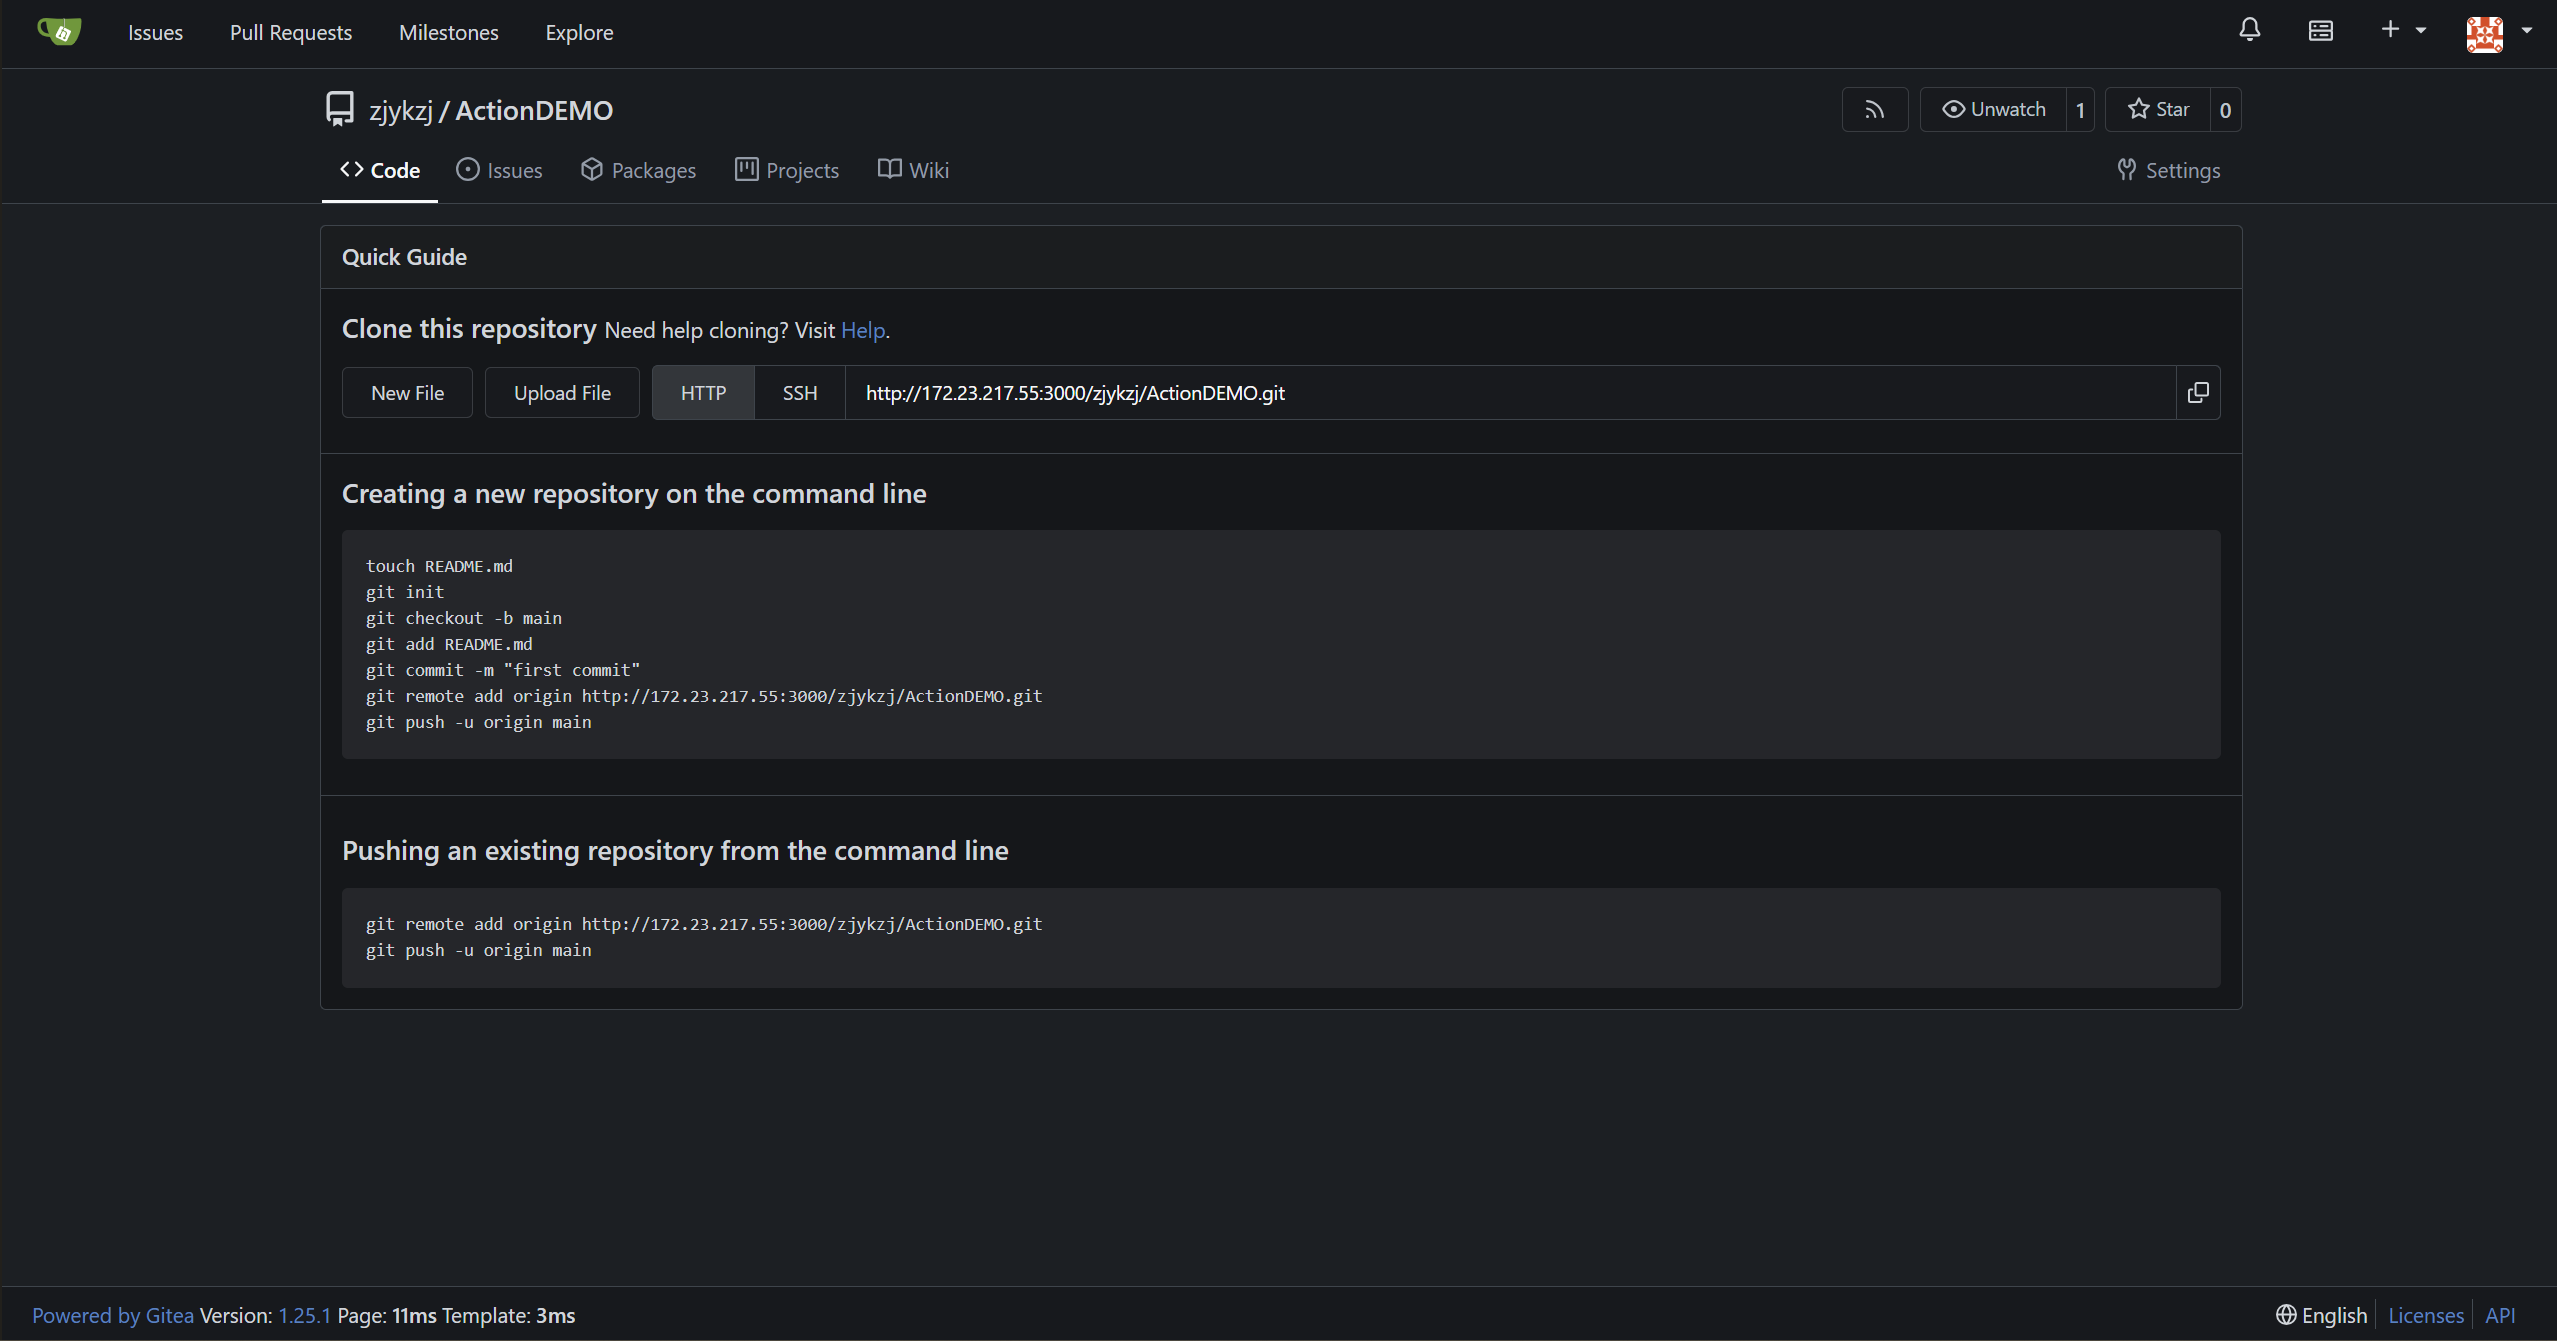
在Gitea上新建仓库ActionDemo,实现每次推送都能够触发workflow
demo.yaml
下载工程到本地后创建配置文件.gitea/workflows/demo.yaml
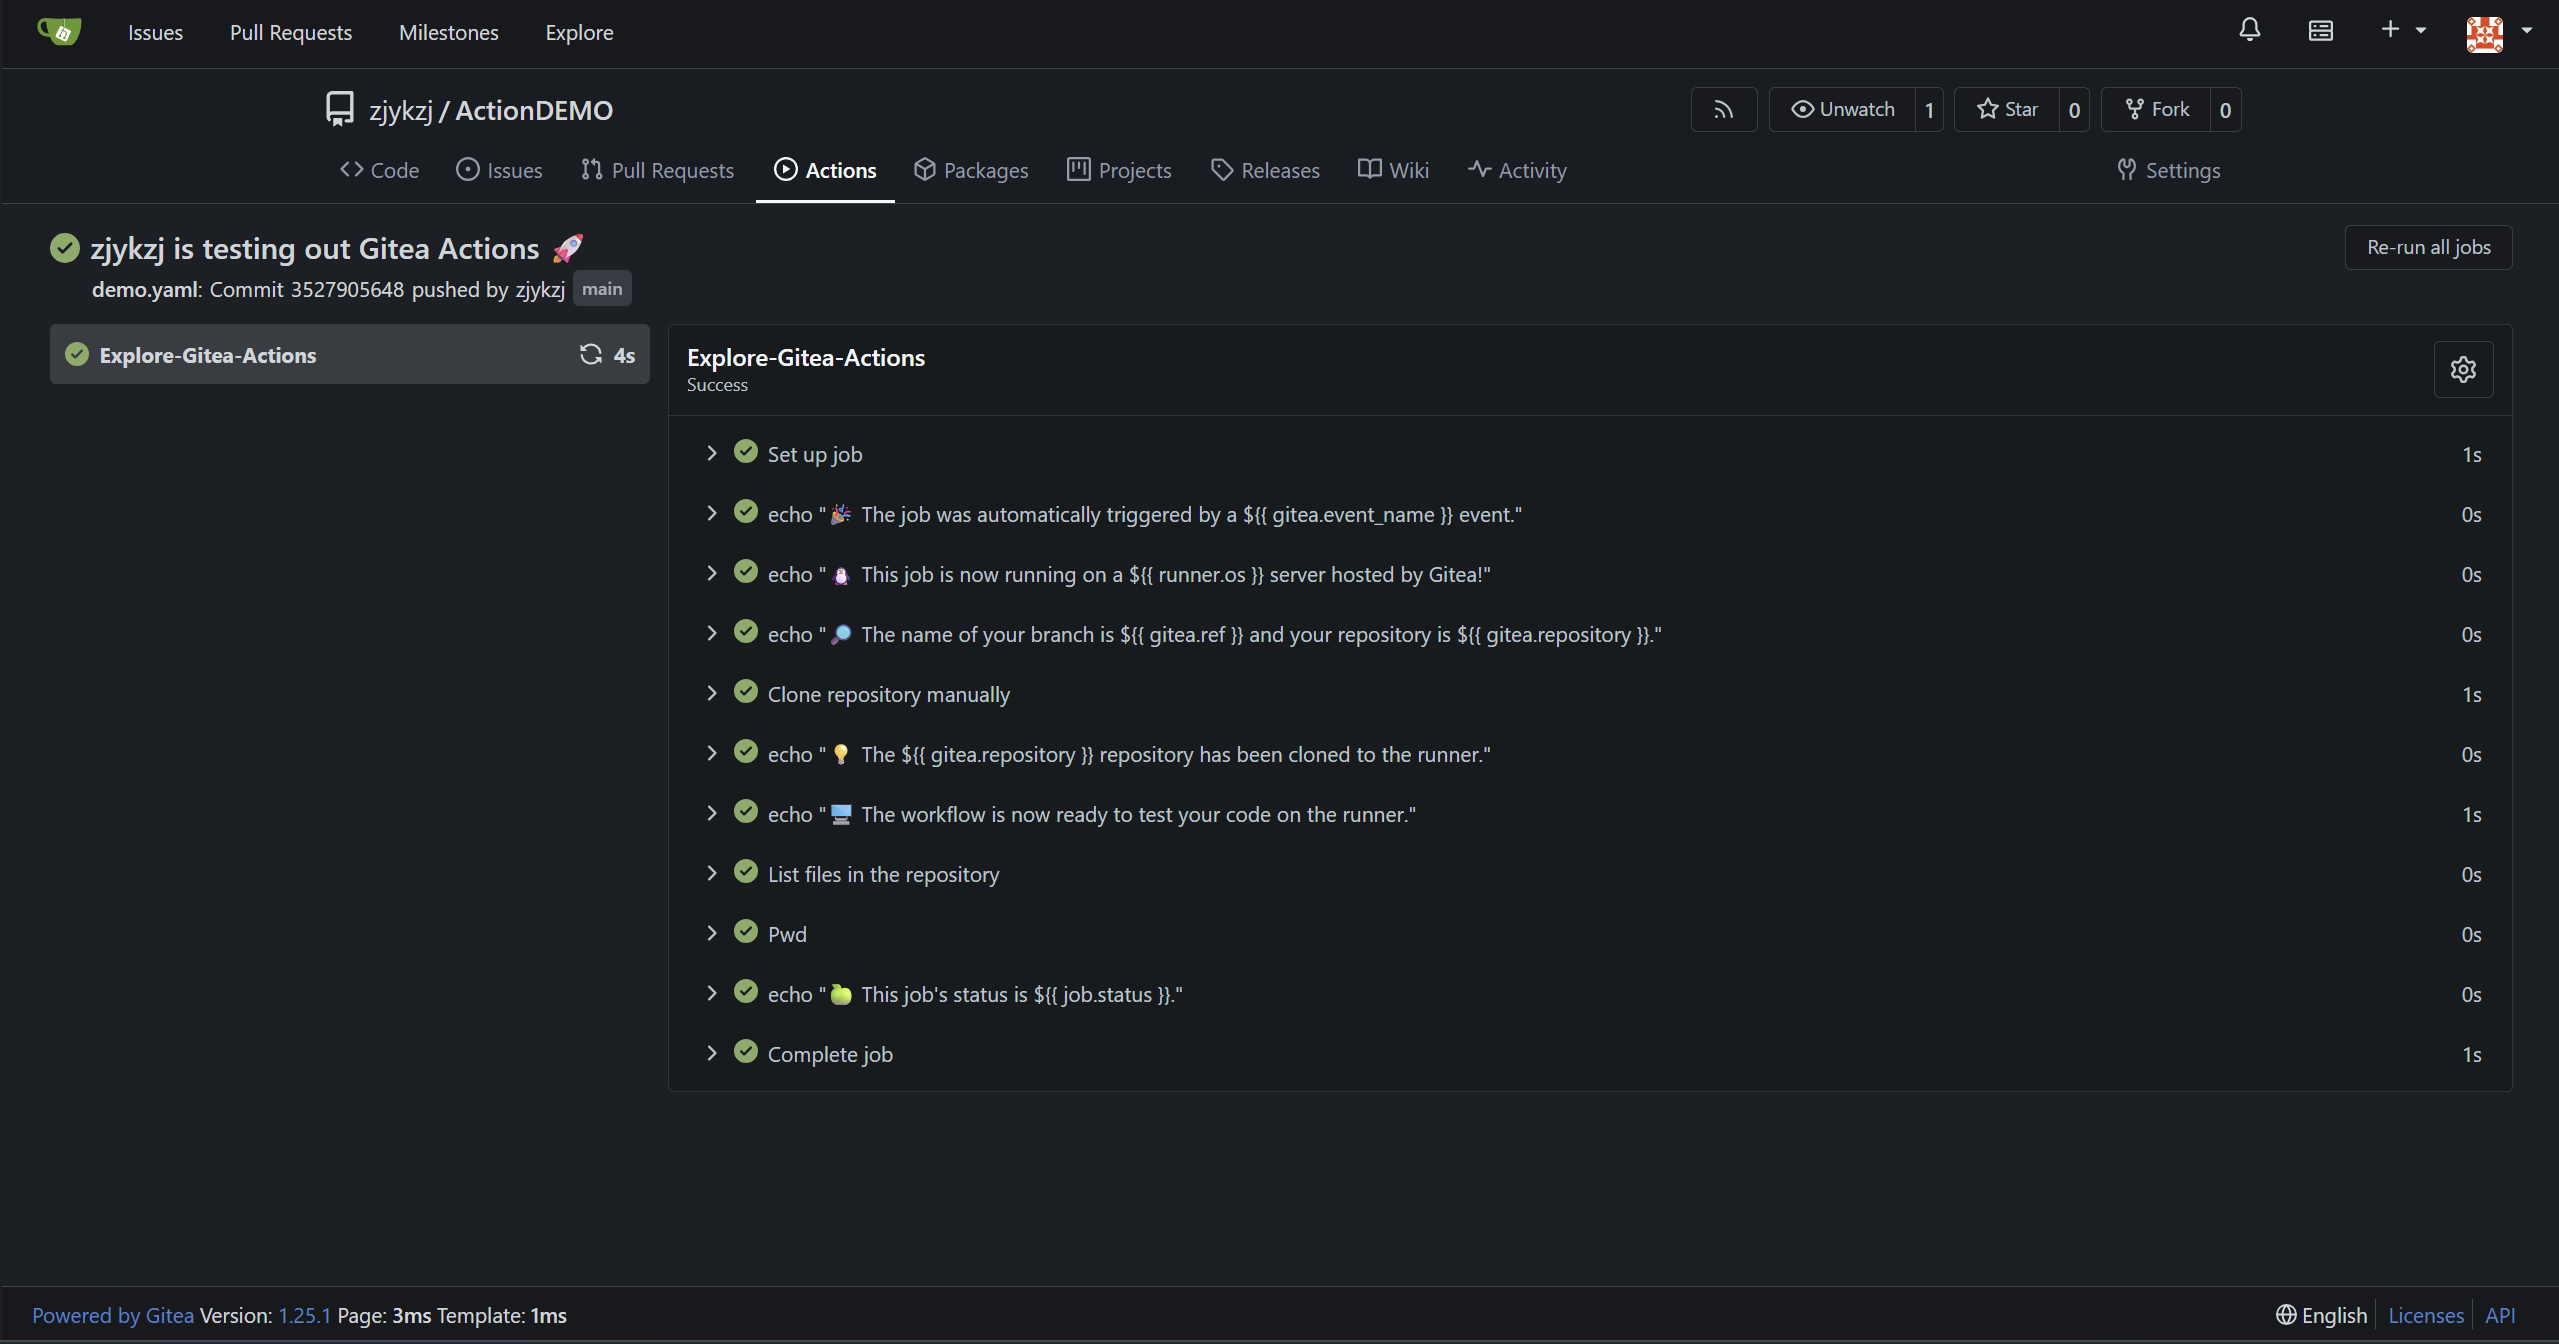
1 2 3 4 5 6 7 8 9 10 11 12 13 14 15 16 17 18 19 20 21 22 23 24 25 26 27 28 29 30 31 32 33 34 35 36 37 38 39 40 41 42 43 44 45 46 47 48 49 50 51 52 53 54 55 56 57 58 59 60 61 62 63 64 name: Gitea Actions Demo run-name: ${{ gitea.actor } } is testing out Gitea Actions 🚀 on: push: branches: - '**' tags-ignore: - '*' jobs : Explore-Gitea-Actions: runs-on: ubuntu-latest steps: - run: echo "🎉 The job was automatically triggered by a ${{ gitea.event_name } } event." - run: echo "🐧 This job is now running on a ${{ runner.os } } server hosted by Gitea!" - run: echo "🔎 The name of your branch is ${{ gitea.ref } } and your repository is ${{ gitea.repository } }." - name: Clone repository manually run: | FULL_REF="${{ gitea.ref } }" BRANCH="${FULL_REF#refs/heads/} " git clone --branch="$BRANCH " --depth=1 http://172.23.217.55:3000/${{ gitea.repository } } . - run: echo "💡 The ${{ gitea.repository } } repository has been cloned to the runner." - run: echo "🖥️ The workflow is now ready to test your code on the runner." - name: List files in the repository run: | ls -al ${{ gitea.workspace } } - name: Pwd run: | pwd - run: echo "🍏 This job's status is ${{ job.status } }."
将更新提交上传到Gitea,就能够触发Actions功能
注意:每个yaml文件表示一个workflow,一个仓库可以创建多个yaml文件,一个workflow yaml文件可以配置多个Job。
workflow语法
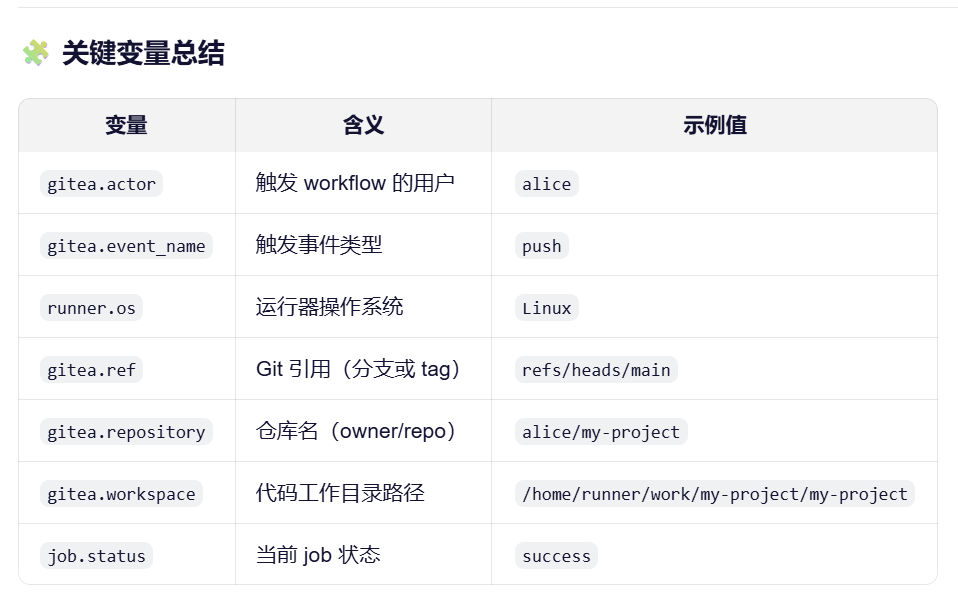
更多变量以及workflow语法可以查看:Workflow syntax for GitHub Actions
预定义action
Gitea可以复用很多Github预定义的actions:Quickstart for GitHub Actions 。比如
1 2 3 4 - name: Check out repository code uses: actions/checkout@v 4
不过使用的时候发现这个action需要访问到Github,建议使用git clone替代。
推送文件到其他仓库
创建新的workflow,将本仓库public文件夹下面的文件推送到指定仓库 。完整执行流程
1 2 3 4 5 6 7 8 9 10 11 12 13 14 15 16 17 18 19 20 21 22 23 打 tag v * ↓ 触发 workflow ↓ 克隆源仓库(ActionDemo) ↓ 检出对应 commit ↓ 检查 public/ 是否存在 ↓ 配置 Git 用户 ↓ 加载 SSH 私钥(来自 secrets) ↓ 克隆目标仓库(ActionDemo-Pages)via SSH ↓ 清空目标仓库内容(保留 .git) ↓ 复制 public/ 内容到目标仓库 ↓ 提交 + 推送 ↓ Pages 自动更新
deploy.yaml
新建.gitea/workflows/deploy.yaml文件
1 2 3 4 5 6 7 8 9 10 11 12 13 14 15 16 17 18 19 20 21 22 23 24 25 26 27 28 29 30 31 32 33 34 35 36 37 38 39 40 41 42 43 44 45 46 47 48 49 50 51 52 53 54 55 56 57 58 59 60 61 62 63 64 65 66 67 68 69 70 71 72 73 74 75 76 77 78 79 80 81 82 83 84 85 86 87 88 89 90 name: Deploy Public to Pages Repo on: push: tags: - 'v*' jobs : deploy-public: runs-on: ubuntu-latest steps: - name: Clone current repository run: | git clone http://172.23.217.55:3000/zjykzj/ActionDemo.git . git checkout ${{ gitea.sha } } - name: Verify public directory exists run: | if [ ! -d "public" ]; then echo "❌ public/ directory not found!" exit 1 fi - name: Configure Git identity run: | git config --global user.name "Gitea Actions Bot" git config --global user.email "actions@gitea.local" - name: Setup SSH for Gitea env : DEPLOY_KEY: ${{ secrets.DEPLOY_KEY } } run: | mkdir -p ~/.ssh echo "$DEPLOY_KEY " > ~/.ssh/id_ed25519 chmod 600 ~/.ssh/id_ed25519 ssh-keyscan -p 2222 172.23.217.55 >> ~/.ssh/known_hosts - name: Clone target repository via SSH run: | git clone ssh://git@172.23.217.55:2222/zjykzj/ActionDemo-Pages.git target-repo - name: Sync public content to target repo run: | cd target-repo git checkout main || git checkout -b main find . -maxdepth 1 ! -name '.git' ! -name '.' -exec rm -rf {} + 2>/dev/null || true cp -r ../public/* ./ - name: Commit and push to target repository run: | cd target-repo git add . git commit -m "Deploy from ${{ gitea.repository } }@${{ gitea.sha } }" git push origin main
密钥配置
生成密钥对(不要设置 passphrase,否则自动化会卡住 )
1 2 3 4 5 6 7 8 9 10 11 12 13 14 15 16 17 18 19 20 21 $ ssh-keygen -t ed25519 -f deploy_key -N "" -C "gitea-deploy-key" Generating public/private ed25519 key pair. Your identification has been saved in deploy_key Your public key has been saved in deploy_key.pub The key fingerprint is: SHA256:1zHk2jGLV+cnQ9tWQXdb+fu7Jjo6Jgdn9B+KQ7sIHAk gitea-deploy-key The key's randomart image is: +--[ED25519 256]--+ | . .o= | | o .* | | E * o.+ | | . . . = O =o | | o S = = + * | | . .. = o . =. | | o = o o . . | | ...B o o .. | | .+o=.o ooo | +----[SHA256]-----+ $ ls deploy_key deploy_key.pub
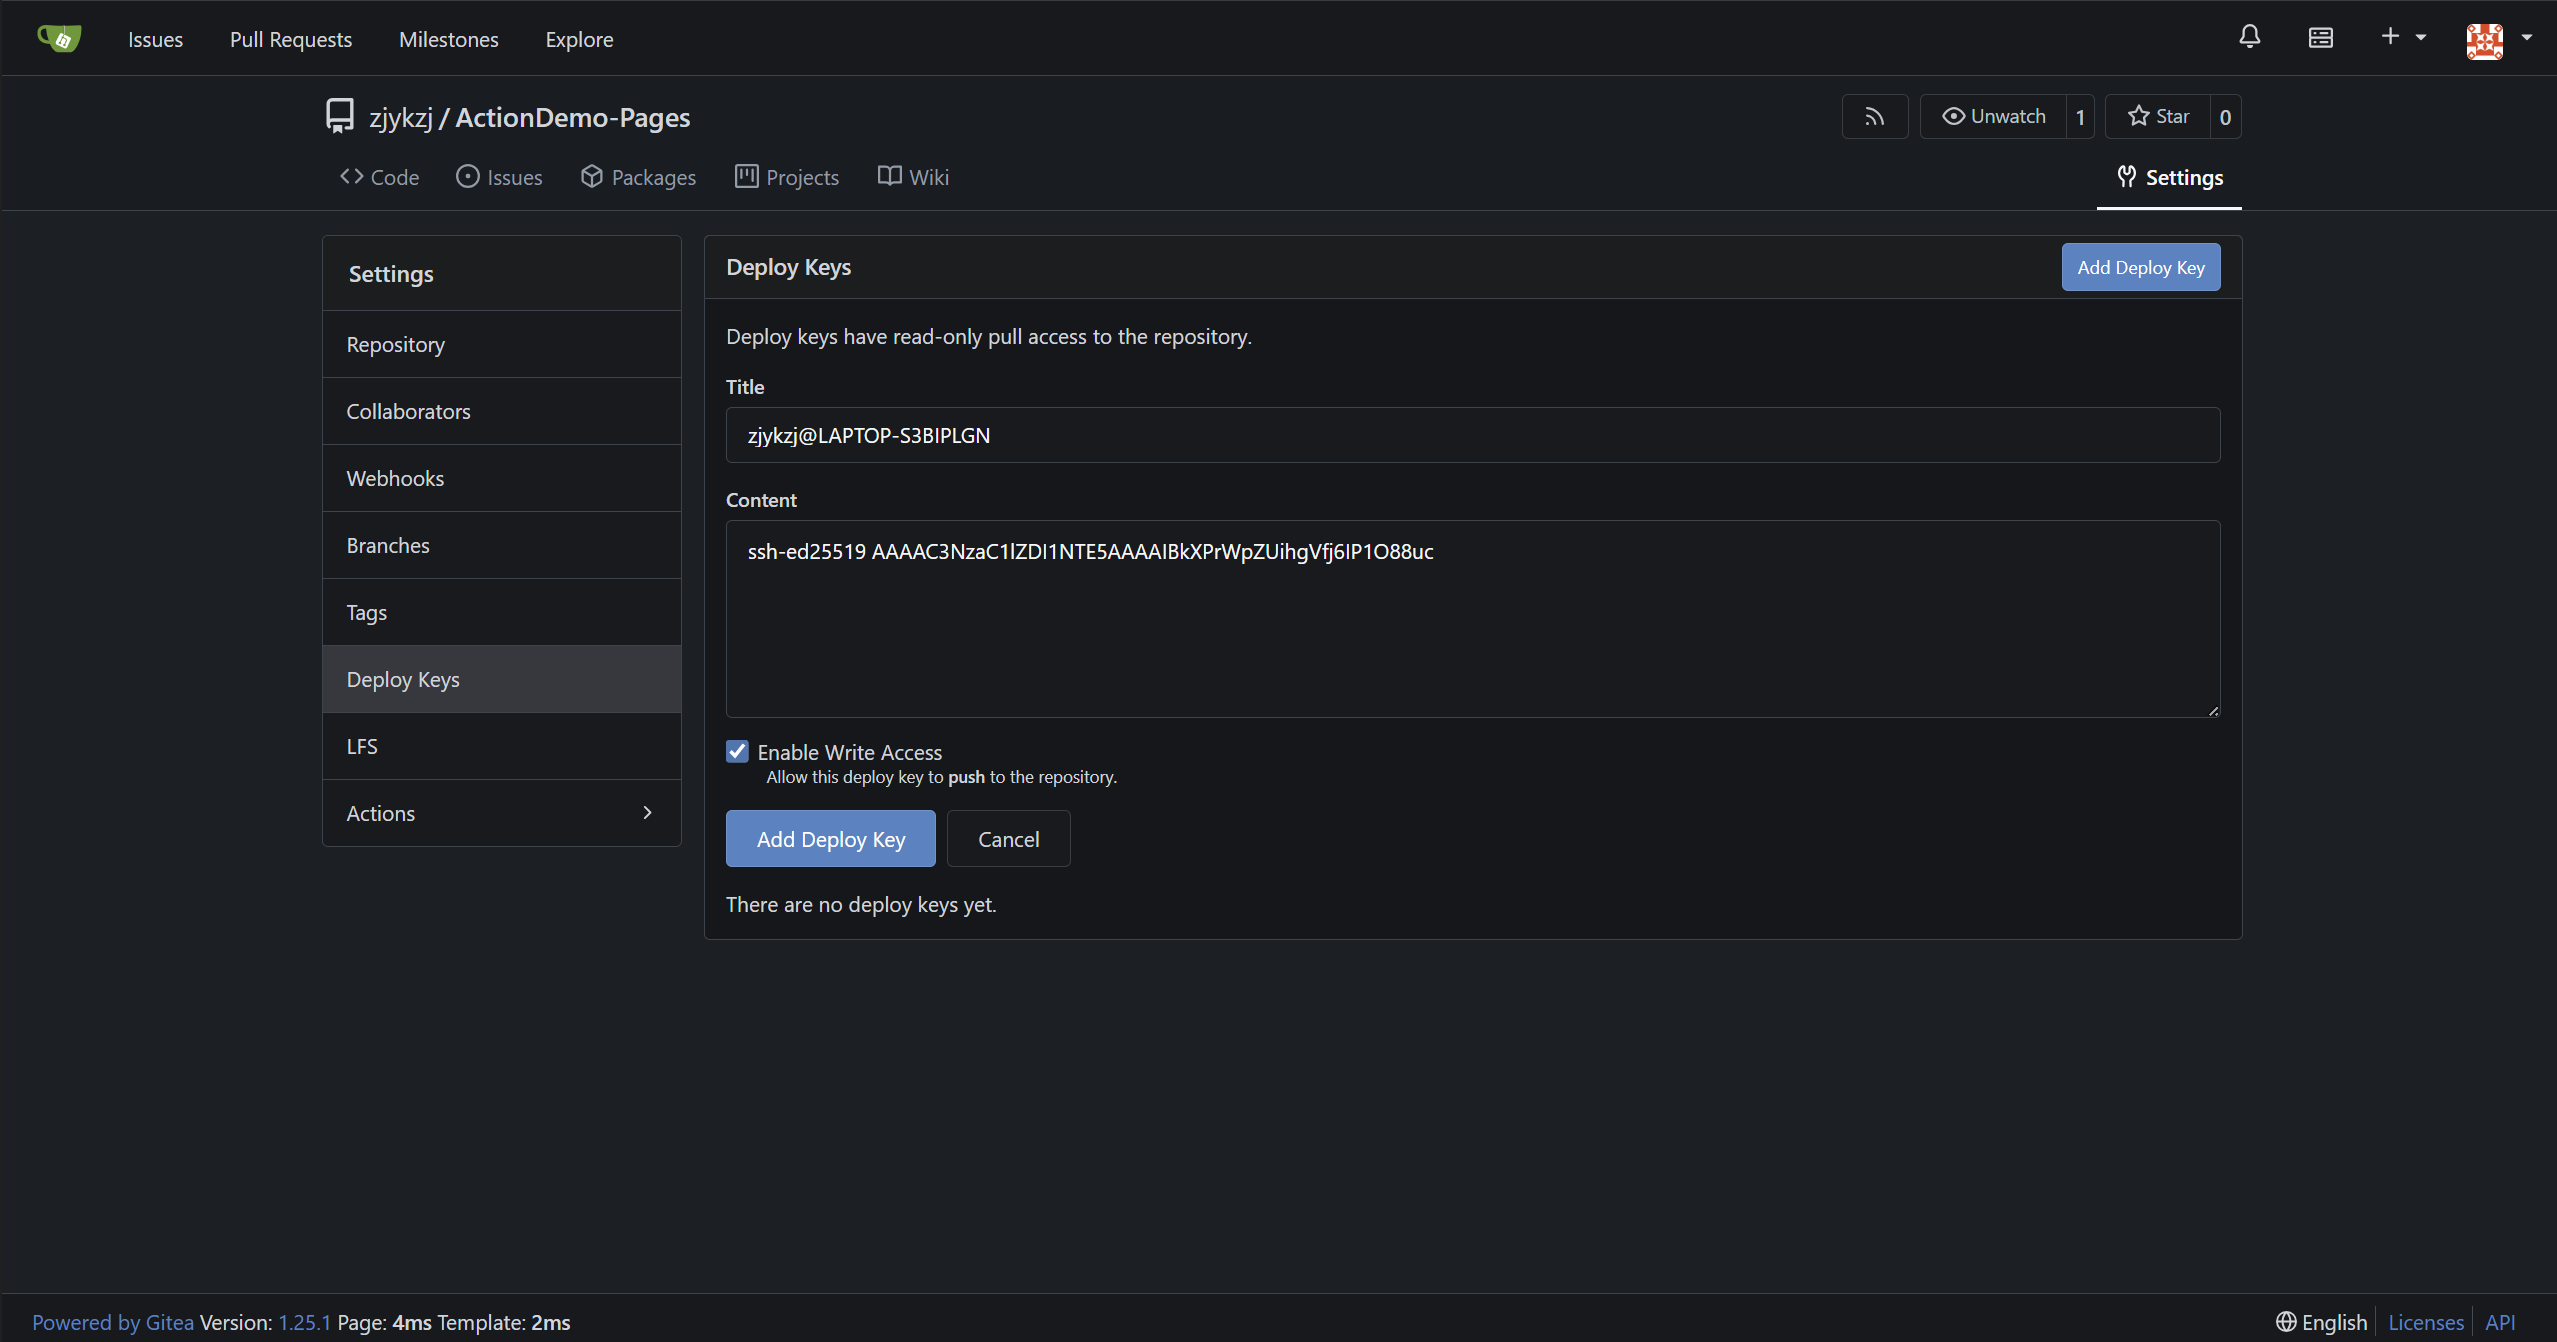
在Gitea新建仓库ActionDemo-Pages
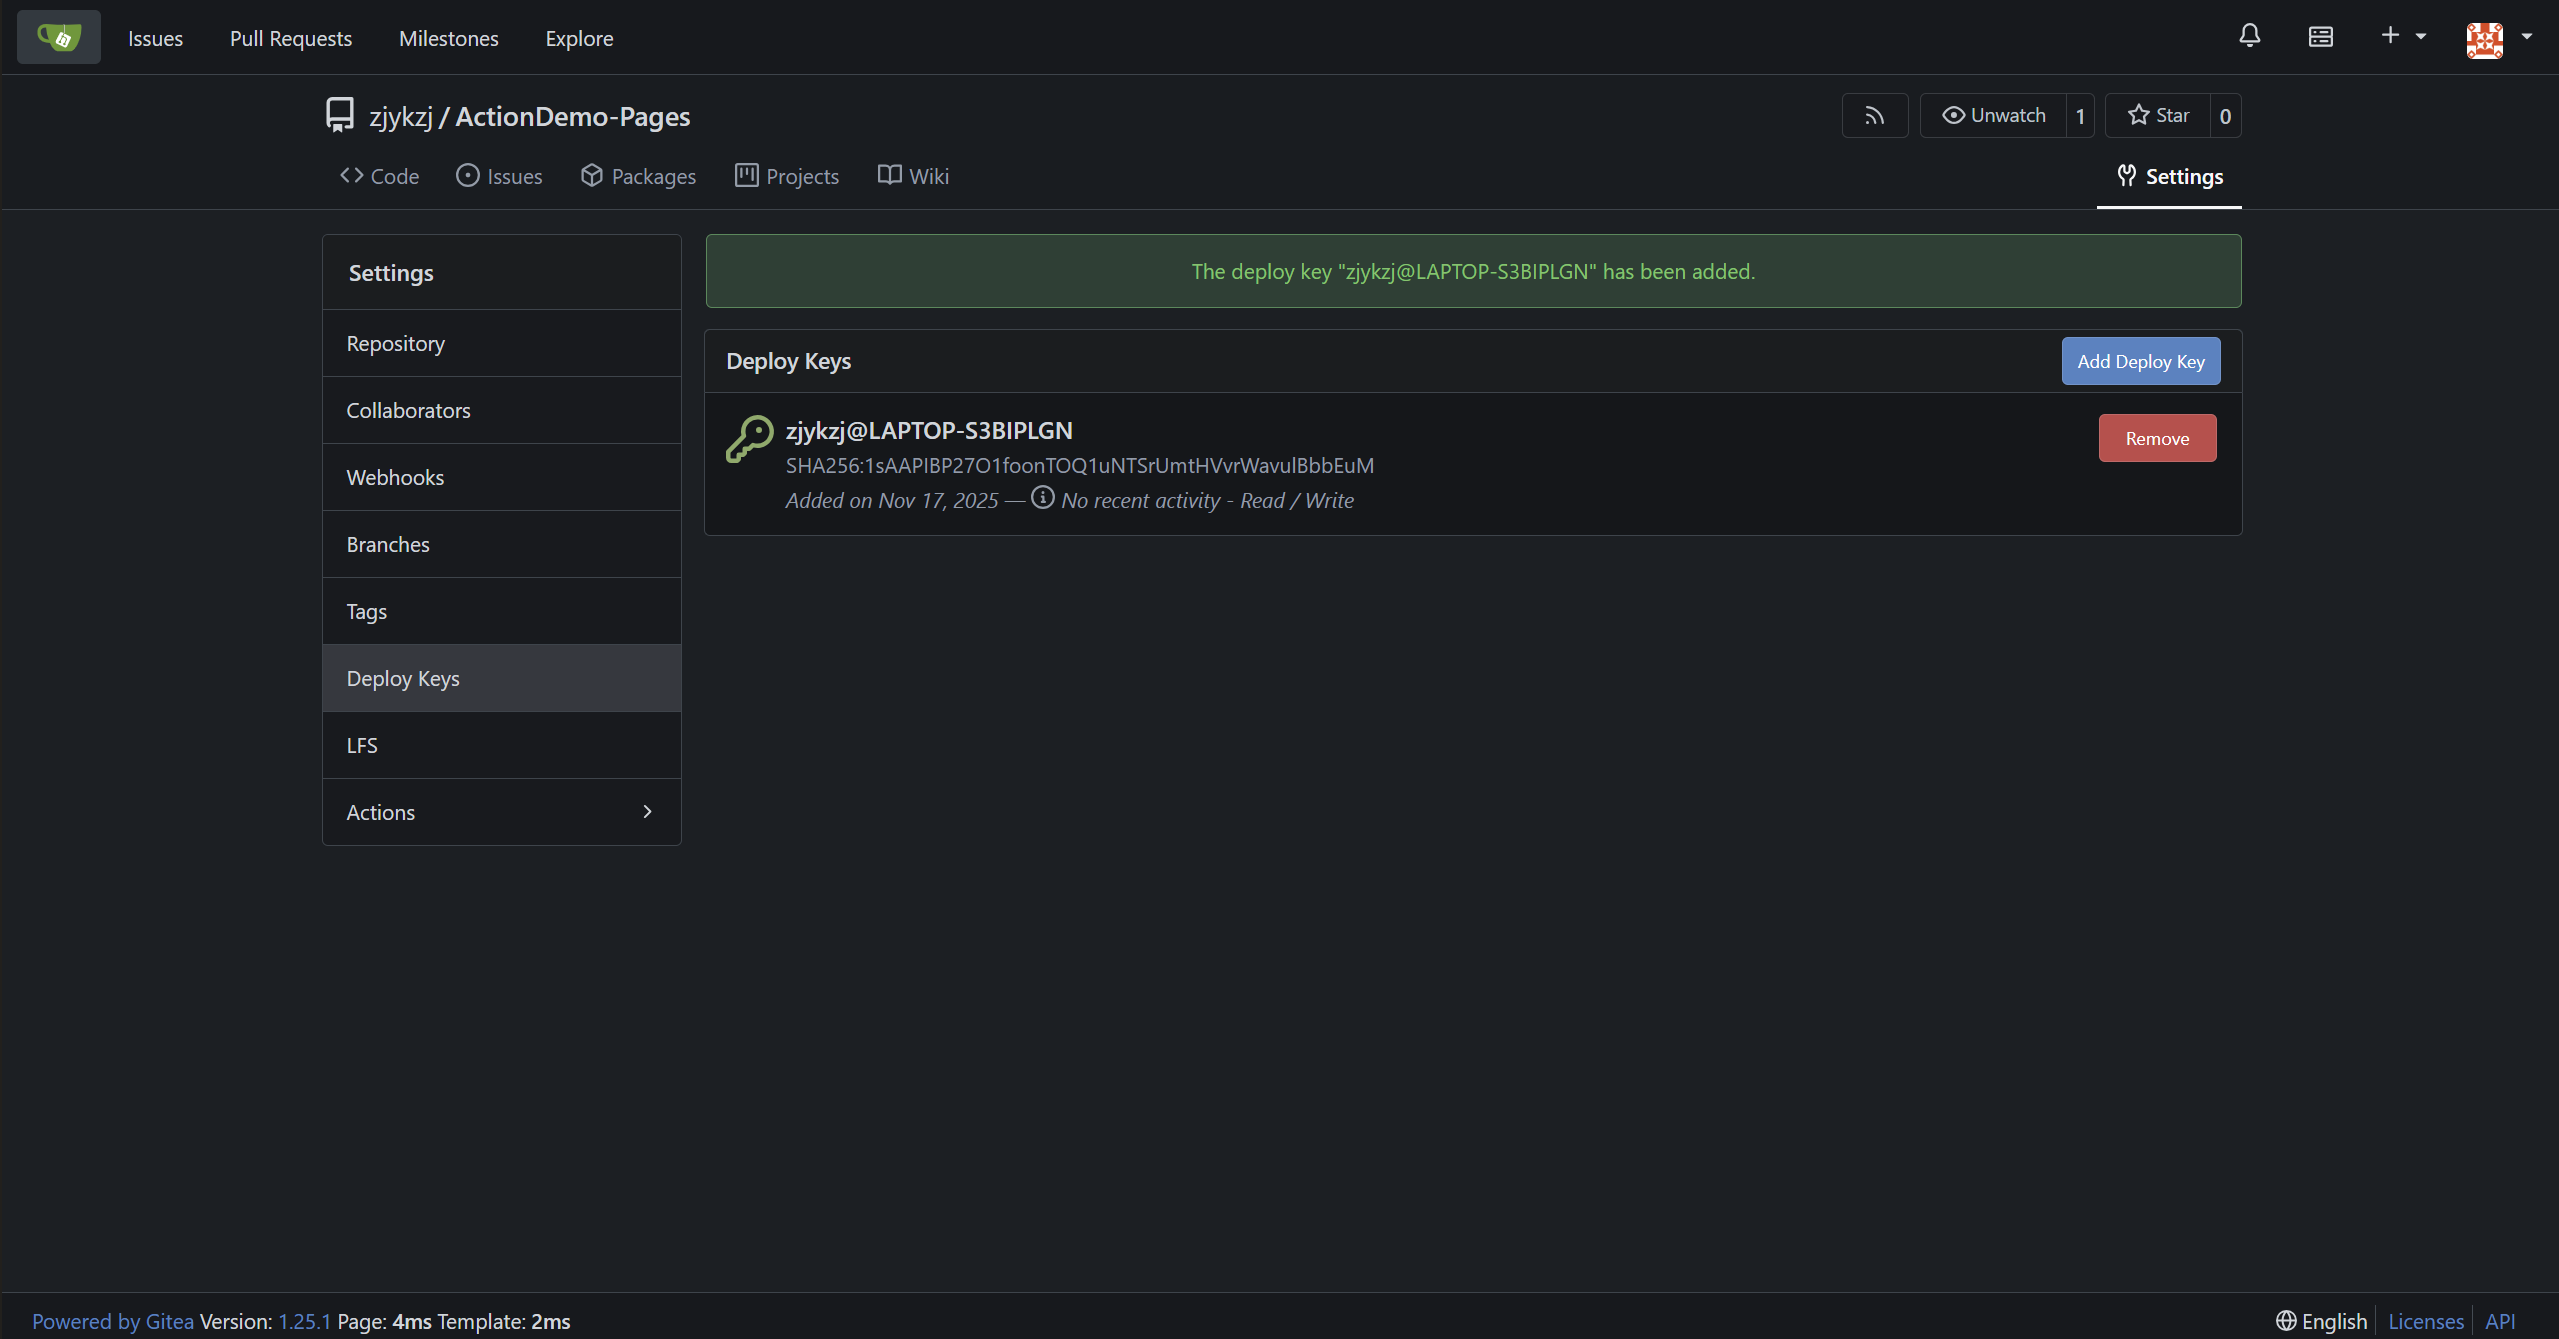
将deploy_key.pub添加到ActionDemo-Pages仓库的Deploy Key(勾选写权限)
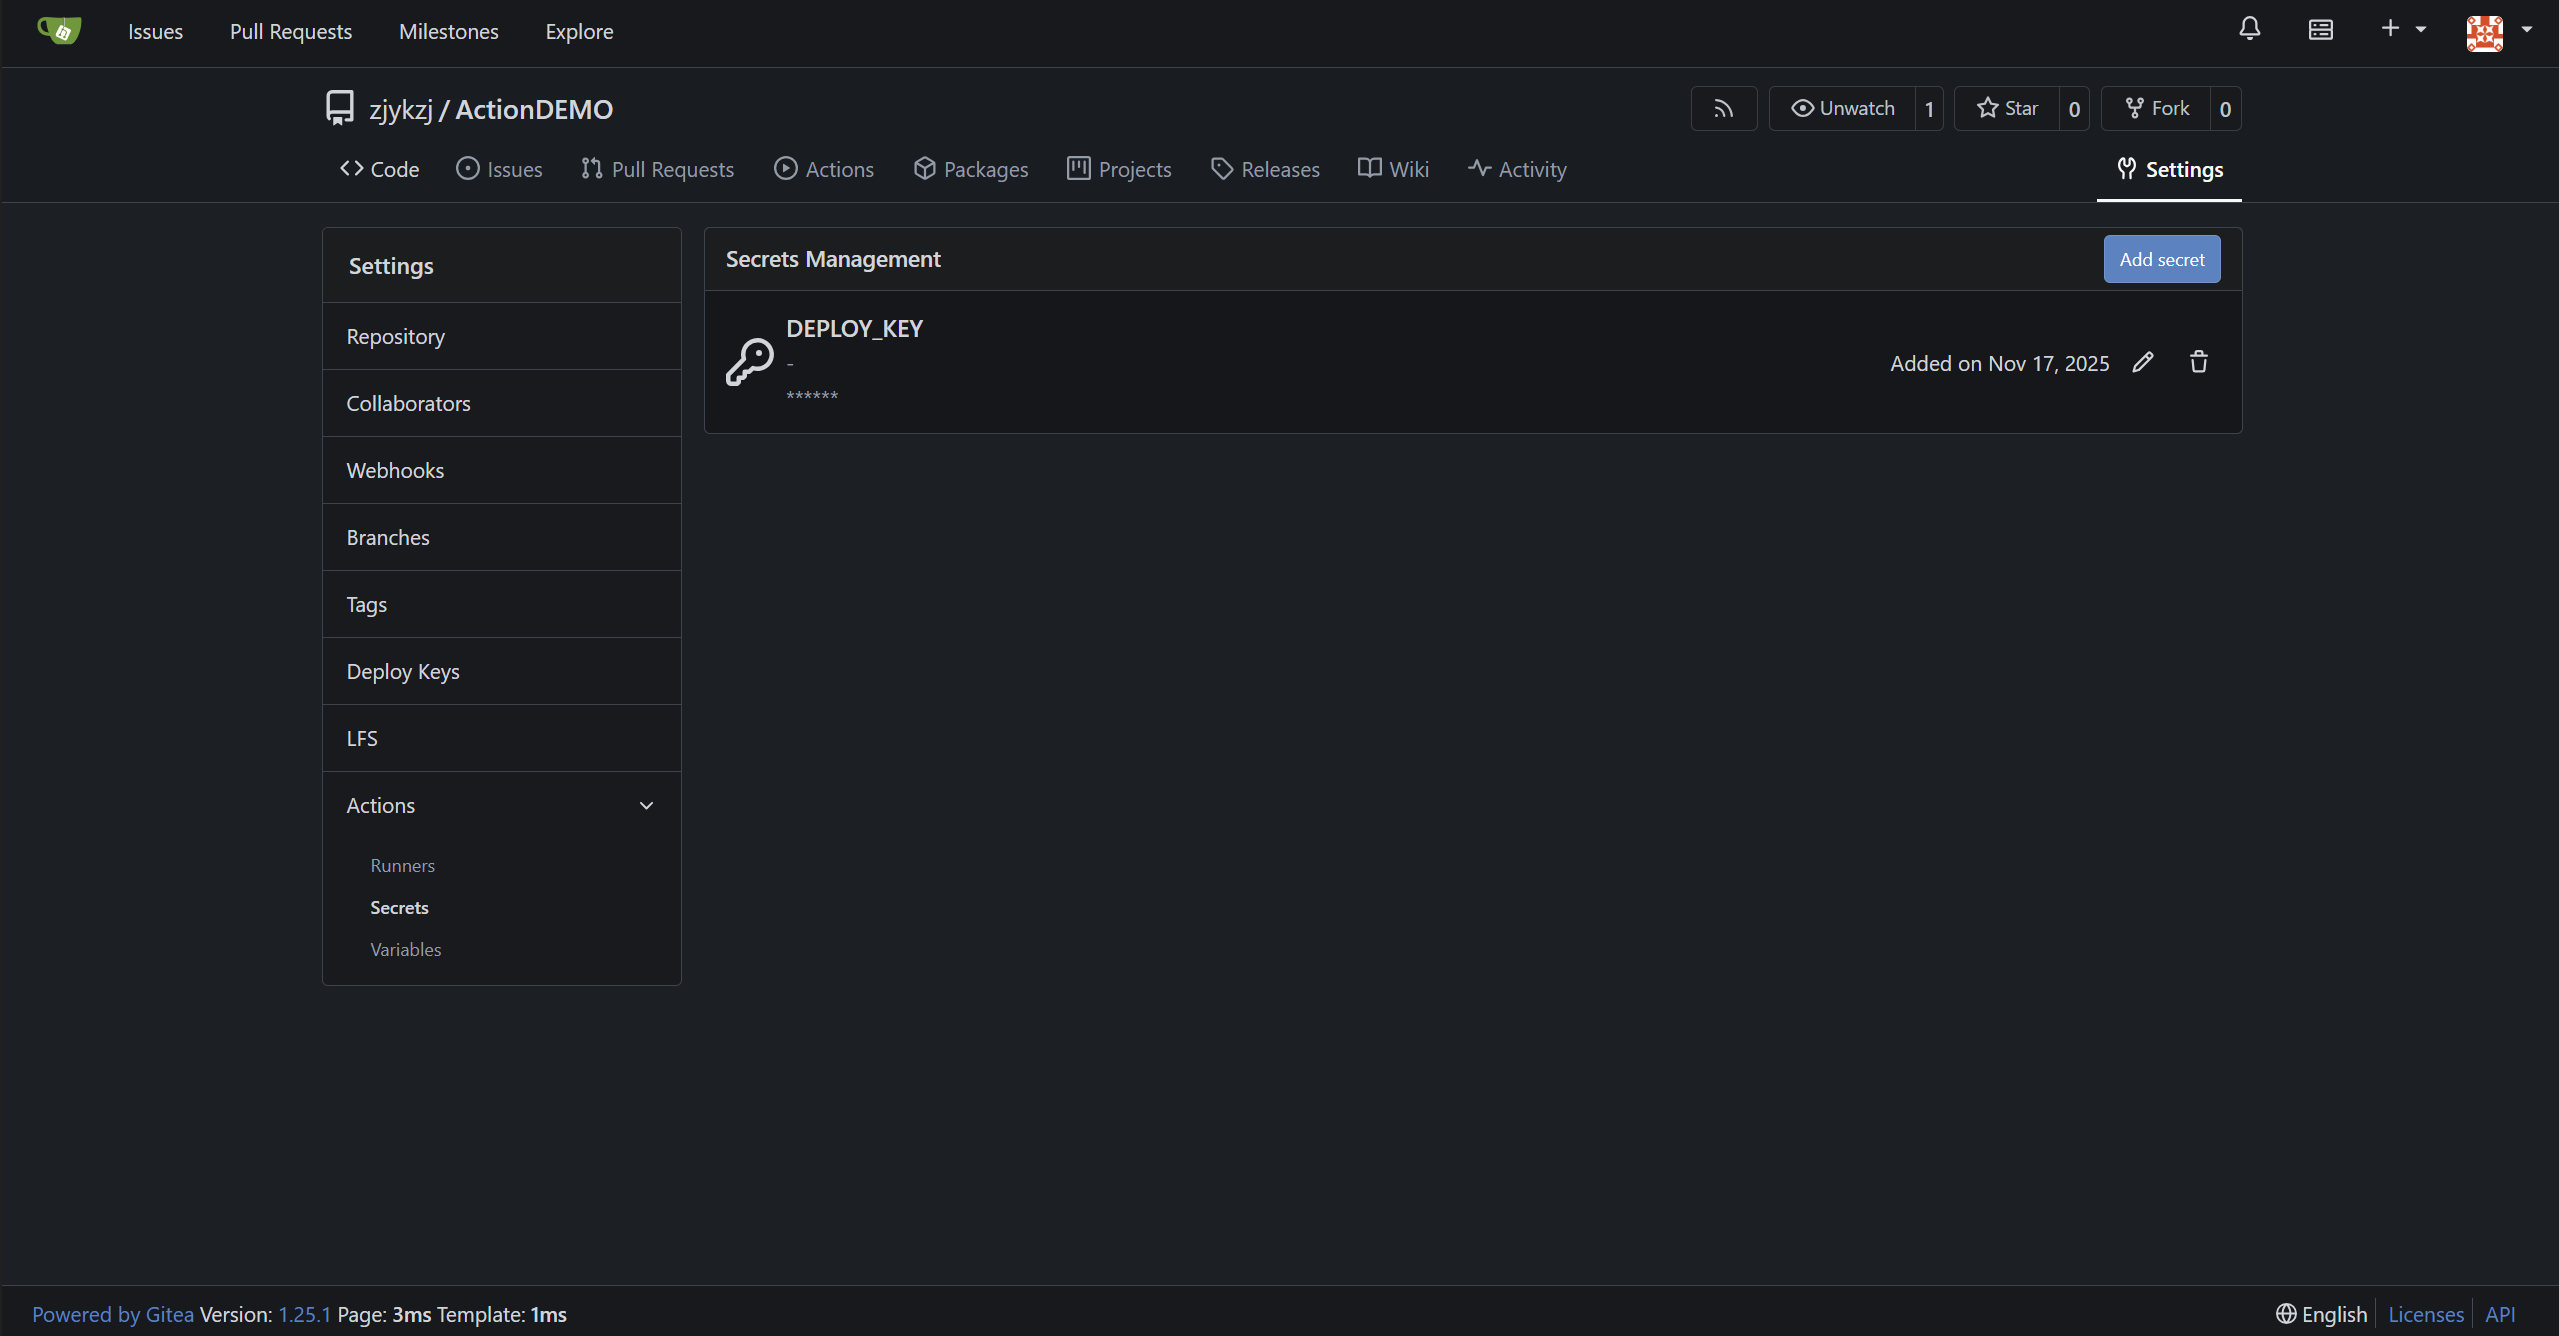
将deploy_key内容粘贴到ActionDemo仓库的Secrets → DEPLOY_KEY
注意:Secrets的名称要跟deploy.yaml保持一致,当前命名为DEPLOY_KEY
文件推送
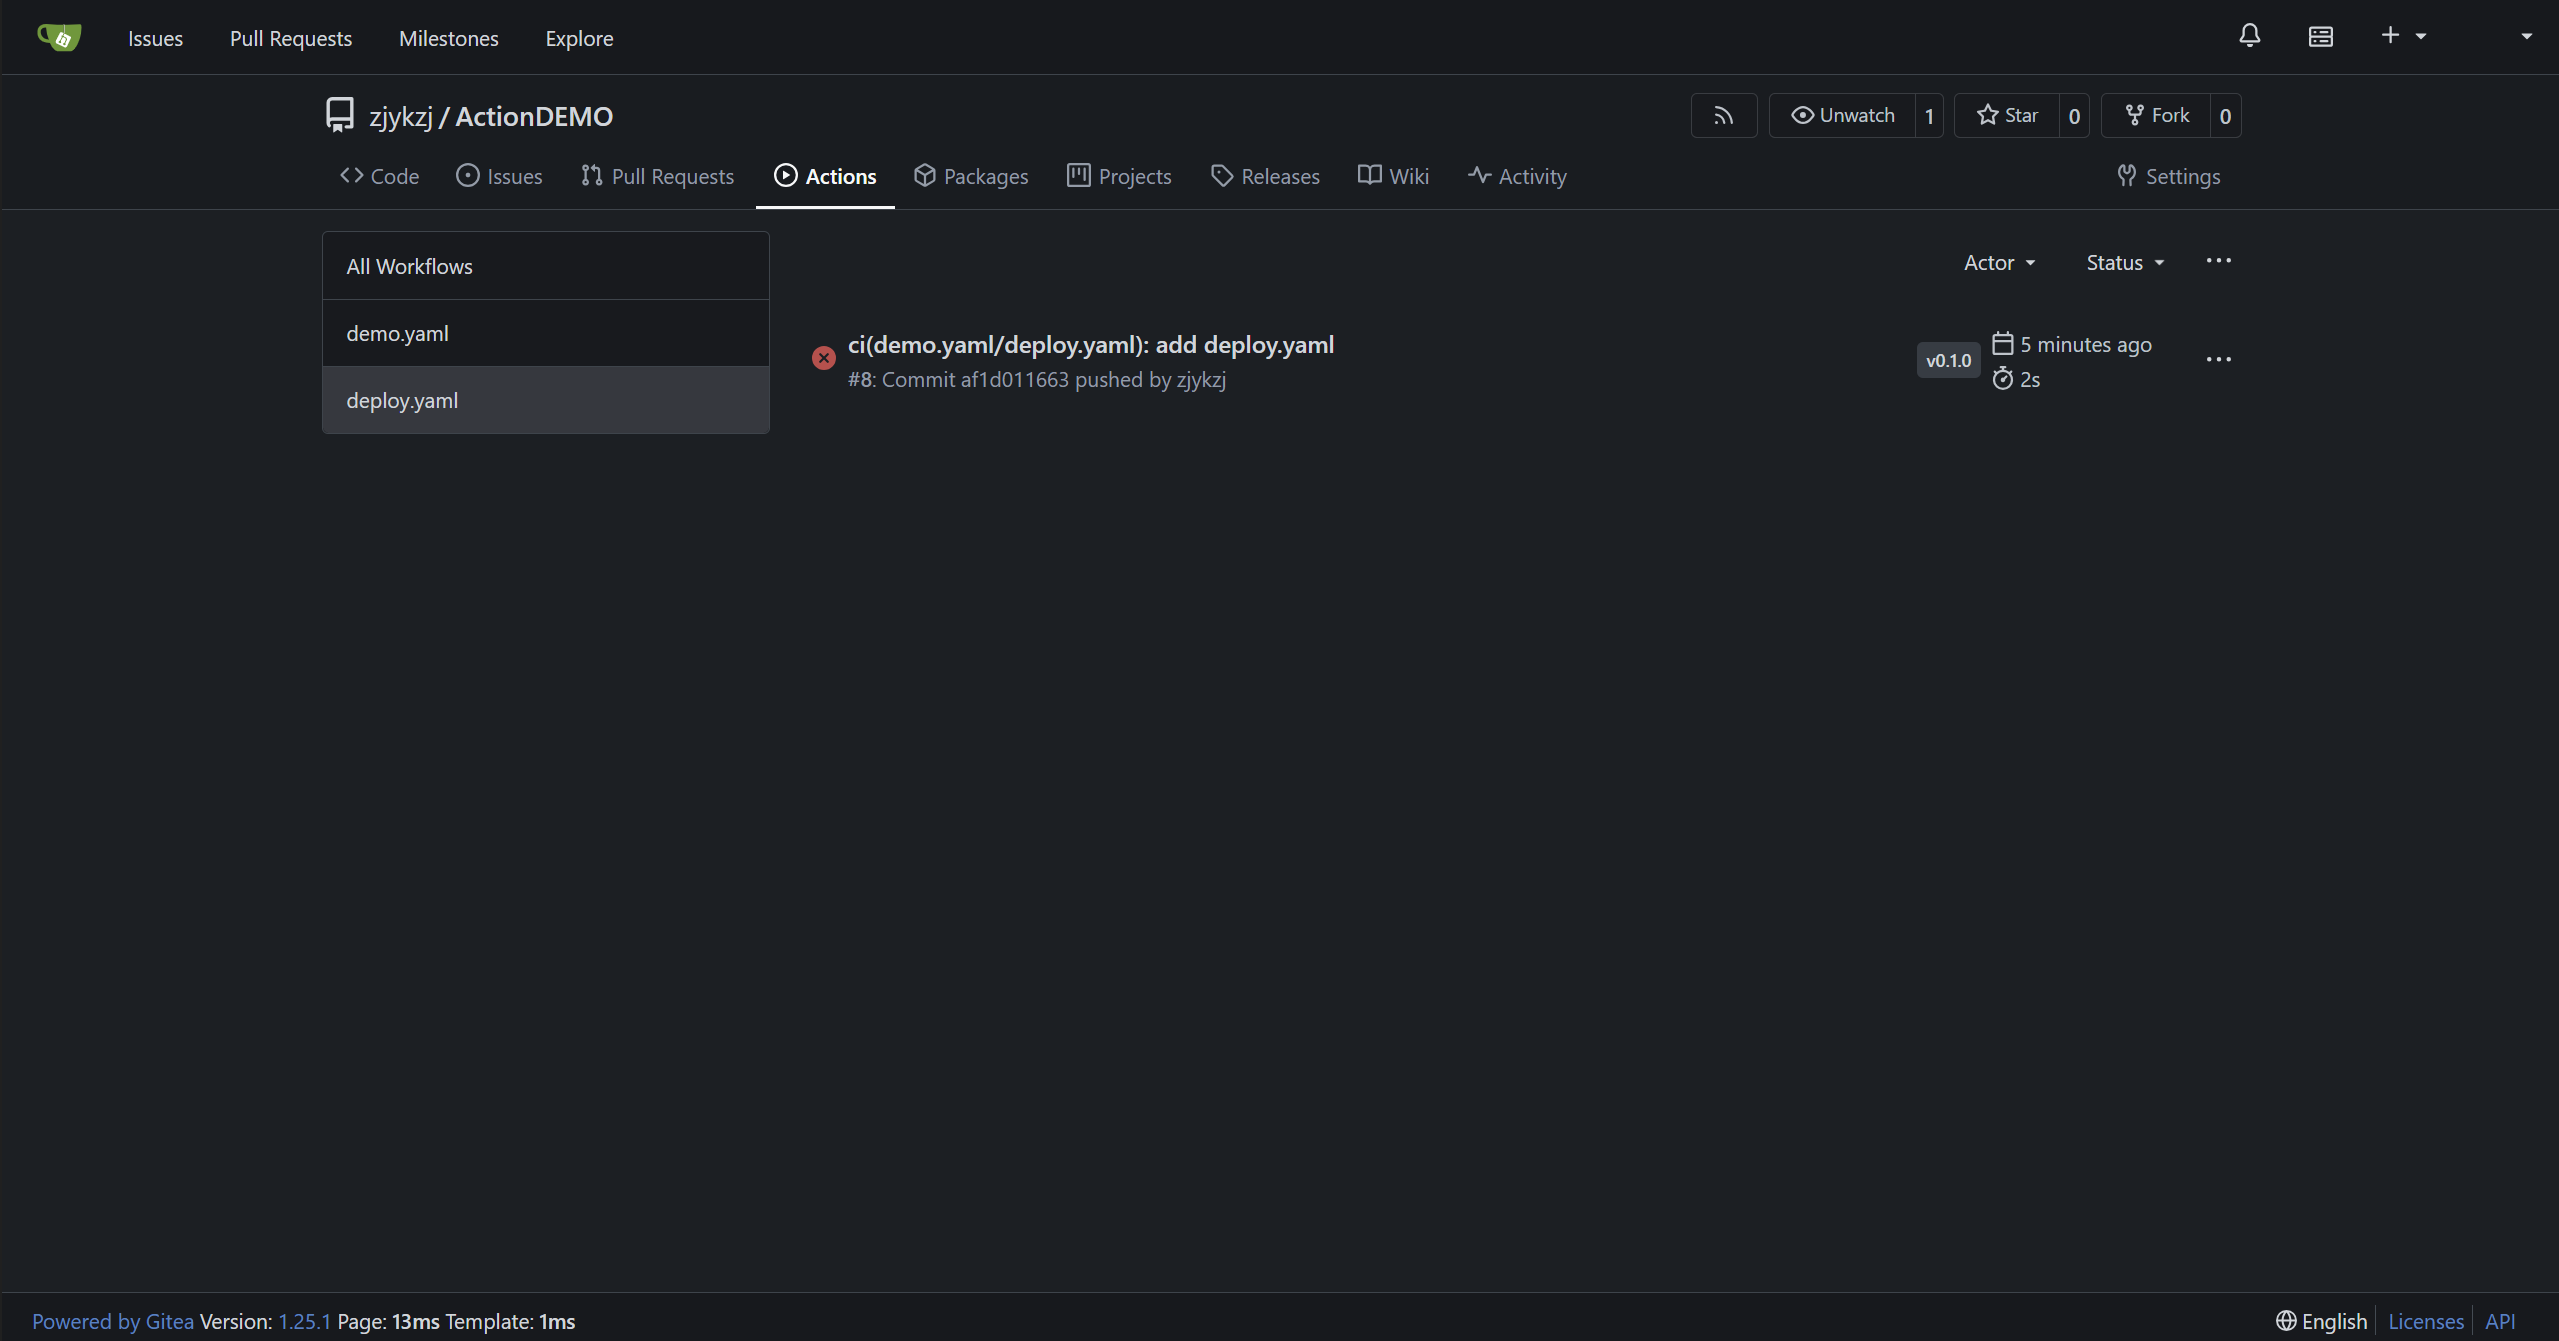
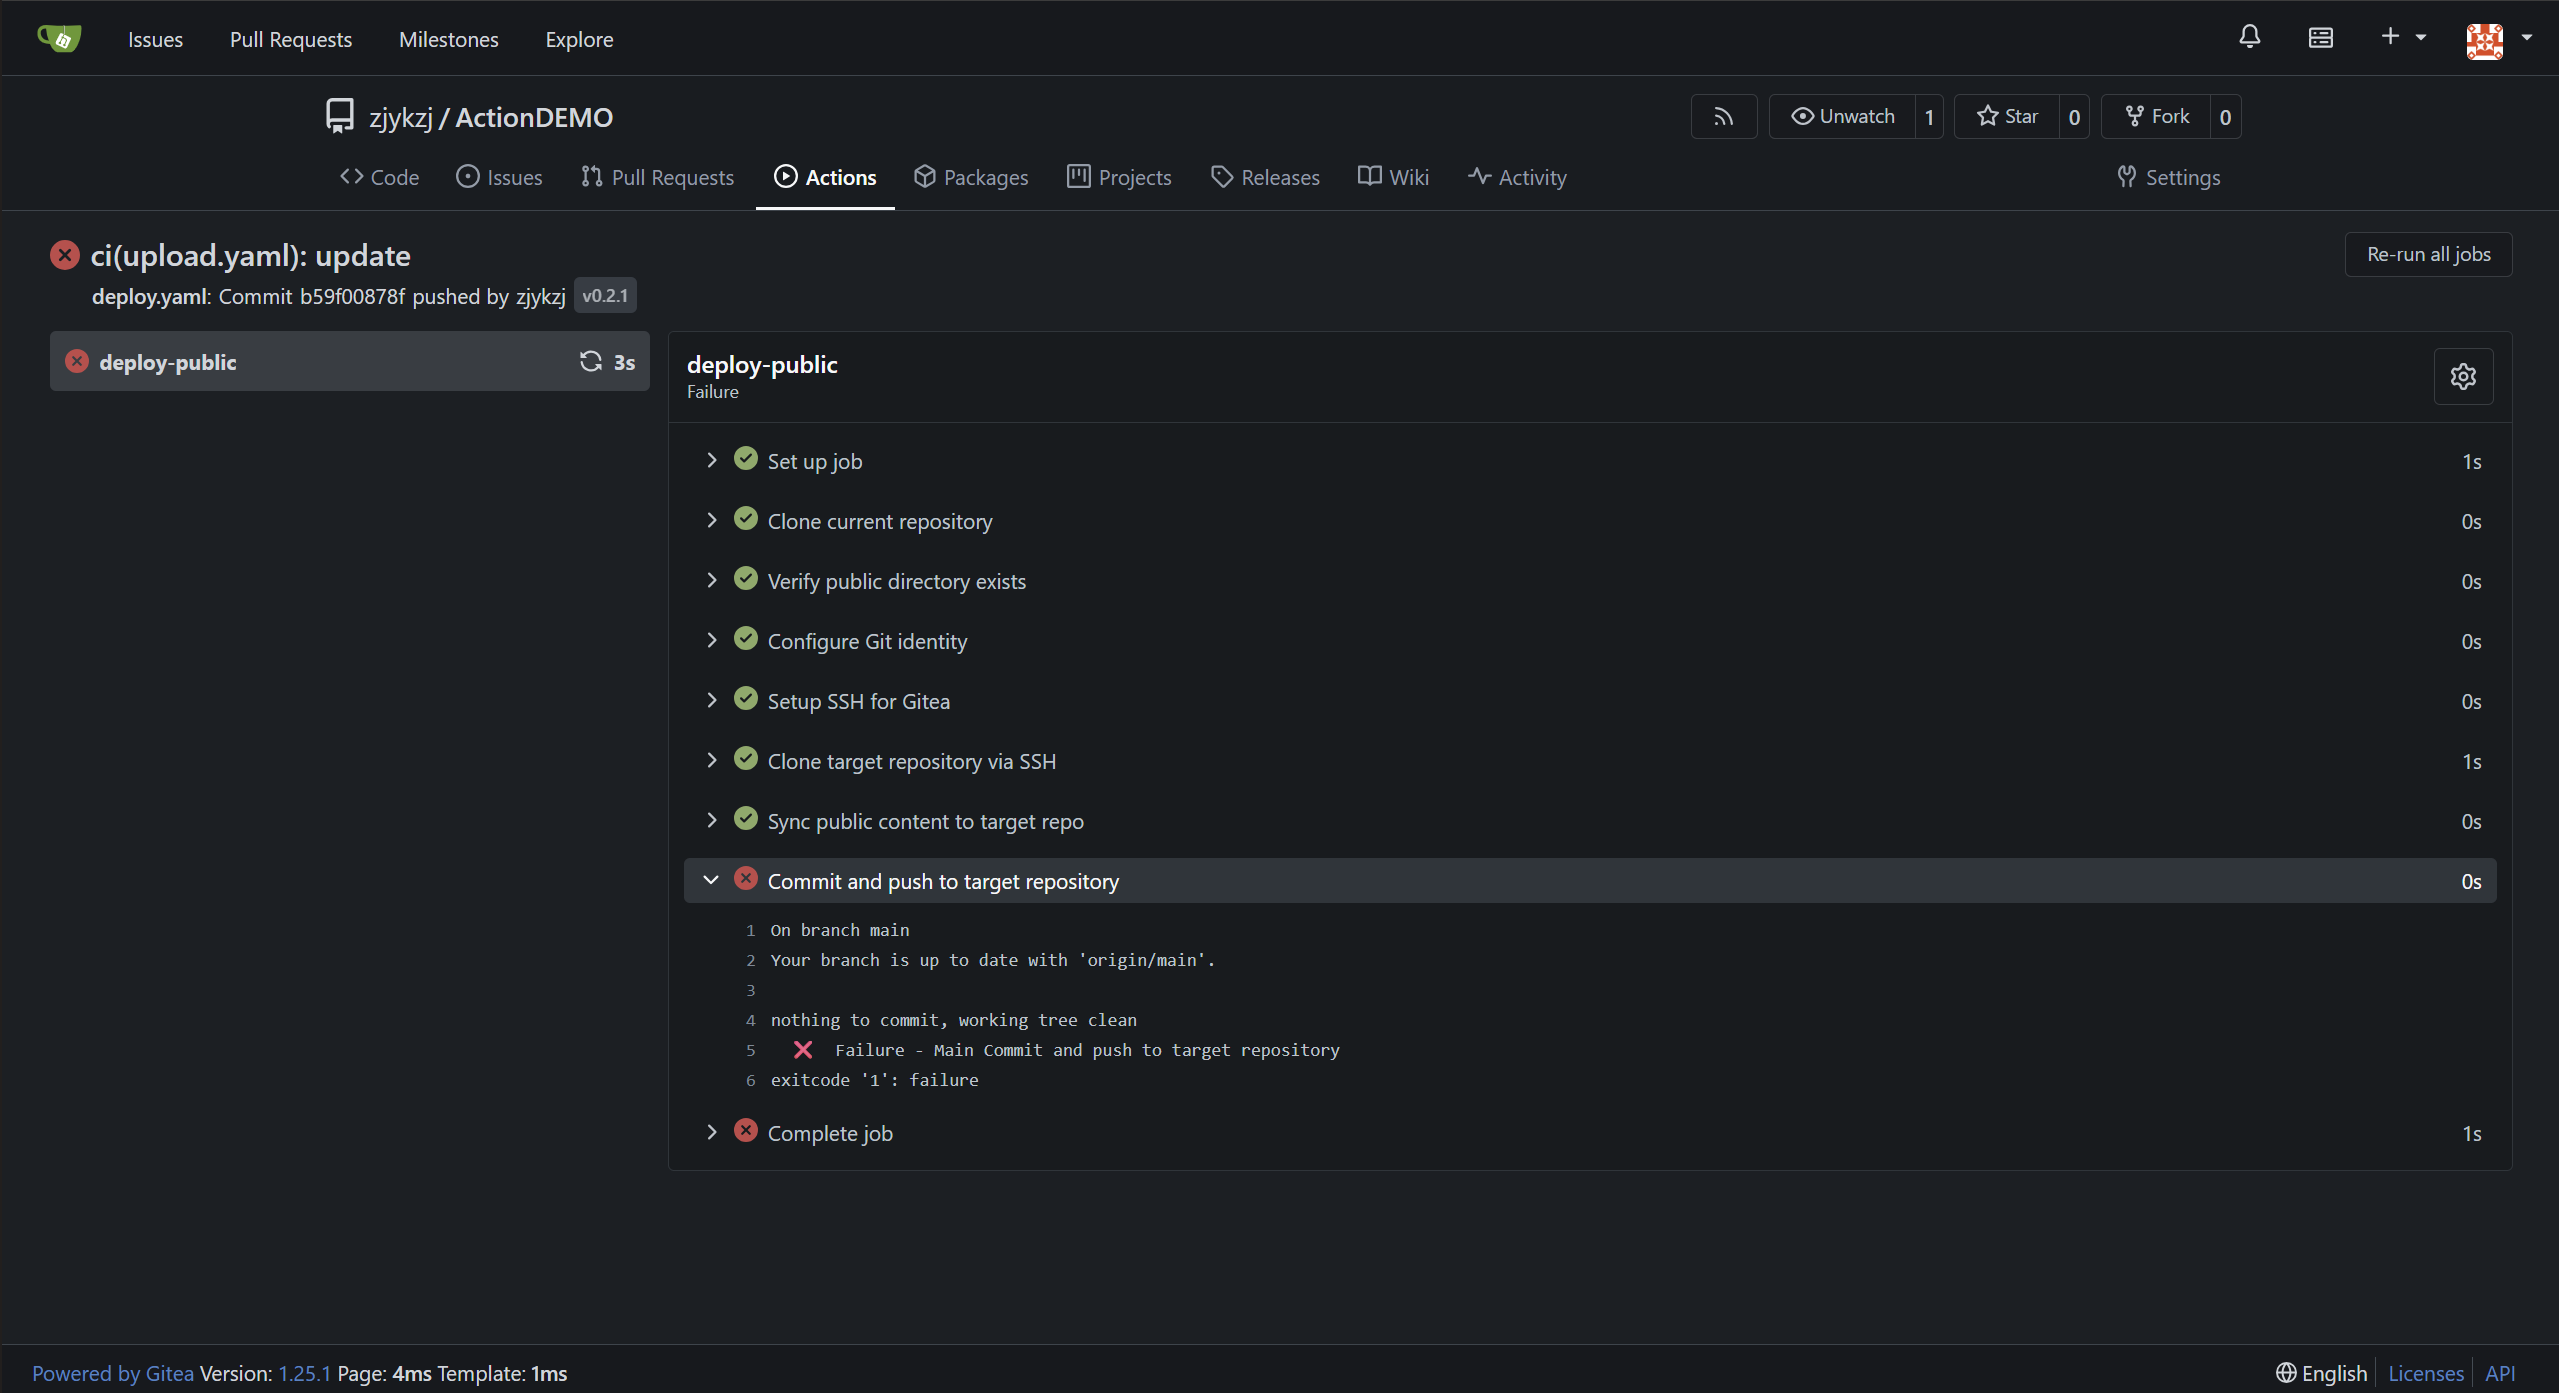
保存修改打tag v0.1.0,上传到Gitea,就能够触发Deploy workflow。此时没有public文件夹,所以报错
新建public文件夹,新建index.html文件
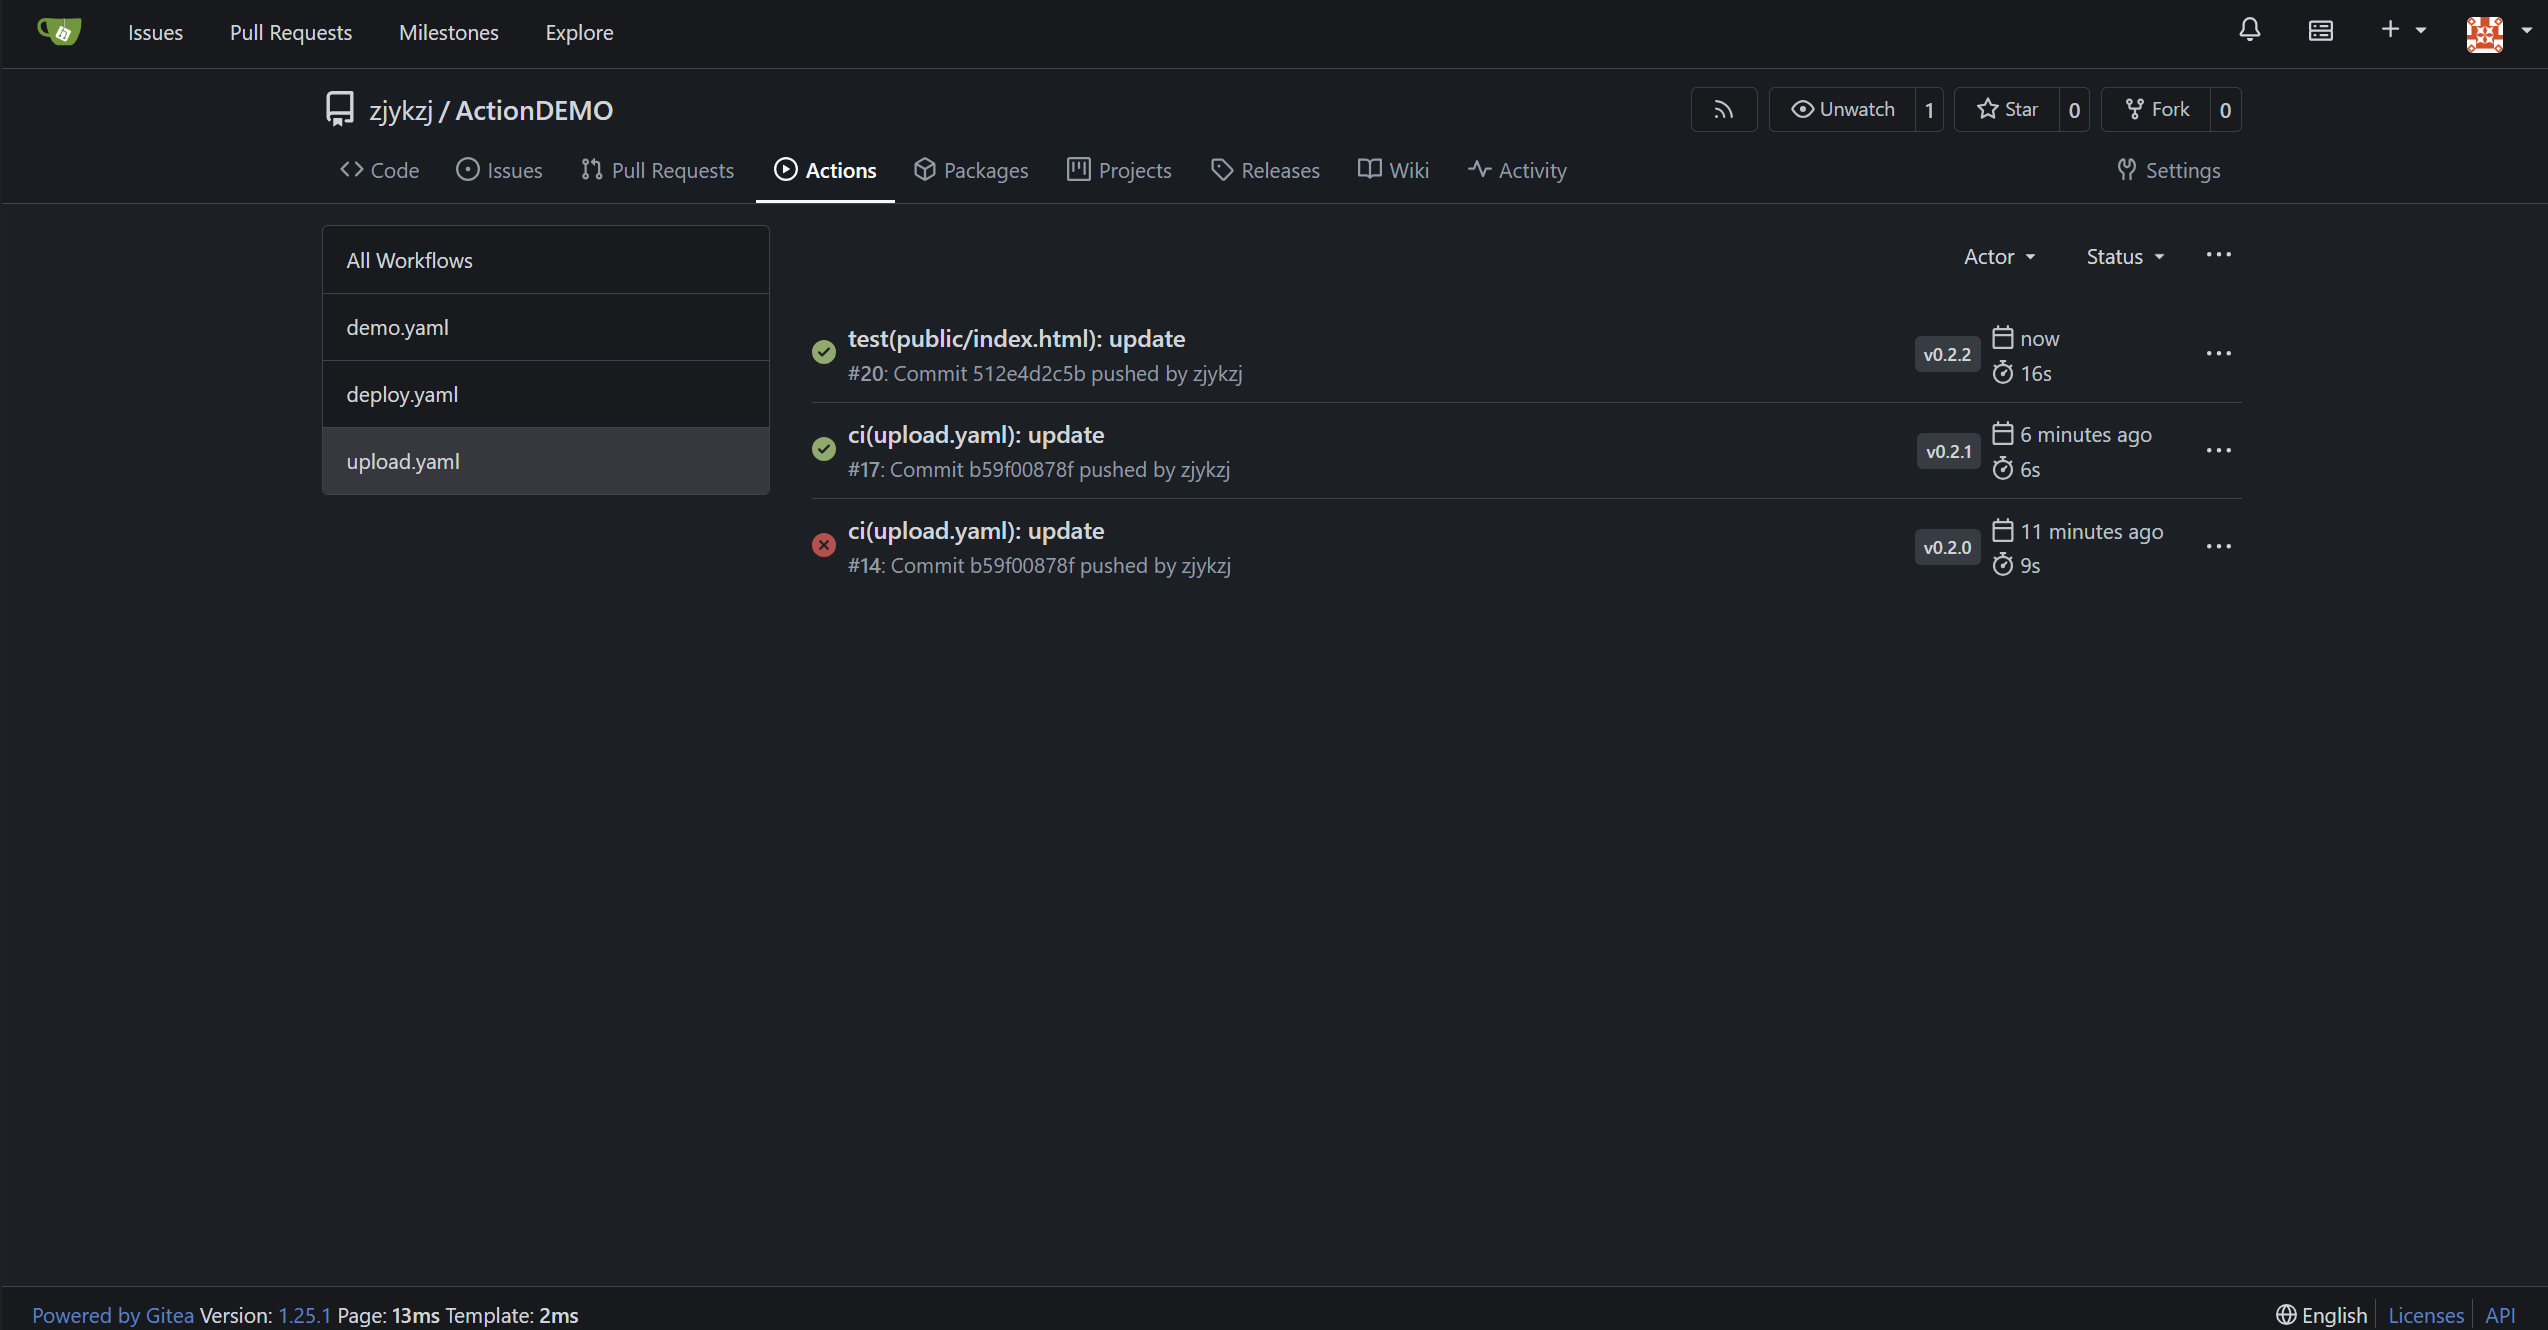
重新打tag v0.1.1,上传到Gitea,此时能够发现文件index.html能够推送到仓库``
如果本次提交的内容不涉及到public文件夹,那么在action中最后一步也会提示报错
推送文件到远程服务器
创建新的workflow,将本仓库public文件夹下面的文件推送到远程服务器,并且使用nginx托管web服务 。完整执行流程
1 2 3 4 5 6 7 8 9 10 11 12 13 14 15 16 17 18 19 20 21 22 23 24 25 26 27 打 tag v* ↓ 触发 workflow ↓ 克隆源仓库(ActionDemo) ↓ 检出对应 commit ↓ 检查 public/ 是否存在 ↓ 配置 SSH 密钥(用于连接远程服务器,私钥来自 secrets) ↓ 生成时间戳作为版本标识 ↓ 打包 public/ 目录为 tar.gz ↓ 通过 scp 上传压缩包到远程服务器(如 /tmp/) ↓ 通过 ssh 在远程服务器执行部署脚本: - 创建新版本目录(/data/workspace/releases/<timestamp > - 解压文件到新版本目录 - 设置文件权限(如 chmod 755) - 原子切换软链接(/data/workspace/blogs → 新版本) - 清理旧版本(保留最近 N 个) - 重启 Nginx 容器(使 volume 重新挂载新目录) ↓ 浏览器通过服务器 IP 即可访问最新内容
upload.yaml
新建.gitea/workflows/upload.yaml文件
1 2 3 4 5 6 7 8 9 10 11 12 13 14 15 16 17 18 19 20 21 22 23 24 25 26 27 28 29 30 31 32 33 34 35 36 37 38 39 40 41 42 43 44 45 46 47 48 49 50 51 52 53 54 55 56 57 58 59 60 61 62 63 64 65 66 67 68 69 70 71 72 73 74 75 76 77 78 79 80 81 82 83 84 85 86 87 88 89 90 91 92 93 94 95 96 97 98 99 100 101 102 103 104 105 106 107 108 109 110 111 112 113 114 115 116 117 118 119 120 121 122 123 124 125 126 127 128 129 130 131 132 133 134 135 name: Upload & Deploy to Hong Kong Server (Docker Nginx)on: push: tags: - 'v* ' jobs: upload-and-deploy: runs-on: ubuntu-latest steps: - name: Clone current repository run: | git clone http:// 172.23 .217.55 :3000 /zjykzj/ActionDemo.git . git checkout ${{ gitea.sha }} - name: Verify public directory exists run: | if [ ! - d "public" ]; then echo "❌ public/ not found!" exit 1 fi - name: Setup SSH key for HK server env: HK_HOST: 47.240 .173.235 HK_SERVER_KEY: ${{ secrets.HK_SERVER_KEY }} run: | mkdir - p ~/.ssh echo "$HK_SERVER_KEY" > ~/.ssh/id_ed25519_hk chmod 600 ~/.ssh/id_ed25519_hk ssh-keyscan - p 22 ${HK_HOST} > > ~/.ssh/known_hosts - name: Generate timestamp id: timestamp run: | echo "TS=$(date -u +%Y%m%d%H%M%S)" > > "$GITHUB_OUTPUT" - name: Package public directory run: | tar - czf site-${{ steps.timestamp.outputs.TS }}.tar.gz - C public . - name: Upload package to HK server env: HK_HOST: 47.240 .173.235 run: | TS = ${{ steps.timestamp.outputs.TS }} scp - i ~/.ssh/id_ed25519_hk - P 22 \ site-${TS}.tar.gz \ root@${HK_HOST}:/ tmp/ site-${TS}.tar.gz - name: Run deployment on HK server env: HK_HOST: 47.240 .173.235 run: | TS = ${{ steps.timestamp.outputs.TS }} BASE_DIR = "/data/workspace" RELEASES_DIR = "${BASE_DIR} /releases" NEW_RELEASE = "${RELEASES_DIR} /${TS} " CURRENT_LINK = "${BASE_DIR} /blogs" ssh - i ~/.ssh/id_ed25519_hk - p 22 root@${HK_HOST} " # 启用严格错误处理:任一命令失败则整个脚本退出 set -e # 创建 releases 目录(若不存在) mkdir -p ${RELEASES_DIR} # 创建新版本目录 mkdir -p ${NEW_RELEASE} # 解压上传的压缩包到新版本目录 tar -xzf /tmp/site-${TS} .tar.gz -C ${NEW_RELEASE} # 设置目录权限为 755,确保 Nginx 容器(通常以 nginx 用户运行)可读 chmod -R 755 ${NEW_RELEASE} # 原子切换软链接: # 1. 先创建临时软链接指向新版本 ln -sfn ${NEW_RELEASE} ${CURRENT_LINK} .new # 2. 用 mv -T 原子替换原软链接(避免中间状态) mv -T ${CURRENT_LINK} .new ${CURRENT_LINK} # 删除临时压缩包 rm -f /tmp/site-${TS} .tar.gz # 自动清理旧版本:进入 releases 目录,按时间倒序列出,删除第6个及之后的(保留最近5个) cd ${RELEASES_DIR} && \ ls -1t | tail -n +6 | xargs -r rm -rf # 重启 Nginx 容器(关键!因为 Docker volume 在启动时解析软链接, # 后续变更对容器不可见,必须重启才能重新挂载新目录) docker restart nginx # 输出成功信息 echo '✅ Deployment complete. Nginx serving new version via volume.' " - name: Report success run: | echo "✅ Deployed version ${{ steps.timestamp.outputs.TS } } to Hong Kong server!"
密钥配置
生成密钥对(不要设置 passphrase,否则自动化会卡住 )
1 2 3 4 5 6 7 8 9 10 11 12 13 14 15 16 17 18 19 20 21 22 23 24 $ ssh-keygen -t ed25519 -f hk-deploy-key -N "" -C "gitea-deploy-key" Generating public/private ed25519 key pair. Your identification has been saved in hk-deploy-key Your public key has been saved in hk-deploy-key.pub The key fingerprint is: SHA256:YJ4CKOWTy+dPYq5zfTzV3VzN1AthRBGYFPwoZdEu3QA gitea-deploy-key The key's randomart image is: +--[ED25519 256]--+ | . oEXB+ . | | + . *.+ o | |o = o o = +oo | |.. + o o . o + o+ | | o o o S .... o. | | o . . . . o | | +... . | | .o.+. + | | .+. .. . | +----[SHA256]-----+ hk-deploy-key hk-deploy-key.pub
将公钥内容配置到远程服务器
1 2 3 4 5 6 7 8 9 10 11 12 13 14 mkdir -p ~/.sshchmod 700 ~/.sshcat hk-deploy-key.pub | ssh root@47.240.173.235 "cat >> ~/.ssh/authorized_keys" nano ~/.ssh/authorized_keys chmod 600 ~/.ssh/authorized_keyschmod 700 ~/.ssh
将私钥内容粘贴到ActionDemo仓库的Secrets → HK_SERVER_KEY
文件上传
打tag v*,上传更新到Gitea,触发Gitea Actions操作
服务器最终目录结构如下:
1
2
3
4
5
6
/ data/ workspace/ ├── releases/ │ ├── 20251118190000 / │ ├── 20251118191500 / │ └── 20251118193022 / ← 最新 └── blogs → / data/ workspace/ releases/ 20251118193022
web服务
使用nginx托管web服务,创建docker-compose.yml如下:
1
2
3
4
5
6
7
8
9
10
11
12
13
14
15
version: "3" services: nginx: container_name: nginx image: nginx ports: - "80:80" - "443:443" volumes: - "/data/workspace/blogs:/opt/www" - "~/nginx/ssl:/etc/nginx/conf" - "~/nginx/logs:/var/log/nginx" - "~/nginx/conf.d:/etc/nginx/conf.d" - "~/nginx/nginx.conf:/etc/nginx/nginx.conf" restart: always
创建配置文件,确保浏览器访问
1 2 3 4 5 6 7 8 9 10 11 12 13 $ mkdir -p ~/nginx/ conf.d $ vim ~/nginx/ conf.d/default.conf server { listen 80 ; server_name _; location / { root /opt/www; index index.html; try_files $uri $uri / =404 ; } }
启动nginx容器
在浏览器输入网址,Perfect !!!