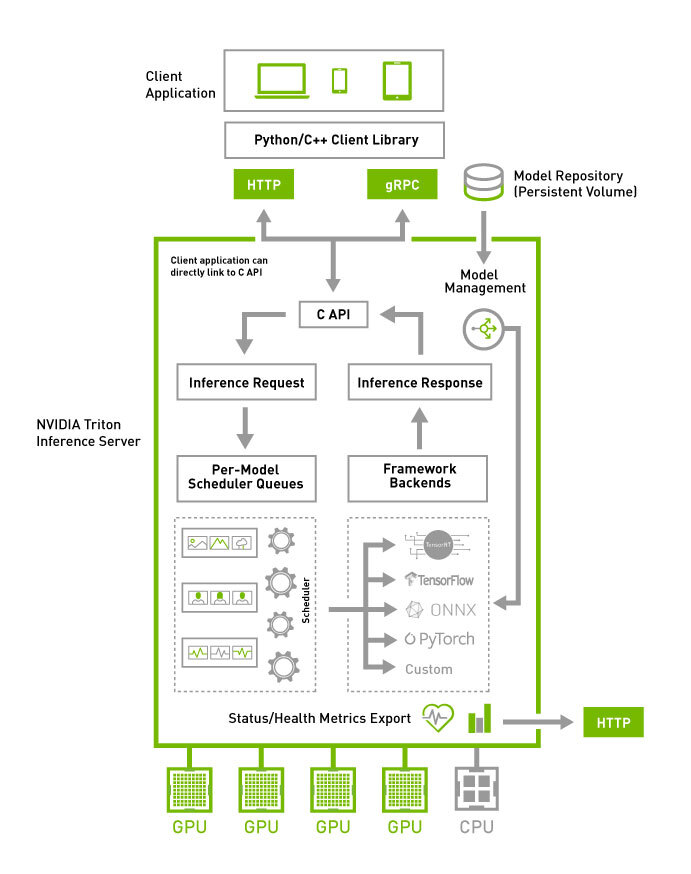
NVIDIA Triton 是一款由 NVIDIA 开发的高性能推理服务软件,不仅能够支持多种主流的推理框架,如 PyTorch、ONNX Runtime 和 TensorRT 等,还具备强大的多GPU负载均衡能力,确保高效利用计算资源。NVIDIA Triton 通过提供统一的接口来管理不同框架下的模型,能够大大提高模型部署的灵活性与效率。
Quick Start
启动和使用NVIDIA Triton主要有3个步骤:
创建模型库
启动Triton Server
发送推理请求
创建模型库
创建文件夹model_repository,里面添加了yolov5s onnx模型,具体文件布局如下:
1
2
3
4
5
├── model_repository │ └── det_yolov5s │ ├── 1 │ │ └── model.onnx │ └── config.pbtxt
配置yolov5s算法需要指定一个配置文件config.pbtxt和对应模型model.onnx(必须命名为model.<suffix>,比如onnx模型是model.onnx,tensorrt模型是model.plan)。配置文件config.pbtxt最小内容如下:
1
2
3
4
5
6
7
8
9
10
11
12
13
14
15
16
17
name: "det_yolov5s" backend: "onnxruntime" max_batch_size: 0 input [ { name: "images" data_type: TYPE_FP32 dims: [1, 3,640,640] } ] output [ { name: "output0" data_type: TYPE_FP32 dims: [1,25200,85] } ]
name:模型的名称,和模型目录名匹配;backend:指定推理后端,推理后端名称可以参考Backends ;max_batch_size:最大批量输入数目,设置为0表示不限制批量大小;input/output:指定模型输入和输出大小,每个输入和输出字段包括节点名称、数据类型和数据维度。
name:节点名称。data_type:数据类型,例如TYPE_FP32表示浮点数。dims:数据维度,例如[1, 3, 640, 640]表示输入图像的维度。
启动Triton Server
官方推荐通过Docker容器部署NVIDIA Triton Server
1
2
3
4
5
# 运行在GPU环境 # 如果不兼容--gpus=all (Docker新语法, 依赖于 nvidia-container-toolkit 和较新版本的 Docker(19.03+),那么修改成--runtime=nvidia (适配旧的nvidia-docker2架构) docker run --gpus=all -it --rm -p 8000:8000 -p 8001:8001 -p 8002:8002 -v $(pwd):/workdir --workdir=/workdir nvcr.io/nvidia/tritonserver:23.10-py3 tritonserver --model-repository=./model_repository/ # 运行在CPU环境 docker run -it --rm -p 8000:8000 -p 8001:8001 -p 8002:8002 -v $(pwd):/workdir --workdir=/workdir nvcr.io/nvidia/tritonserver:23.10-py3 tritonserver --model-repository=./model_repository/
更多的Triton容器版本可以访问NVIDIA GPU Cloud (NGC) ,命名格式为nvcr.io/nvidia/tritonserver:<xx.yy>-py3。Triton Server程序安装在容器内的/opt/tritonserver/bin/tritonserver路径下,可以直接在容器内部启动它。
1
2
tritonserver --model-repository=./model_repository/ tritonserver --model-repository=./model_repository/ --http-port=8080 --grpc-port=8090 --metrics-port=8070 # 指定端口号
通过上述命令启动后,Triton Server 会加载模型库中已配置好的模型。如果希望通过 Triton Client 动态加载模型库中的模型,可以在启动时添加 --model-control-mode=explicit参数。这样,Triton Server 在启动后不会自动加载任何模型,而是需要通过 Triton Client 发送模型加载和卸载请求来管理模型。
1 tritonserver --model-repository=./model_repository/ --http-port=8080 --grpc-port=8090 --metrics-port=8070 --model-control-mode=explicit
发送推理请求 安装Triton Client 1 pip install tritonclient[all] -i https://pypi.tuna.tsinghua.edu.cn/simple
CLIENT DEMO
Triton Client的使用流程跟其他推理后端操作类似:首先是创建客户端实例,然后准备输入数据,构建并发送推理请求至Triton Server,最后处理返回的推理结果。
1
2
3
4
5
6
7
8
9
10
11
12
13
14
15
16
17
18
19
20
21
22
23
24
25
26
27
28
29
30
31
32
33
34
35
36
37
38
39
40
41
42
43
44
45
46
47
48
49
50
51
52
53
54
55
56
57
58
59
60
61
62
63
64
65
66
67
68
69
70
71
72
73
74
75
76
import torchimport cv2import numpy as npfrom tritonclient import grpc as grpcclient from tritonclient.utils import np_to_triton_dtype from py.yolov5.yolov5_util import letterbox, non_max_suppression, scale_boxes, draw_results from py.yolov5.general import CLASSES_NAME def preprocess (im0, img_size=640 , stride=32 , auto=False , device=None , fp16=False ): im = letterbox(im0, img_size, stride=stride, auto=auto)[0 ] im = im.transpose((2 , 0 , 1 ))[::-1 ] im = np.ascontiguousarray(im) im = torch.from_numpy(im).to(device) im = im.half() if fp16 else im.float () im /= 255 if len (im.shape) == 3 : im = im[None ] return im def main (): im0 = cv2.imread("../../assets/bus.jpg" ) im = preprocess(im0, img_size=640 , stride=32 , auto=False ) im = im.cpu().numpy() triton_client = grpcclient.InferenceServerClient("localhost:8001" ) res = triton_client.is_server_live() res = triton_client.is_server_ready() if not triton_client.is_model_ready(model_name="det_yolov5s" ): triton_client.load_model(model_name="det_yolov5s" ) metadata = triton_client.get_model_metadata(model_name="det_yolov5s" ) print (f"metadata:\n{metadata} " ) model_config = triton_client.get_model_config(model_name='det_yolov5s' ) print (f"model_config:\n{model_config} " ) inputs = [grpcclient.InferInput("images" , im.shape, np_to_triton_dtype(np.float32))] inputs[0 ].set_data_from_numpy(im.astype(np.float32)) outputs = [grpcclient.InferRequestedOutput("output0" )] response = triton_client.infer(model_name="det_yolov5s" , inputs=inputs, outputs=outputs) preds = [response.as_numpy("output0" )] pred = non_max_suppression(preds, conf_thres=0.25 , iou_thres=0.45 , max_det=300 )[0 ] print (pred) boxes = scale_boxes(im.shape[2 :], pred[:, :4 ], im0.shape[:2 ]) confs = pred[:, 4 :5 ] cls_ids = pred[:, 5 :6 ] print (f"There are {len (boxes)} objects." ) print (boxes) overlay = draw_results(im0, boxes, confs, cls_ids, CLASSES_NAME, is_xyxy=True ) cv2.imshow("overlay" , overlay) cv2.waitKey(0 ) if __name__ == '__main__' : main()
GRPC vs. HTTP
配置文件
通过接口get_model_config 可以获取到triton处理模型配置文件的全部信息,以yolov5s为例,在Docker CPU环境下启动的配置信息如下:
1
2
3
4
5
6
7
8
9
10
11
12
13
14
15
16
17
18
19
20
21
22
23
24
25
26
27
28
29
30
31
32
33
34
35
36
37
38
39
config { name: "det_yolov5s" platform: "onnxruntime_onnx" version_policy { latest { num_versions: 1 } } input { name: "images" data_type: TYPE_FP32 dims: 1 dims: 3 dims: 640 dims: 640 } output { name: "output0" data_type: TYPE_FP32 dims: 1 dims: 25200 dims: 85 } instance_group { name: "det_yolov5s" count: 2 kind: KIND_CPU } default_model_filename: "model.onnx" optimization { input_pinned_memory { enable: true } output_pinned_memory { enable: true } } backend: "onnxruntime" }
基本信息
name: 模型的名称为 “det_yolov5s”。这通常是指模型的唯一标识符。
platform: 使用的平台是 “onnxruntime_onnx”,这意味着该模型是以 ONNX 格式存储,并使用 ONNX Runtime 进行推理。
版本策略
version_policy: 定义了模型版本的管理策略。在这个例子中,latest 表示只保留最新的一个版本(num_versions: 1)。
输入配置
input: 定义了模型的输入。
name: 输入张量的名称为 “images”。
data_type: 数据类型为 TYPE_FP32,即单精度浮点数。
dims: 输入张量的维度为 [1, 3, 640, 640]。这里 1 表示批处理大小,3 表示图像的通道数(RGB),640x640 是图像的尺寸。
输出配置
output: 定义了模型的输出。
name: 输出张量的名称为 “output0”。
data_type: 数据类型为 TYPE_FP32。
dims: 输出张量的维度为 [1, 25200, 85]。1 同样表示批处理大小,25200 可能是预测框的数量,85 包括了每个预测框的坐标、类别概率等信息。
实例组配置
instance_group: 定义了模型实例的配置。
name: 实例组的名称为 “det_yolov5s”。
count: 实例的数量为 2,这意味着 Triton 将会启动两个相同的模型实例来处理请求。
kind: 实例运行在 CPU 上 (KIND_CPU)。
默认模型文件名
default_model_filename: 模型文件的默认名称为 “model.onnx”。
优化选项
optimization: 定义了一些优化选项以提高推理性能。
input_pinned_memory: 启用了输入数据的固定内存 (enable: true),这样可以加快从主机内存到 GPU 内存的数据传输速度。
output_pinned_memory: 同样启用了输出数据的固定内存 (enable: true)。
后端配置
backend: 指定了使用的后端为 “onnxruntime”,即 ONNX Runtime。
运行在Docker GPU环境下,Triton读取的模型配置信息如下:
1
2
3
4
5
6
7
8
9
10
11
12
13
14
15
16
17
18
19
20
21
22
23
24
25
26
27
28
29
30
31
32
33
34
35
36
37
38
39
40
41
42
43
44
45
46
47
config { name: "det_yolov5s" platform: "onnxruntime_onnx" backend: "onnxruntime" version_policy { latest { num_versions: 1 } } input { name: "images" data_type: TYPE_FP32 dims: 1 dims: 3 dims: 640 dims: 640 } output { name: "output0" data_type: TYPE_FP32 dims: 1 dims: 25200 dims: 85 } optimization { input_pinned_memory { enable: true } output_pinned_memory { enable: true } } instance_group { name: "det_yolov5s" kind: KIND_GPU count: 1 gpus: 0 gpus: 1 gpus: 2 gpus: 3 gpus: 4 gpus: 5 gpus: 6 gpus: 7 } default_model_filename: "model.onnx" }
数据类型
TensorRT配置
将ONNX模型转换成TensorRT模型,命名为model.plan,存放于文件夹1中。配置文件config.pbtxt内容如下:
1
2
3
4
5
6
7
8
9
10
11
12
13
14
15
16
17
18
name: "det_yolov5s" platform: "tensorrt_plan" max_batch_size: 0 input [ { name: "images" data_type: TYPE_FP16 dims: [1, 3,640,640] } ] output [ { name: "output0" data_type: TYPE_FP16 dims: [1,25200,85] } ] version_policy: { latest: { num_versions: 1}}
注:配置文件中的后端配置选项是platform而不是backend
CPU/GPU设置
使用instance_group可以配置模型在 CPU 或 GPU 环境下的实例数目。以下面的配置为例:
1
2
3
4
5
6
7
8
9
10
11
12
instance_group [ { count: 1 kind: KIND_GPU gpus: [ 0 ] }, { count: 2 kind: KIND_GPU gpus: [ 1, 2 ] } ]
各个参数解析如下:
count:指定该实例组中的实例数量。kind:指定实例组的类型,可以是 KIND_CPU 或 KIND_GPU。gpus:指定实例组使用的 GPU 编号列表。如果 kind 为 KIND_CPU,则不需要指定 gpus。
所以上面的实例组配置中,实现如下功能:
第一个实例组:
count: 1:创建 1 个实例。kind: KIND_GPU:这些实例运行在 GPU 上。gpus: [ 0 ]:这些实例使用 GPU 0。
第二个实例组:
count: 2:创建 2 个实例。kind: KIND_GPU:这些实例运行在 GPU 上。gpus: [ 1, 2 ]:这些实例分别使用 GPU 1 和 GPU 2。
如果希望在CPU上运行模型,可以配置如下内容:
1
2
3
4
5
6
instance_group [ { count: 3 kind: KIND_CPU } ]
这样模型会在CPU上运行3个实例。
版本策略
在模型仓库中,每个模型指定一个文件夹,该文件夹内除了一个配置文件外,还可以保存多个版本的模型文件,用子文件名表示版本号。格式如下:
注意:版本号用正整数表示,数字越大表示版本越高。
1
2
3
4
5
6
7
8
9
. └── det_yolov5s ├── 1(最小版本号) │ └── model.onnx ├── 2 │ └── model.onnx ├── 20241119(最高版本号) │ └── model.onnx └── config.phtxt
NVIDIA Triton在配置文件中使用version_policy控制模型加载版本,同一个模型可以加载多个版本,
方式一:version_policy: { all: {}},表示加载该模型的所有版本;
方式二:version_policy: { latest: { num_versions: 2}},表示加载版本最高的前2个模型;
方式三:version_policy: { specific: { versions: [1,3]}},表示加载指定版本的模型。
默认情况下,版本策略设置为version_policy: { latest: { num_versions: 1}},即加载版本最高的模型。
Server连接 在使用Triton Inference Server的过程中,推荐的做法是按需创建客户端连接实例 ,而不是维护一个长期存在的单例连接。这是因为长时间运行的连接可能会因网络波动、服务端重启等原因导致连接中断,且这类问题往往难以及时察觉,从而影响推理请求的稳定性。
1
2
3
4
5
6
7
8
9
10
11
12
13
14
15
16
17
18
19
20
21
22
23
24
25
26
27
28
29
30
31
32
33
34
35
36
37
38
39
40
41
42
43
44
import grpc from tritonclient.utils import InferenceServerException import tritonclient.http as http_client import tritonclient.grpc as grpc_client def create_triton_client( server_url: str = "localhost:8001", protocol: str = "grpc" ): """ 按需创建 Triton 客户端实例并验证服务器状态。 参数: server_url (str): Triton Server 地址。 protocol (str): 协议类型,"http" 或 "grpc"。 返回: client: 初始化完成的 Triton 客户端实例。 抛出: ConnectionError: 如果连接失败或服务器未就绪。 """ try: if protocol.lower() == "http": client = http_client.InferenceServerClient(url=server_url) elif protocol.lower() == "grpc": client = grpc_client.InferenceServerClient(url=server_url) else: raise ValueError(f"Unsupported protocol: {protocol}. Use 'http' or 'grpc'.") # 验证服务器是否存活和就绪 if not client.is_server_live(): raise ConnectionError(f"Triton server at {server_url} is not live.") if not client.is_server_ready(): raise ConnectionError(f"Triton server at {server_url} is not ready.") print(f"✅ Successfully connected to Triton Server at {server_url} using {protocol.upper()}") return client except (InferenceServerException, grpc.RpcError) as e: error_msg = f"❌ Failed to connect to Triton server at {server_url}: {str(e)}" print(error_msg) raise ConnectionError(error_msg)
使用的时候:
1
2
3
4
with create_triton_client(protocol="grpc") as client: # 执行推理任务 result = client.infer(model_name="your_model", inputs=[...]) print(result)
版本依赖 NVIDIA官方提供了Triton Inference Server镜像:nvidia/containers/tritonserver ,根据命名不同内置了不同的环境:
xx.yy-py3:包含支持PyTorch、TensorRT、ONNX和OpenVINO模型的Triton推理服务器;xx.yy-py3-sdk:包含Python和C++客户端库、客户端示例、GenAI Perf、性能分析器和模型分析器;
其他的还有xx.yy-py3-min、xx.yy-pyt-python-py3、xx.yy-vllm-python-py3等等。
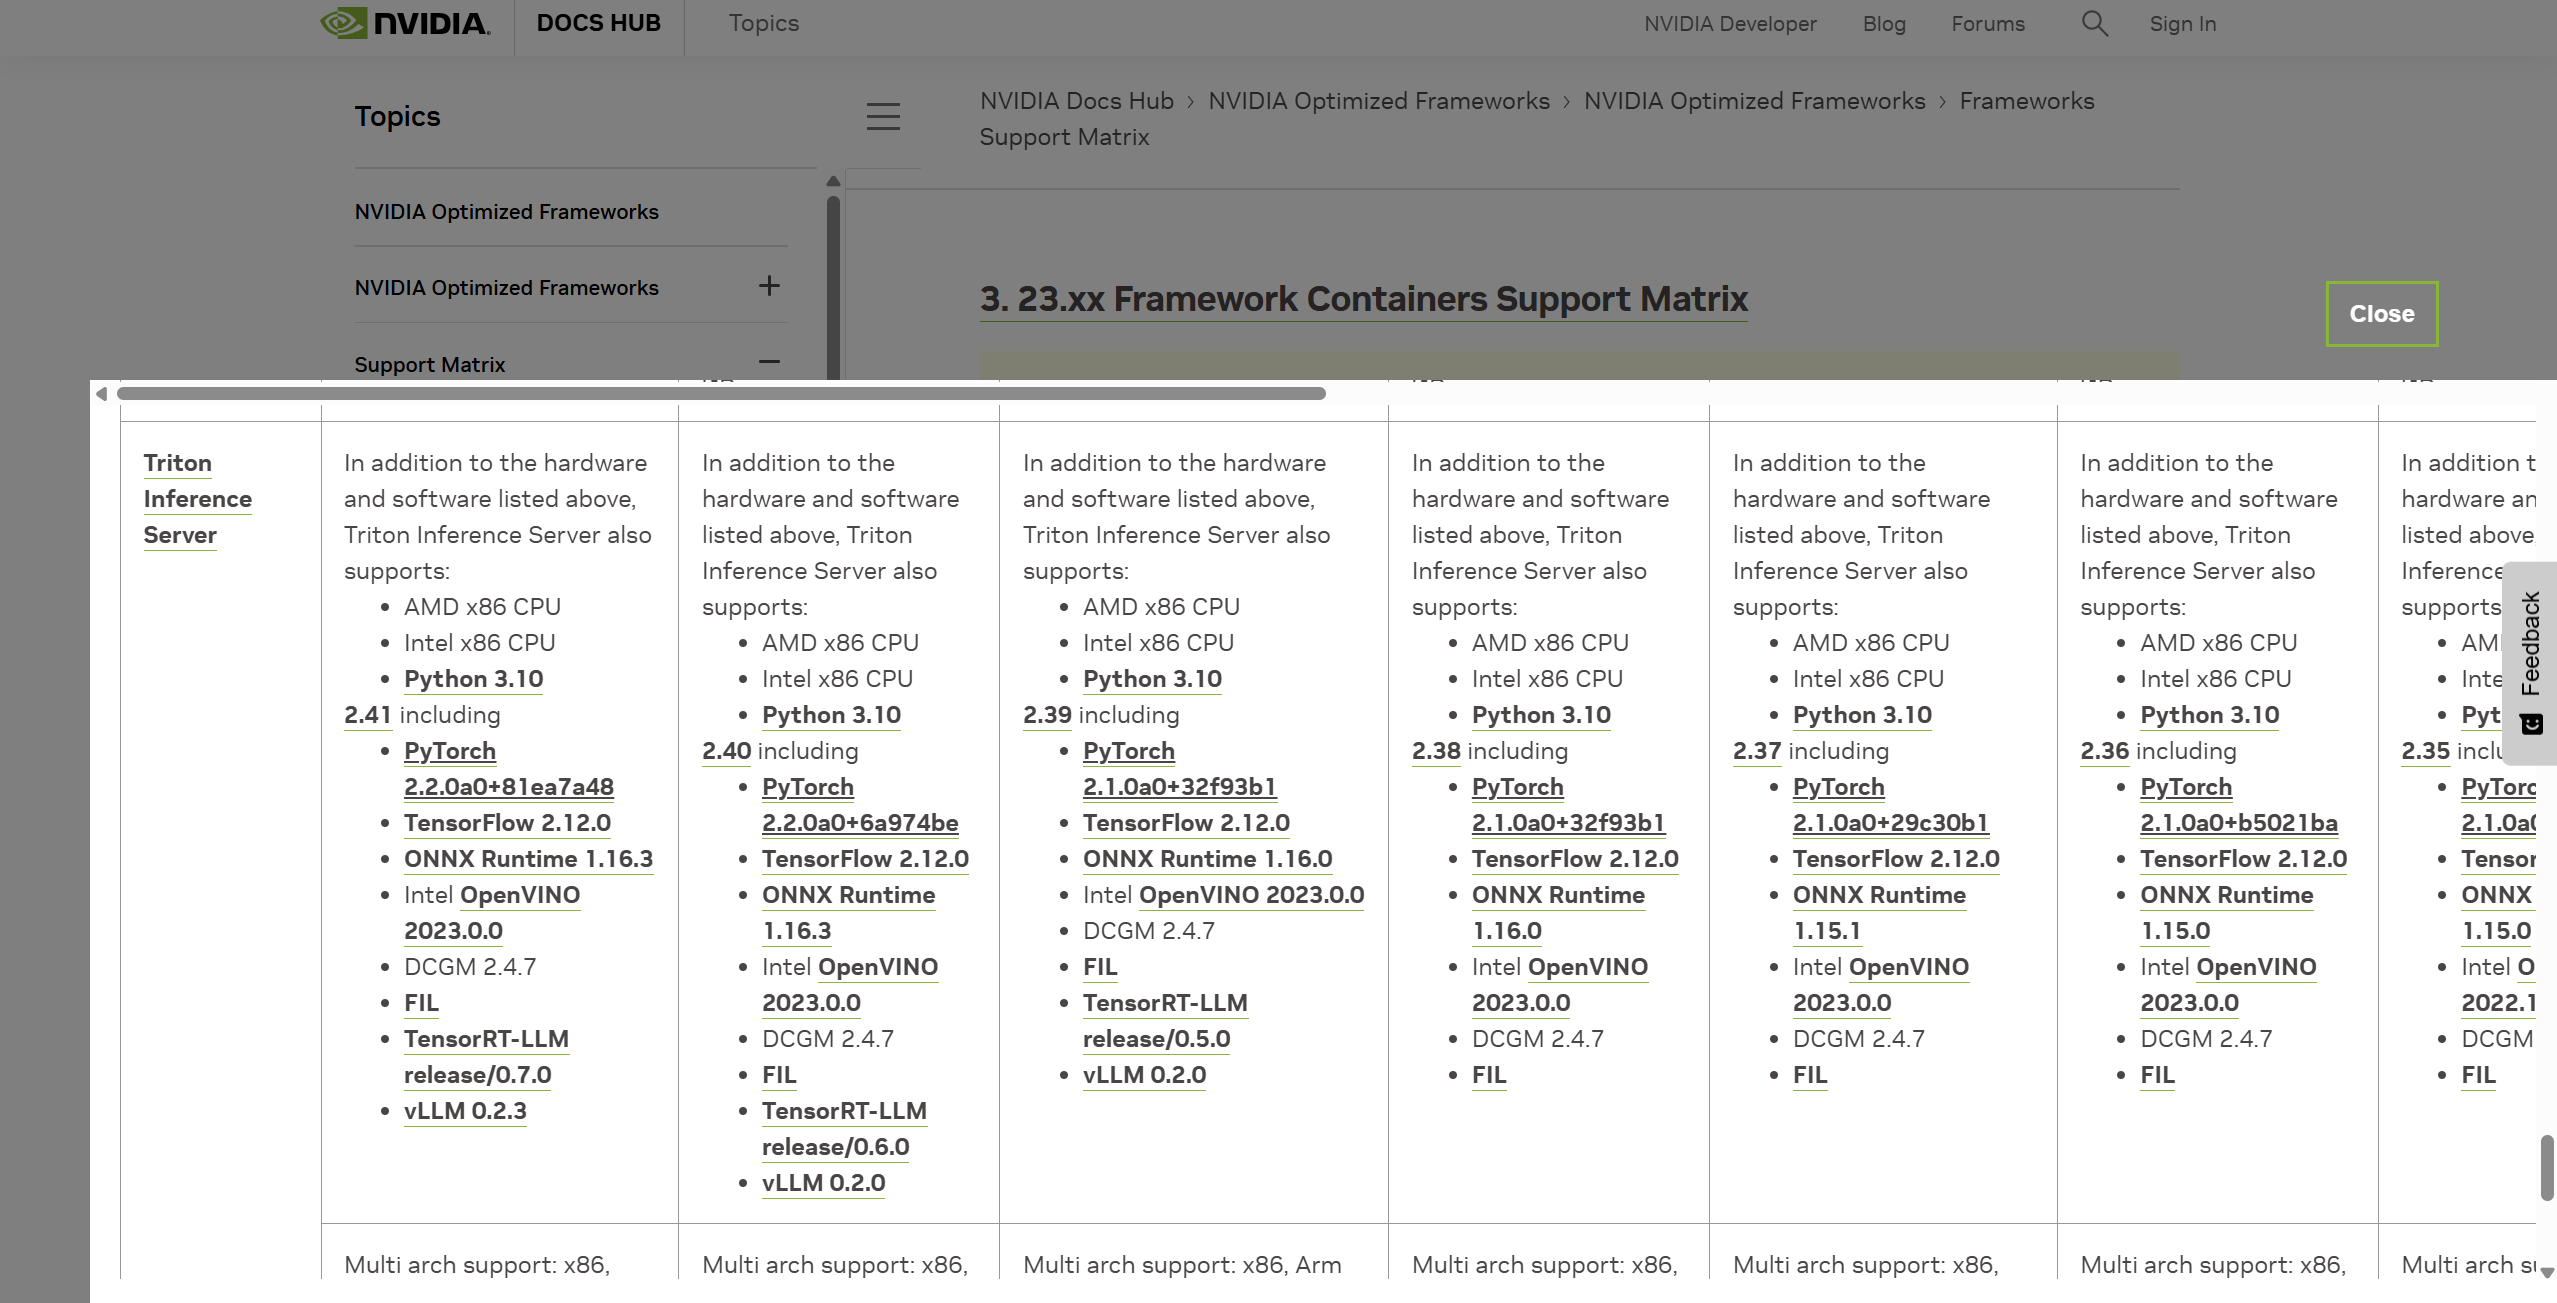
以Triton Inference Server Release 23.10为例,可以在官方文档NVIDIA TRITON INFERENCE SERVER DOCUMENTATION 找到它的发布说明和技术要求,比如驱动要求(Driver Requirements)、GPU支持要求(GPU Requirements)等等。相关信息还可以从GITHUB server 的Release说明中找到:Release 2.39.0 corresponding to NGC container 23.10
具体到内置的Pytorch、ONNXRuntime、TensorRT等工具版本,可以查阅:
调试指南
相关阅读