[Vibe Coding][Github Actions/Pages][Hexo/NexT]从零构建博客网站

距离上一次搭建Hexo/NexT博客网站已过去四年。虽然整体交互体验并未发生颠覆性的变化,但在交互细节与部署实现方面,确实持续进行了打磨与优化。这一次我打算使用最新版本(hexo 8.1.1 / NexT 8.25.0)重新构建我的博客网站,同时会结合更多的工具(Docker、Github Action/Pages、Gitea Actions/Nginx)来优化整个部署PIPELINE。

构建Docker容器

编写Dockerfile,构建Hexo部署环境

1
2
3
4
5
6
7
8
9
10
11
12
13
14
15
16
17
18
19
20
21
22
23
24
25
26
27
28
# 使用 Node.js 20(LTS)
FROM node:20

# 安装 locales、git 和时区数据
# --no-install-recommends 减少体积,locales 是关键!
RUN apt-get update && \
apt-get install -y --no-install-recommends \
locales \
git \
tzdata && \
# 生成 en_US.UTF-8 locale(通用且兼容性好)
localedef -i en_US -c -f UTF-8 -A /usr/share/locale/locale.alias en_US.UTF-8 && \
# 清理缓存
rm -rf /var/lib/apt/lists/*

# 设置 UTF-8 环境变量(关键!)
ENV LANG=en_US.UTF-8 \
LANGUAGE=en_US:en \
LC_ALL=en_US.UTF-8

# 设置工作目录
WORKDIR /blog

# 全局安装 Hexo CLI
RUN npm install -g hexo-cli

# 默认命令(可选)
CMD ["echo", "Use 'hexo init', 'hexo generate', or 'hexo server' as needed."]

编译镜像并启动容器

1
2
3
4
5
6
7
8
9
10
11
12
13
14
15
16
17
18
19
20
21
22
23
24
25
26
27
28
29
30
31
32
33
34
35
36
37
38
39
40
41
42
43
44
45
46
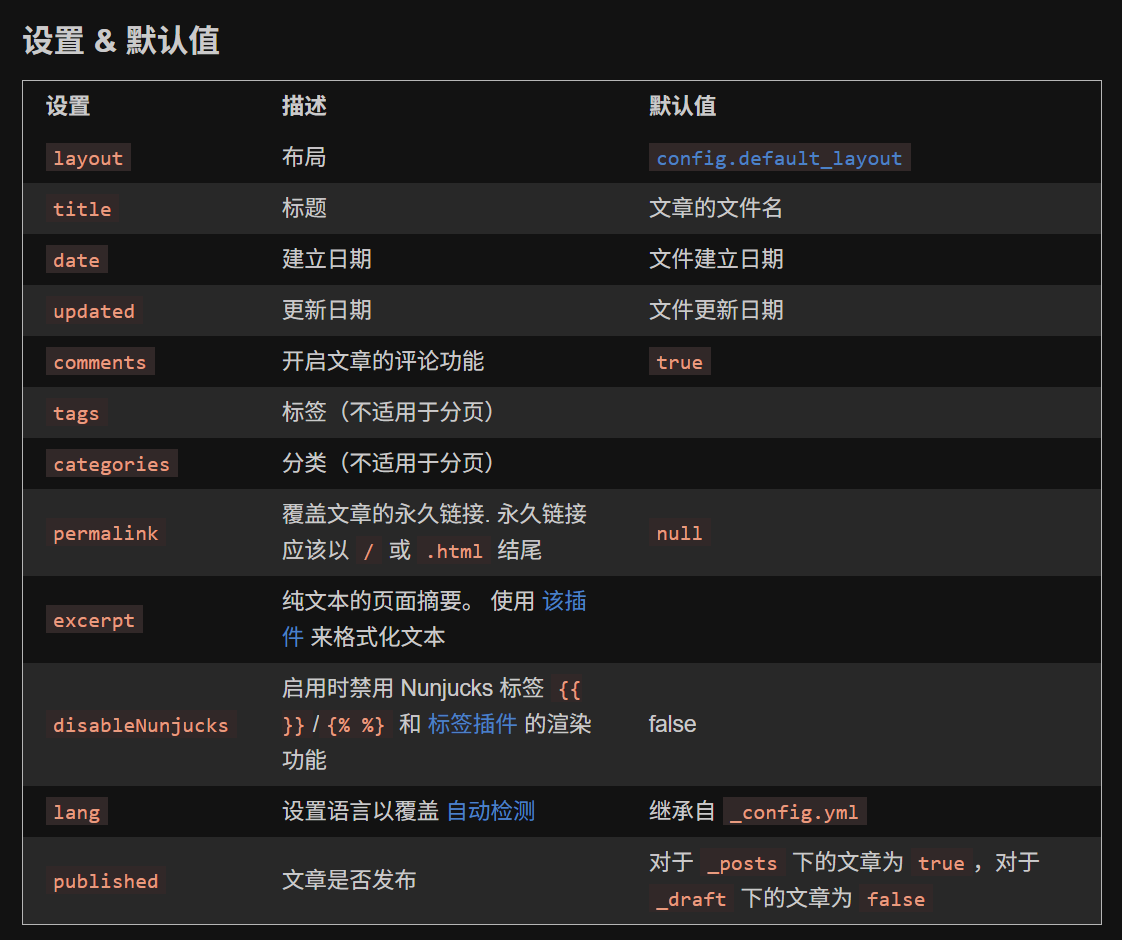
# 构建镜像
# REPOSITORY TAG IMAGE ID CREATED SIZE
# zjykzj/hexo-env latest a1e9ee129a0f About a minute ago 1.14GB
$ docker build -t zjykzj/hexo-env .
#
# 启动容器,后台运行
# CONTAINER ID IMAGE COMMAND CREATED STATUS PORTS NAMES
# fe35a9fe54c4 zjykzj/hexo-env "docker-entrypoint.s…" About a minute ago Up About a minute 0.0.0.0:4000->4000/tcp, [::]:4000->4000/tcp hexo-dev
$ docker run -it -d \
--name hexo-dev \
-v "$(pwd)/blog":/blog \
-v /etc/localtime:/etc/localtime:ro \
-w /blog \
-p 4000:4000 \
--user "$(id -u):$(id -g)" \
zjykzj/hexo-env \
sleep infinity
#
# 进入容器
$ docker exec -it hexo-dev bash
node@1156c9756f25:/blog$ hexo -v
INFO Validating config
hexo: 8.1.1
hexo-cli: 4.3.2
os: linux 6.6.87.2-microsoft-standard-WSL2 Debian GNU/Linux 12 (bookworm) 12 (bookworm)
node: 20.19.6
acorn: 8.15.0
ada: 2.9.2
ares: 1.34.5
brotli: 1.1.0
cjs_module_lexer: 2.1.0
cldr: 47.0
icu: 77.1
llhttp: 9.3.0
modules: 115
napi: 9
nghttp2: 1.61.0
openssl: 3.0.17
simdutf: 6.4.2
tz: 2025b
undici: 6.22.0
unicode: 16.0
uv: 1.46.0
uvwasi: 0.0.23
v8: 11.3.244.8-node.33
zlib: 1.3.1-470d3a2

创建Hexo工程

初始化Hexo工程

1
2
3
4
5
6
7
8
node@1156c9756f25:/blog$ hexo init .
INFO Cloning hexo-starter https://github.com/hexojs/hexo-starter.git
INFO Install dependencies
warning hexo-renderer-stylus > stylus > glob@7.2.3: Glob versions prior to v9 are no longer supported
warning hexo-renderer-stylus > stylus > glob > inflight@1.0.6: This module is not supported, and leaks memory. Do not use it. Check out lru-cache if you want a good and tested wayINFO Start blogging with Hexo!
node@1156c9756f25:/blog$
node@1156c9756f25:/blog$ ls
_config.landscape.yml _config.yml node_modules package.json scaffolds source themes yarn.lock

hexo常用命令

1
2
3
4
5
6
7
8
9
10
11
12
13
14
15
16
17
18
19
# 安装依赖(hexo init 会自动运行 npm install,但有时需要手动确认)
npm install

# 生成静态文件
hexo generate

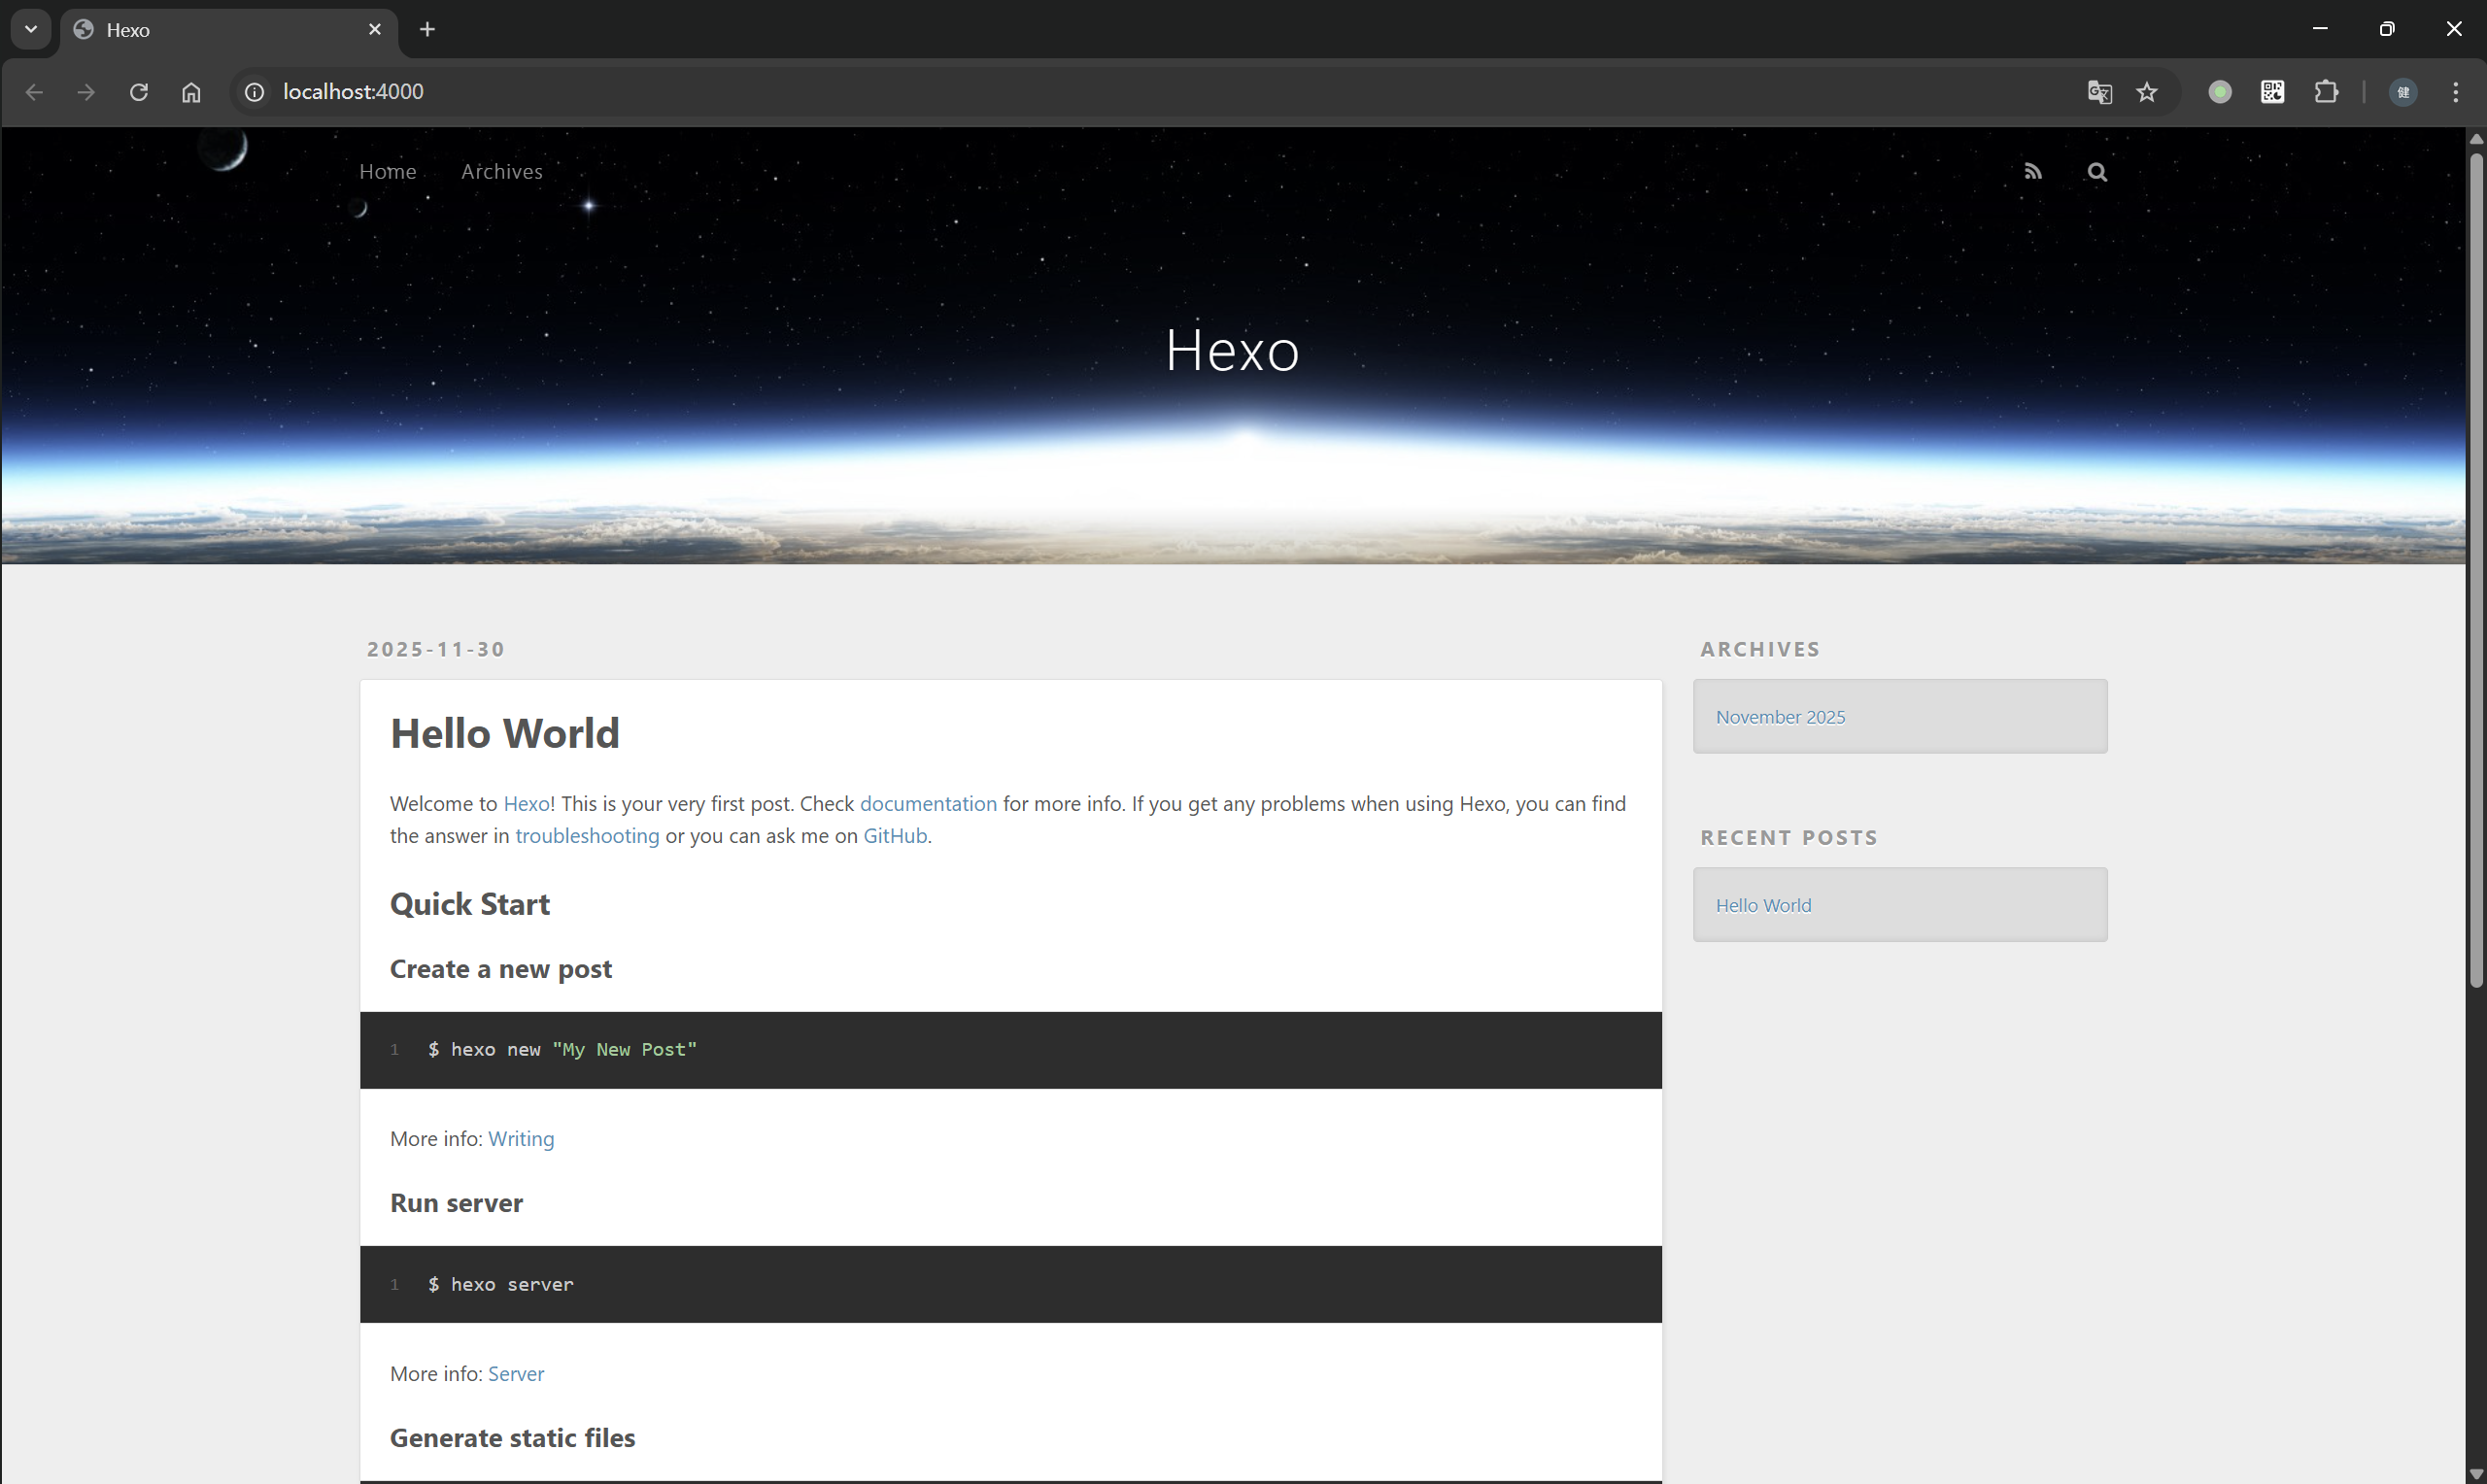
# 启动本地预览服务器(注意:需额外暴露端口!)
# node@1156c9756f25:/blog$ hexo server
# INFO Validating config
# INFO Start processing
# INFO Hexo is running at http://localhost:4000/ . Press Ctrl+C to stop.
hexo server --host 0.0.0.0

# 清除缓存和生成的静态文件
hexo clean

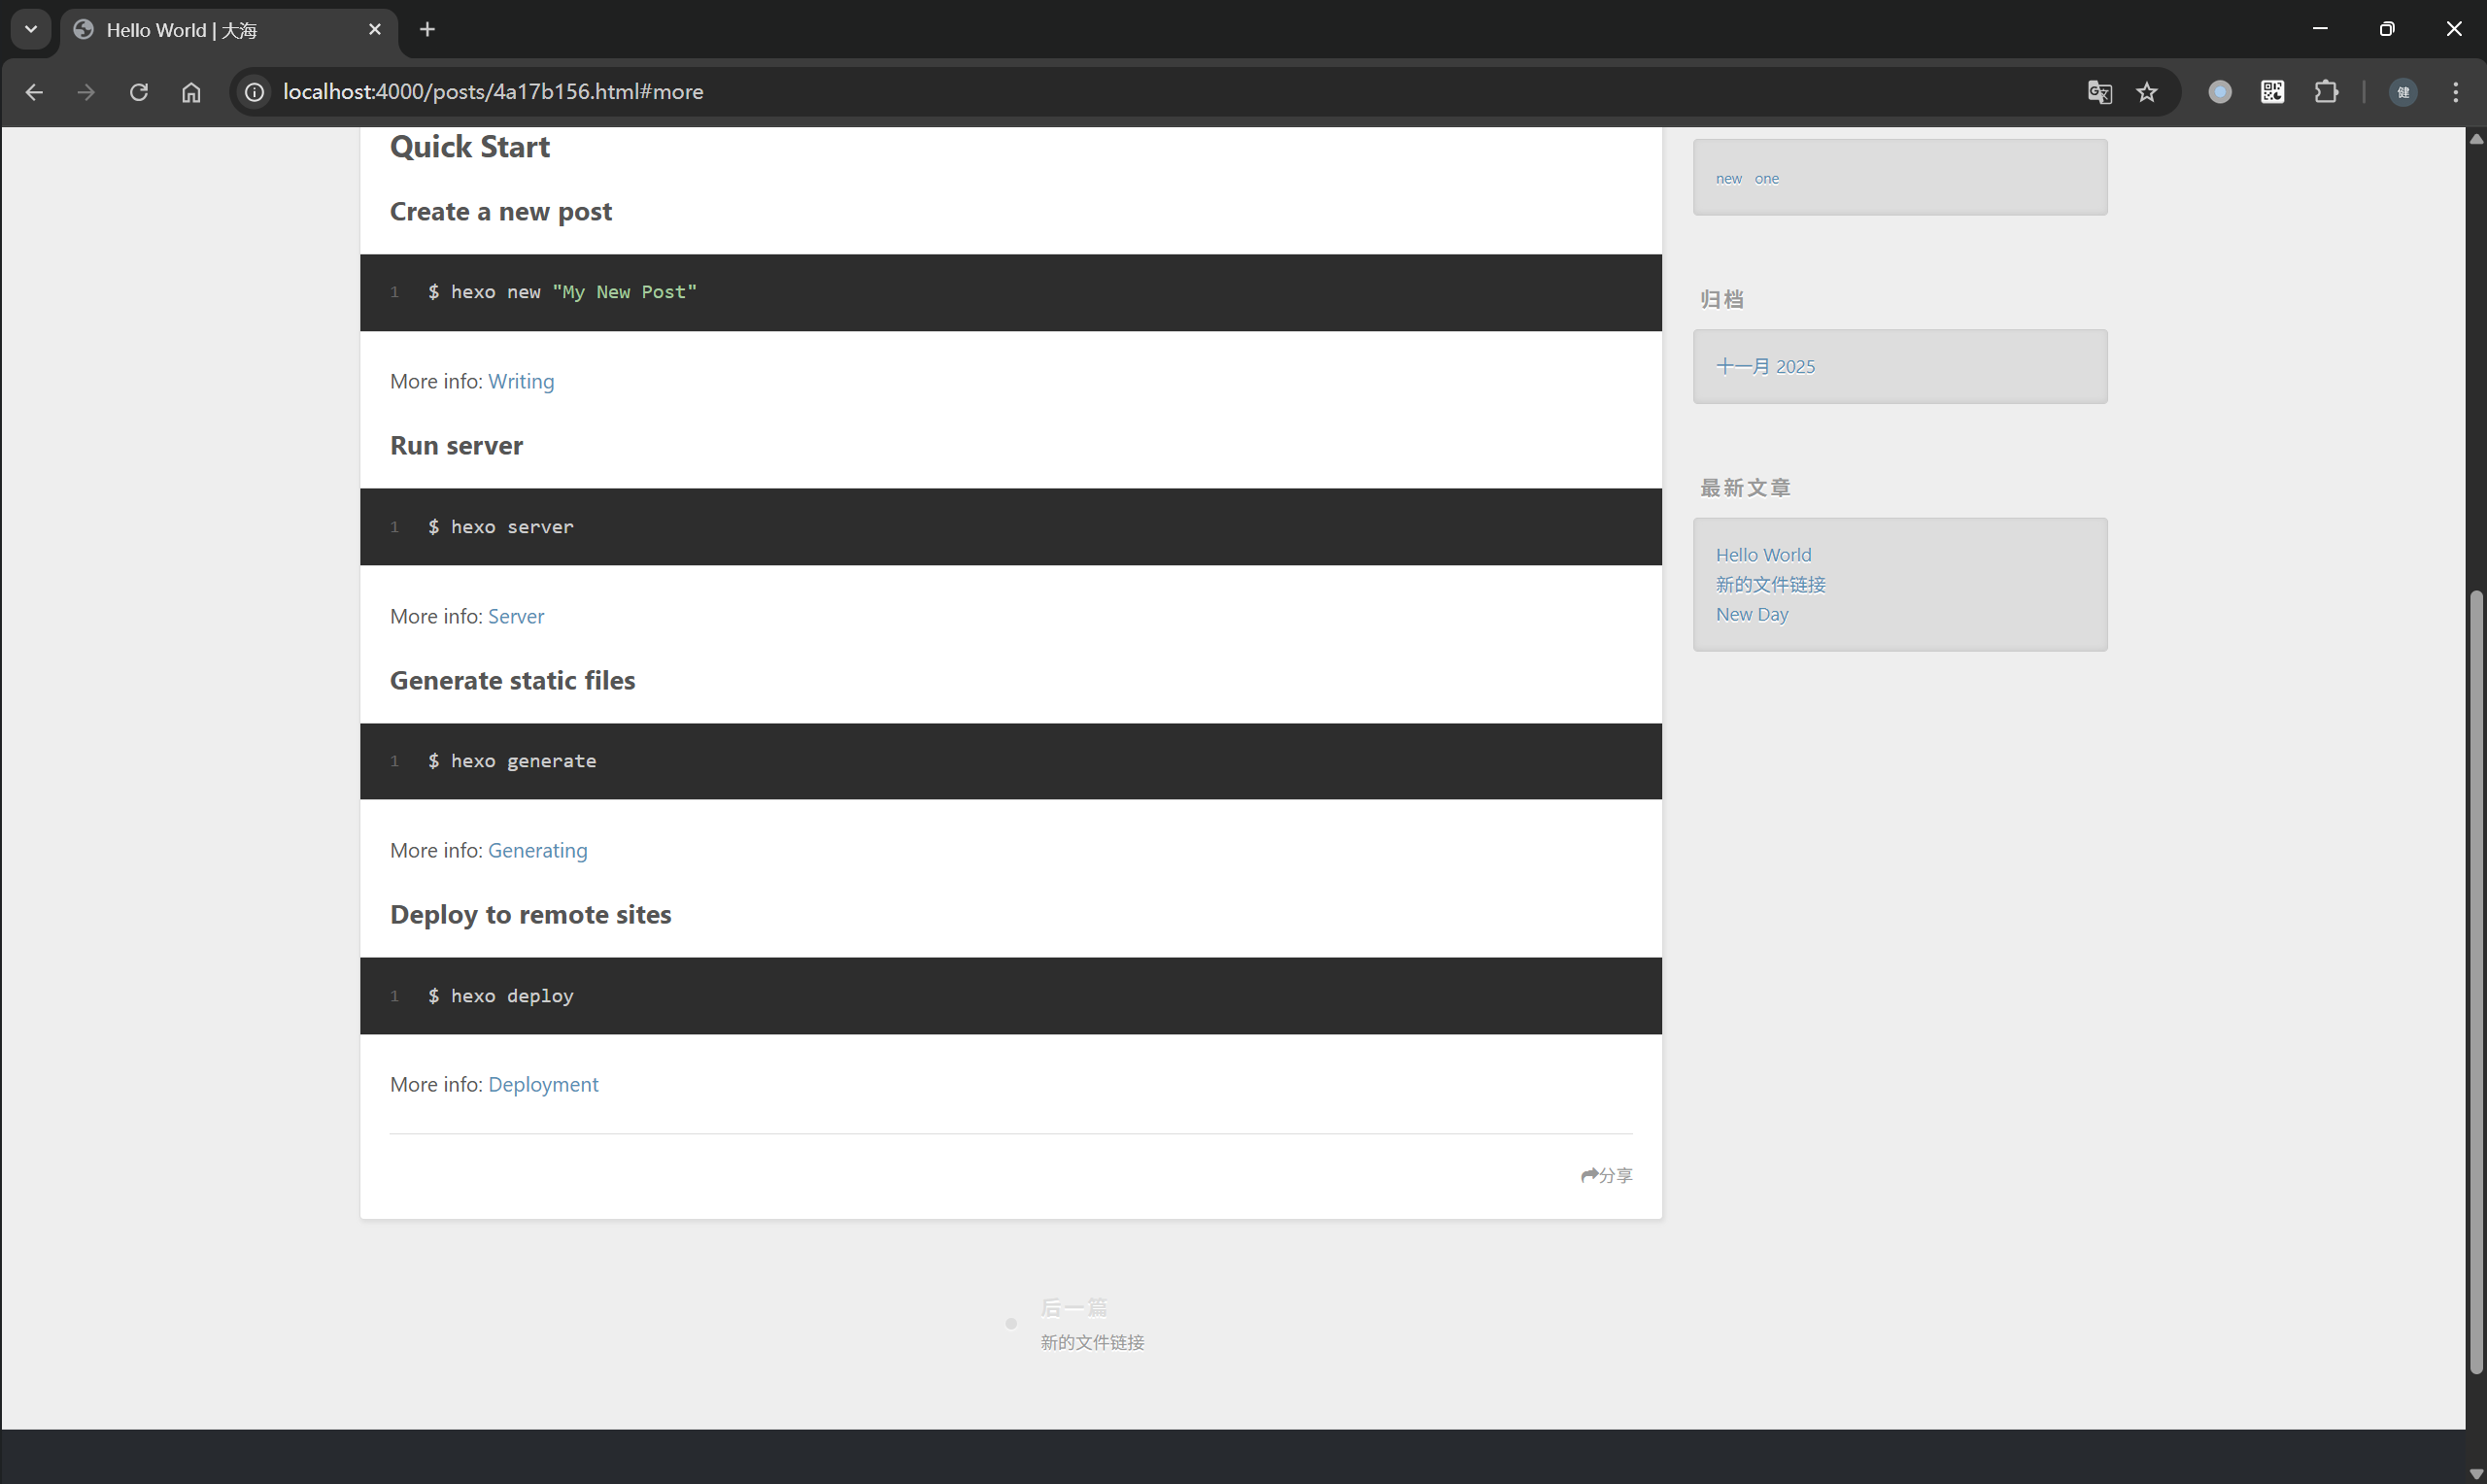
# 自动生成一篇新文章的Markdown文件,放在source/_posts/目录下
# 文件名称为xxx.md
hexo new "xxx"

使用hexo init .初始化工程后,在package.json上已经写入了一些快捷脚本

1
2
3
4
5
6
7
8
9
10
11
12
13
14
15
16
17
18
19
20
21
22
23
24
25
26
27
node@1156c9756f25:/blog$ cat package.json
{
"name": "hexo-site",
"version": "0.0.0",
"private": true,
"scripts": {
"build": "hexo generate",
"clean": "hexo clean",
"deploy": "hexo deploy",
"server": "hexo server"
},
"hexo": {
"version": "8.1.1"
},
"dependencies": {
"hexo": "^8.0.0",
"hexo-generator-archive": "^2.0.0",
"hexo-generator-category": "^2.0.0",
"hexo-generator-index": "^4.0.0",
"hexo-generator-tag": "^2.0.0",
"hexo-renderer-ejs": "^2.0.0",
"hexo-renderer-marked": "^7.0.0",
"hexo-renderer-stylus": "^3.0.1",
"hexo-server": "^3.0.0",
"hexo-theme-landscape": "^1.0.0"
}
}

比方说重新生成静态文件使用npm run build,在本地启动本地预览服务器使用npm run server就行。当然,也可以自定义一些命令

1
2
3
4
5
6
7
8
{
"scripts": {
"cg": "hexo clean && hexo generate",
"dev": "hexo clean && hexo generate && hexo server"
...
}
...
}

运行命令如下

1
2
3
4
5
6
7
8
9
10
11
12
13
14
15
16
17
18
19
20
21
22
23
24
25
26
node@1156c9756f25:/blog$ npm run dev

> hexo-site@0.0.0 dev
> hexo clean && hexo generate && hexo server

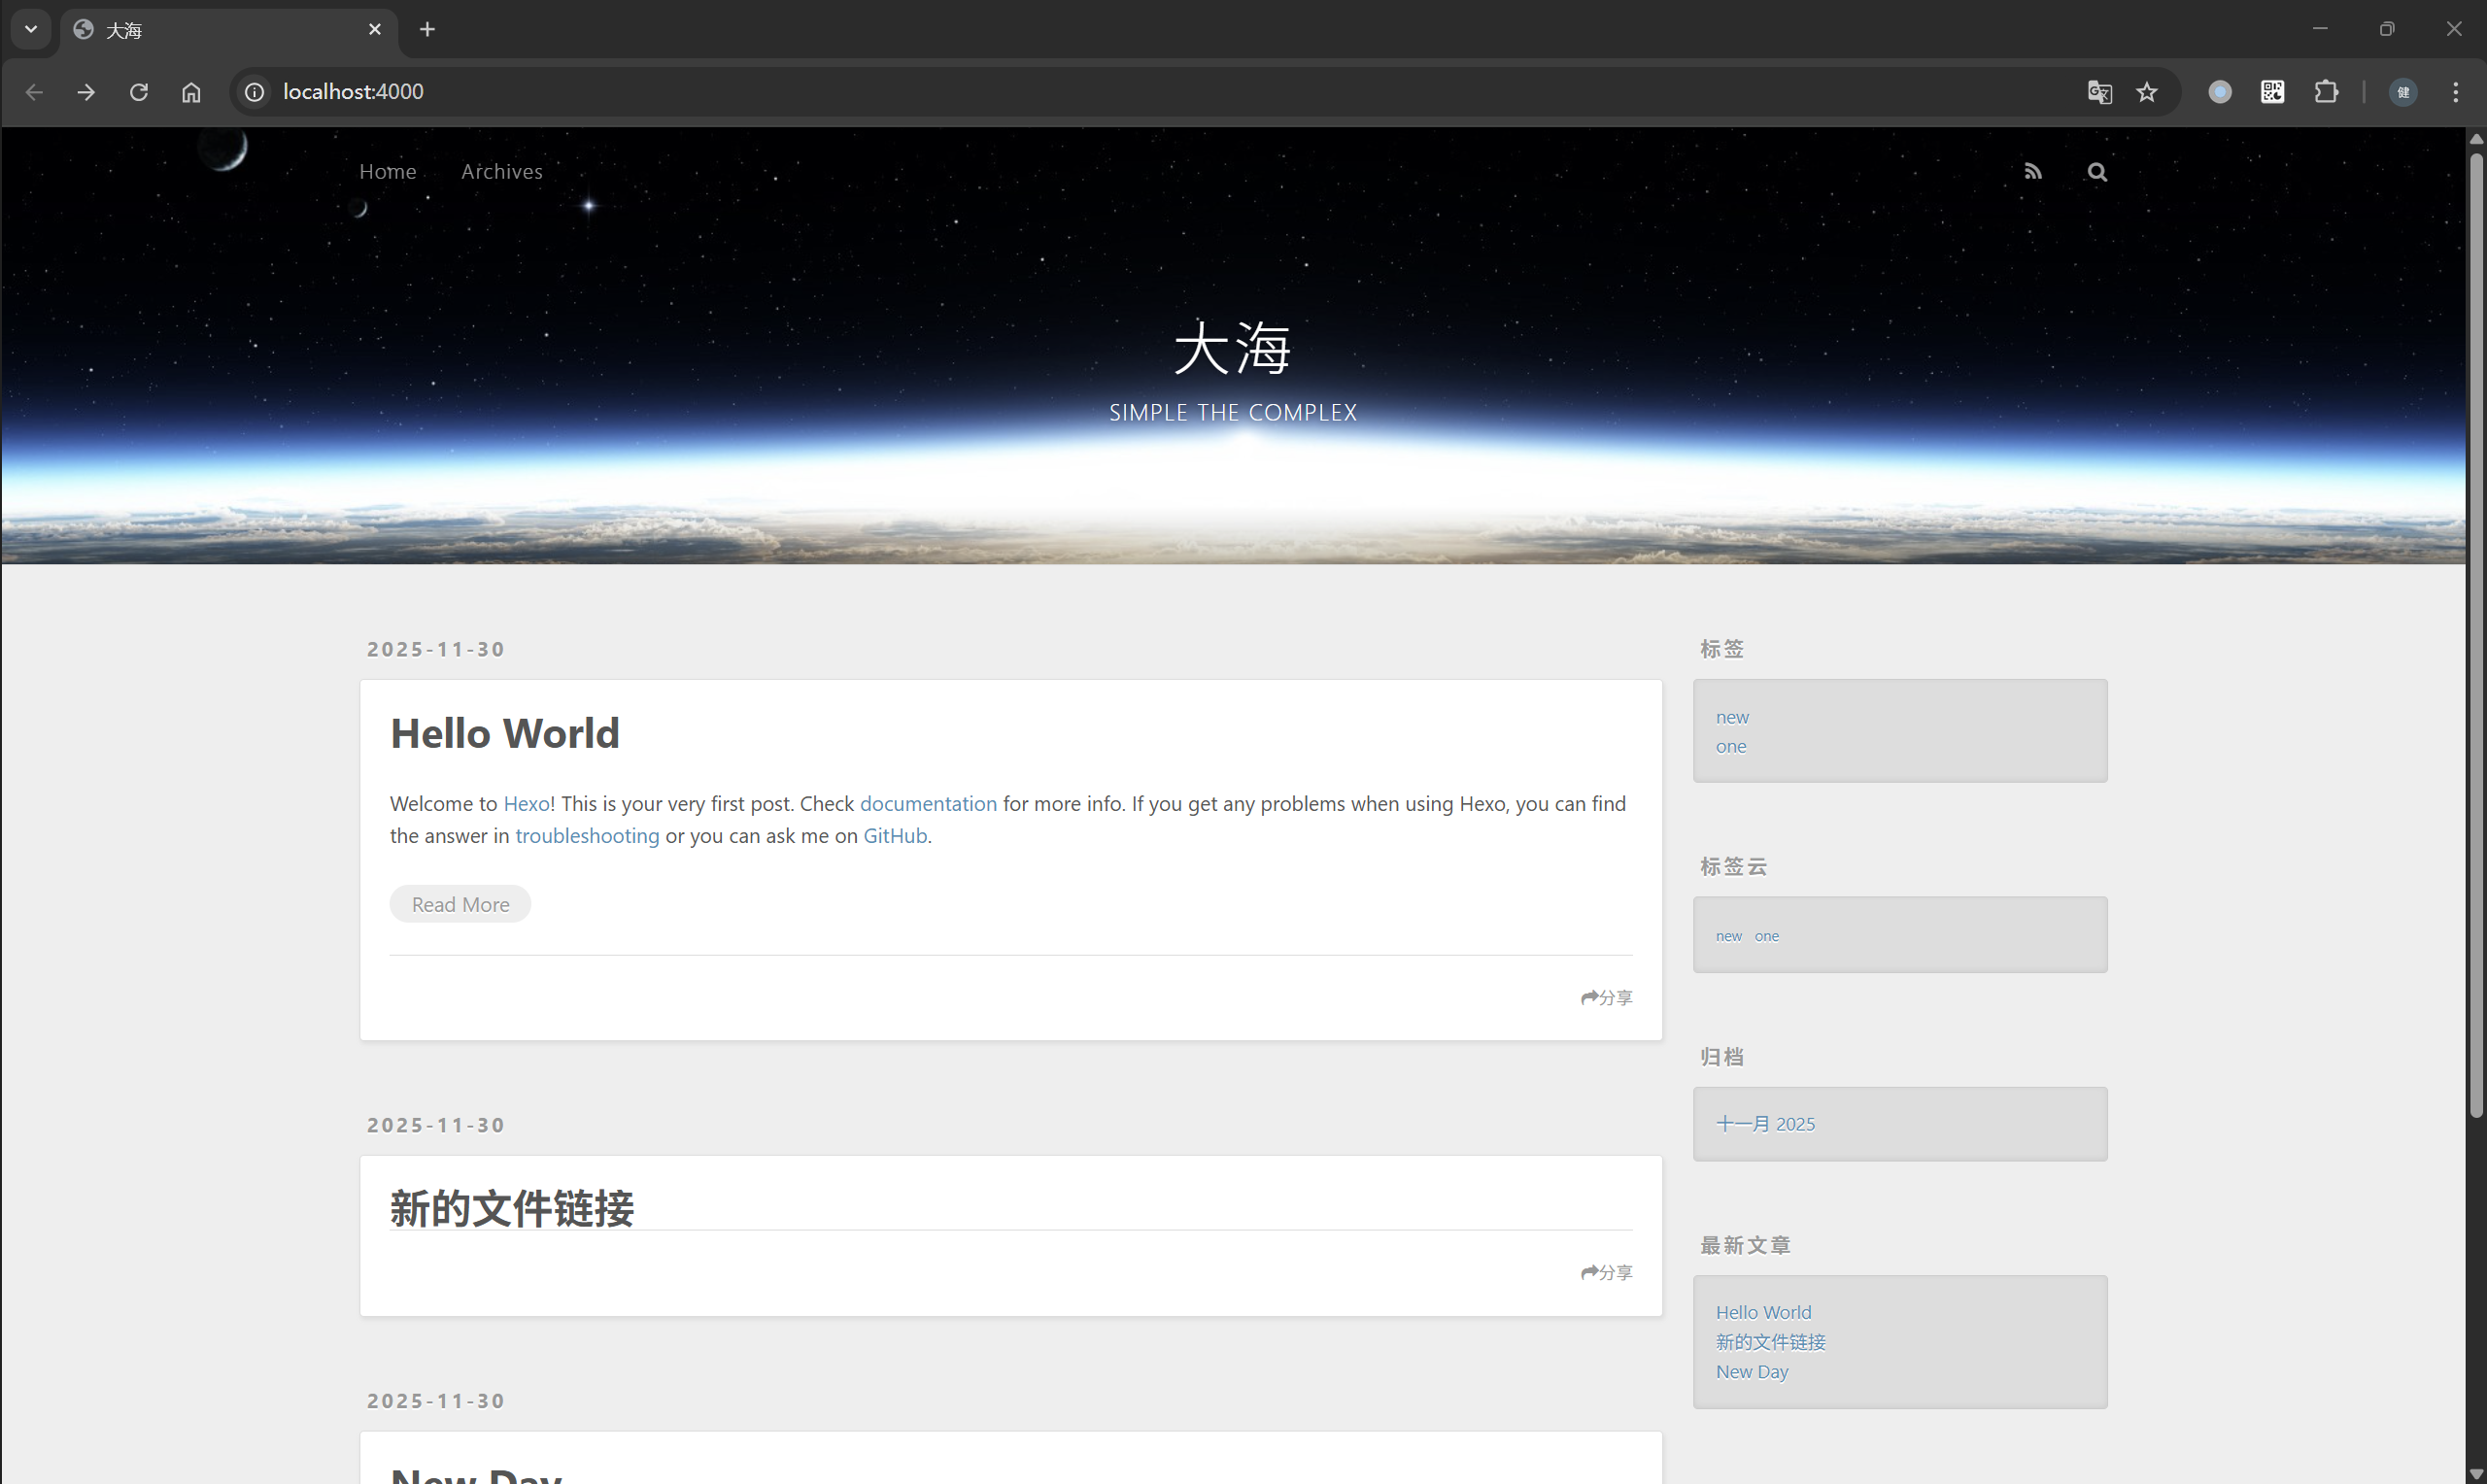
INFO Validating config
INFO Deleted database.
INFO Deleted public folder.
INFO Validating config
INFO Start processing
INFO Files loaded in 219 ms
INFO Generated: archives/index.html
INFO Generated: index.html
INFO Generated: archives/2025/11/index.html
INFO Generated: css/style.css
INFO Generated: js/script.js
INFO Generated: archives/2025/index.html
INFO Generated: fancybox/jquery.fancybox.min.js
INFO Generated: js/jquery-3.6.4.min.js
INFO Generated: fancybox/jquery.fancybox.min.css
INFO Generated: css/images/banner.jpg
INFO Generated: 2025/11/30/hello-world/index.html
INFO 11 files generated in 162 ms
INFO Validating config
INFO Start processing
INFO Hexo is running at http://localhost:4000/ . Press Ctrl+C to stop.

Hexo工程配置

_config.yml

可以在_config.yml中修改大部分的配置,参考Hexo 配置

1
2
3
4
5
6
7
8
9
10
11
12
13
14
15
16
17
18
19
20
21
22
23
24
25
26
27
28
29
30
31
32
33
34
35
36
37
38
39
40
41
42
43
44
45
46
47
48
49
50
51
52
53
54
55
56
57
58
59
60
61
62
63
64
65
66
67
68
69
70
71
72
73
74
75
76
77
78
79
80
81
82
83
84
85
86
87
88
89
90
91
92
93
94
95
96
97
98
99
100
101
102
103
104
105
106
107
108
109
110
111
112
113
114
115
116
117
118
119
120
121
122
123
124
125
126
127
128
129
130
131
132
133
134
135
136
137
138
139
140
141
142
143
144
145
146
147
148
149
150
151
152
153
# Hexo Configuration
## Docs: https://hexo.io/docs/configuration.html
## Source: https://github.com/hexojs/hexo/

# ================== 网站基本信息 ==================
# 网站主标题(显示在浏览器标签页和页面顶部)
title: Hexo
# 网站副标题(可留空)
subtitle: ''
# 网站描述,用于 SEO(搜索引擎优化)
description: ''
# 网站关键词,用于 SEO(可写成列表形式)
keywords:
# 作者名字
author: John Doe
# 网站语言(en: 英文, zh-CN: 简体中文, zh-TW: 繁体中文)
language: en
# 时区(如 Asia/Shanghai 表示中国标准时间)
timezone: ''

# ================== URL 设置 ==================
# 网站完整地址(必须带 http:// 或 https://)
url: http://example.com
# 文章永久链接格式(:year/:month/:day/:title/ 会生成 /2025/11/30/hello-world/)
permalink: :year/:month/:day/:title/
# permalink 中各字段的默认值(通常留空)
permalink_defaults:
# 是否美化 URL
pretty_urls:
# 是否保留目录页的 index.html(设为 false 可去掉)
trailing_index: true
# 是否保留文章的 .html 后缀(设为 false 可去掉,推荐关闭)
trailing_html: true

# ================== 目录结构 ==================
# 源文件目录(你的 Markdown、图片等放在这里)
source_dir: source
# 静态文件输出目录(hexo generate 生成的内容放这里)
public_dir: public
# 标签页路径(最终 URL 为 /tags/xxx)
tag_dir: tags
# 归档页路径(URL 为 /archives)
archive_dir: archives
# 分类页路径(URL 为 /categories/xxx)
category_dir: categories
# 代码下载目录(用于 {% codeblock %} 引用的文件)
code_dir: downloads/code
# 多语言内容目录模板(:lang 会被替换为 language 值)
i18n_dir: :lang
# 不参与渲染的文件(直接复制到 public,适合 PDF、压缩包等)
skip_render:

# ================== 写作设置 ==================
# 新建文章的文件名格式(:title 会被替换为文章标题)
new_post_name: :title.md
# 默认文章类型(post: 博客文章, page: 页面, draft: 草稿)
default_layout: post
# 是否自动将标题转为 Title Case(如 "hello world" → "Hello World")
titlecase: false
# 外链设置
external_link:
# 是否在新标签页打开外链
enable: true
# 作用范围(site: 全站生效)
field: site
# 排除的域名(多个用逗号隔开,如 'google.com,baidu.com')
exclude: ''
# 文件名大小写处理(0: 原样, 1: 小写, 2: 大写)
filename_case: 0
# 是否渲染草稿(source/_drafts/ 下的文章)
render_drafts: false
# 是否为每篇文章创建同名资源文件夹(用于存放图片等)
post_asset_folder: false
# 是否使用相对链接(一般保持 false)
relative_link: false
# 是否发布未来日期的文章
future: true
# 代码高亮引擎(highlight.js 或 prismjs)
syntax_highlighter: highlight.js
# highlight.js 配置
highlight:
# 是否显示行号
line_number: true
# 是否自动检测代码语言(不推荐,容易出错)
auto_detect: false
# Tab 字符替换(如设为 ' ' 表示两个空格)
tab_replace: ''
# 是否折行显示代码
wrap: true
# 是否启用 hljs 额外样式
hljs: false
# prismjs 配置(仅当 syntax_highlighter 为 prismjs 时生效)
prismjs:
# 是否预处理代码块
preprocess: true
# 是否显示行号
line_number: true
# Tab 字符替换
tab_replace: ''

# ================== 首页设置 ==================
# 首页生成器配置
index_generator:
# 首页路径(留空表示根路径 /)
path: ''
# 每页显示文章数(0 表示禁用分页)
per_page: 10
# 文章排序(-date 表示按日期倒序)
order_by: -date

# ================== 分类与标签 ==================
# 默认分类(当文章未指定分类时使用)
default_category: uncategorized
# 分类别名映射(如将 "tech" 映射为 "技术")
category_map:
# 标签别名映射(如将 "js" 映射为 "JavaScript")
tag_map:

# ================== 元数据 ==================
# 是否在 HTML 中注入 <meta name="generator" content="Hexo ...">
meta_generator: true

# ================== 日期时间格式 ==================
# 日期显示格式(参考 Moment.js)
date_format: YYYY-MM-DD
# 时间显示格式
time_format: HH:mm:ss
# 文章更新时间来源(mtime: 文件修改时间, date: Front-matter 中的 date, empty: 不显示)
updated_option: 'mtime'

# ================== 分页设置 ==================
# 每页文章数(0 表示禁用分页,全局生效)
per_page: 10
# 分页目录名(如 /page/2)
pagination_dir: page

# ================== 文件包含/排除 ==================
# 额外包含的文件(仅对 source/ 目录有效)
include:
# 排除的文件(不会被处理或复制)
exclude:
# 忽略的文件(类似 exclude,但更底层)
ignore:

# ================== 扩展 ==================
# 使用的主题名称(需安装在 themes/ 目录下)
theme: landscape

# ================== 部署设置 ==================
# 部署配置(配合 hexo deploy 使用)
deploy:
# 部署类型(如 git, heroku, ftpsync 等)
type: ''

永久性链接

Hexo默认使用日期以及标题名称来生成文件链接,参考永久链接(Permalinks)

1
2
3
4
5
6
7
8
9
# URL
## Set your site url here. For example, if you use GitHub Page, set url as 'https://username.github.io/project'
url: http://example.com
# 比如 /2025/11/30/我的博客/
permalink: :year/:month/:day/:title/
permalink_defaults:
pretty_urls:
trailing_index: true # Set to false to remove trailing 'index.html' from permalinks
trailing_html: true # Set to false to remove trailing '.html' from permalinks

可以使用插件hexo-abbrlink为每篇文章生成永久性、固定不变的短链接(基于唯一ID)

第一步:安装插件

1
npm install hexo-abbrlink --save

第二步:修改_config.yml

1
2
3
4
5
6
7
8
9
10
11
12
13
permalink: posts/:abbrlink/

...
...

# abbrlink config
# 基于文章文件名和创建时间,通过 CRC32 算法计算出的唯一十六进制 ID
abbrlink:
alg: crc32 # Algorithm used to calc abbrlink. Support crc16(default) and crc32
rep: hex # Representation of abbrlink in URLs. Support dec(default) and hex
drafts: false # Whether to generate abbrlink for drafts. (false in default)
force: false # Enable force mode. In this mode, the plugin will ignore the cache, and calc the abbrlink for every post even it already had an abbrlink. (false in default)
writeback: true # Whether to write changes to front-matters back to the actual markdown files. (true in default)

第三步:生成静态网站文件

注意:hexo-abbrlink只在执行hexo generate时才会为文章生成并写入abbrlink

1
2
3
4
5
6
node@fe35a9fe54c4:/blog$ npm run dev

> hexo-site@0.0.0 dev
> hexo clean && hexo generate && hexo server
...
...

此时每个文件的Front-Matter会插入abbrlink属性

1
2
3
4
---
title: Hello World
abbrlink: 4a17b156
---

网站登陆地址也变成了http://localhost:4000/posts/4a17b156.html

Hexo博客写作

Front-matter

Front-matter是一个特殊的代码块,每篇博客文件头部会有它的存在,它保存了Hexo自定义的属性配置。参考Front-matter,以YAML格式书写时,Front-matter以三个破折号结束。

1
2
3
4
5
6
7
8
---
title: New Day
tags:
- new
- one
abbrlink: 180d6a30
date: 2025-11-30 09:26:08
---

每次使用命令hexo new xxx.md生成博客文件时,hexo会参考scaffolds/page.md模板文件来生成具体配置

1
2
3
4
5
# scaffolds/page.md
---
title: {{ title }}
date: {{ date }}
---

还可以在Front-matter代码块中设置属性分类标签,在编译成静态网站文件时通过它们可以结构化博客文章的层次。

1
2
3
4
5
6
7
8
9
10
11
12
13
categories:
- Sports
- Baseball
tags:
- Injury
- Fight
- Shocking
#
categories:
- [Sports, Baseball]
- [MLB, American League, Boston Red Sox]
- [MLB, American League, New York Yankees]
- Rivalries

博客写作

Hexo 使用 Markdown 语法撰写博客文章,并在此基础上扩展了一些自定义语法。

例如,参考帖子摘要,你可以在文章中插入以下分隔符:

1
2
3
4
5
6
# 在文章中插入
...
...
<!-- more -->
...
...

位于<!-- more -->之前的内容将作为文章摘要,显示在博客首页的文章列表中;而之后的内容则仅在进入文章详情页时展示。

Github Actions/Pages

Github提供了免费托管静态网站(Github Pages)以及自动化工作流(Github Actions)的功能(要求是设置仓库public,对于私有仓库要额外收费)。

Github Pages

首先实现托管静态网站功能,参考官网教程:Quickstart for GitHub Pages

  1. 创建一个仓库: <username>.github.io
  2. 上传创建好的hexo工程(存放在blog/文件夹)以及编译好的静态网站文件(存放在docs/文件夹);
1
2
3
4
5
6
7
8
9
10
11
12
13
14
15
16
17
18
19
20
21
22
.
├── Dockerfile
├── README.md
├── blog
│   ├── _config.landscape.yml
│   ├── _config.yml
│   ├── db.json
│   ├── node_modules
│   ├── package-lock.json
│   ├── package.json
│   ├── public
│   ├── scaffolds
│   ├── source
│   ├── themes
│   └── yarn.lock
└── docs
├── 2025
├── archives
├── css
├── fancybox
├── index.html
└── js
  1. 在仓库设置页面配置Pages选项,设置部署地址是main分支的/docs文件夹

Github Actions

下面参考官网教程使用Github Actions实现CI&CD部署:Using custom workflows with GitHub Pages

第一步:编写配置文件.github/workflows/hexo.yml,实现如下功能:

  • 下载zjykzj/hexo-env:latest编译静态网站文件;
  • ./blog/public目录打包成一个Pages deployment artifact
  • 上传到GitHubPages专用存储后端(不是Git)。
1
2
3
4
5
6
7
8
9
10
11
12
13
14
15
16
17
18
19
20
21
22
23
24
25
26
27
28
29
30
31
32
33
34
35
36
37
38
39
40
41
42
43
44
45
46
47
48
49
50
51
52
53
54
55
# .github/workflows/hexo.yml
name: Build and Deploy Hexo Blog to GitHub Pages

on:
push:
branches: ["main"]
paths:
- 'blog/**'
- '.github/workflows/hexo.yml'
workflow_dispatch: # 允许手动触发

permissions:
contents: read
pages: write
id-token: write

concurrency:
group: "pages"
cancel-in-progress: false

jobs:
deploy:
environment:
name: github-pages
url: ${{ steps.deployment.outputs.page_url }}
runs-on: ubuntu-latest
steps:
- name: Checkout repository
uses: actions/checkout@v4

- name: Pull custom Hexo build image
run: docker pull zjykzj/hexo-env:latest

- name: Generate static files with Docker
run: |
docker run --rm \
-v "$PWD/blog:/workspace" \
-w /workspace \
zjykzj/hexo-env:latest \
bash -c "npm install && hexo generate"

- name: "Debug: list generated files"
run: ls -R ./blog/public

- name: Setup Pages
uses: actions/configure-pages@v5

- name: Upload artifact (only public/)
uses: actions/upload-pages-artifact@v3
with:
path: ./blog/public # 👈 关键:只上传生成的静态文件

- name: Deploy to GitHub Pages
id: deployment
uses: actions/deploy-pages@v4

第二步:修改Pages页面设置,配置Build and deploymentSource选项为Github Actions

第三步:将修改内容保存好推送到github仓库,即可触发CI&CD工作流,编译工程并发布静态网站